How to Repair a Stone Retaining Wall

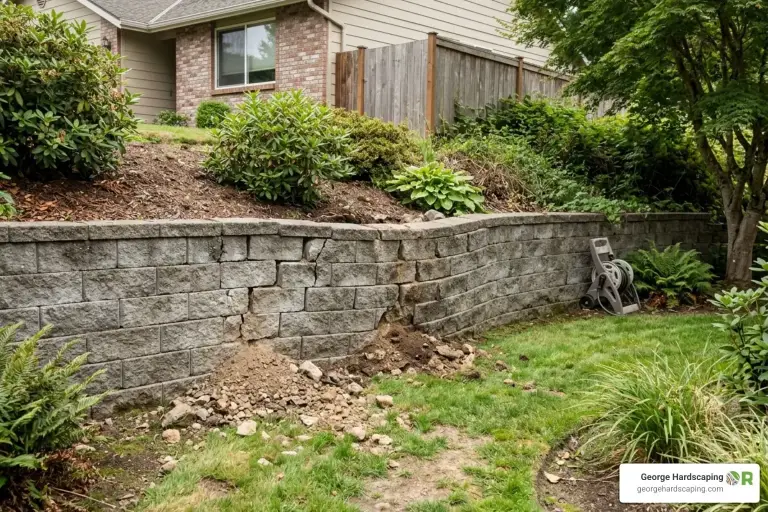
Repairing a stone retaining wall starts with one question: is the problem in the face of the wall, or behind it? Crumbling joints, a few loose stones and hairline cracks are face problems, and you fix them by repointing the joints and resetting the stones. A wall that leans forward, bulges, or keeps cracking after it has been repaired has a problem behind it, usually trapped water or a failing base, and that section normally has to come down and be rebuilt with proper drainage.
This guide covers mortared stone walls and natural stone walls in general: how to read what's wrong, which repairs are reasonable for a homeowner, and where repair ends and rebuilding begins. If your wall is concrete block, dry-stacked rock, or you mainly want to understand one crack, the sibling guides linked below go deeper on each.
First, work out what kind of stone wall you have
The right repair depends on how the wall was built, so look closely before buying anything.
- Mortared stone. The joints between stones are filled with mortar, and the wall relies on that mortar, its footing and some way for water to get out, such as weep holes or a drain at the base. Most of this article is about this type.
- Dry-laid (dry-stacked) stone or rock. No mortar at all. The stones hold by weight and friction, and the repair is resetting and rebuilding, never adding mortar. See repairing a dry-stacked rock retaining wall.
- Stone face over a block or concrete core. Thin stone set against a structural core. Look at the top or an exposed end: if you see block or poured concrete behind the stone, the core is what holds the soil, and its problems follow the rules in repairing a cinder block retaining wall.
Also note the stone itself. Cape Ann was a major granite quarrying district for about a century, according to this history of the Cape Ann quarries, and granite is far harder than any mortar you'll put next to it. Softer stones such as some sandstones need more care in choosing a mortar, which comes up below.
Read the symptoms: face problem or behind-the-wall problem
Walk the whole wall, top and bottom, ideally the day after a heavy rain. This table sorts the common symptoms by what they usually mean.
| What you see | What it usually points to | Usual fix |
|---|---|---|
| Sandy, soft or missing mortar in the joints | Weathered mortar; a face problem if the wall is straight | Repoint the joints |
| One or two loose stones in an otherwise straight wall | Local mortar failure | Reset the stones in fresh mortar |
| White, powdery deposits on the face | Water moving through the wall and leaving salts behind | Clean it, then find where the water gets in |
| Hairline cracks in the mortar only | Normal movement, often seasonal | Monitor, then repoint or seal |
| Stepped or tapering cracks along the joints | Part of the base settling more than the rest | Watch for movement; the base may need work |
| A bulge in the face | Water pressure, or a wall too weak for the soil behind it | Drainage correction, often a section rebuild |
| The top leaning forward, out past the base | The wall is rotating under the soil load | Engineered reinforcement or a rebuild |
| Weep holes that stay dry after heavy rain, or leak muddy water | Blocked or failed drainage behind the wall | Clear the drains; if that fails, dig out and redo the drainage |
The white deposit is called efflorescence. The masonry industry's own guide, TEK 8-3A on controlling efflorescence (Concrete Masonry and Hardscapes Association), notes it doesn't affect structural performance, but heavy streaks just below the joints mean water is getting into the wall higher up. That is worth tracing before you repoint.
The bulge and lean rows come from HUD's Residential Rehabilitation Inspection Guide (2000), which lists bowing, horizontal bulging and cracking caused by water pressure, and leaning from the top as overturning. It adds that bowing may be correctable if caught early and the cause is poor drainage.
How to check for lean
Hold a 4-foot level against the face in several places, or hang a string with a weight from the top. Don't panic if the face tips back toward the slope: many stone walls are built that way on purpose, and dry stone specifications call for it. The warning sign is a face that has moved forward past vertical, or a lean that is getting worse. Mark it and measure again after a few weeks of weather.
If cracks are the main thing you're seeing, our guide to cracks in a stone retaining wall explains how to tell a moving crack from an old one and what each pattern means.
Repairs that suit a sound, low wall
These are reasonable homeowner jobs when the wall is plumb, isn't bulging, and is low enough that a mistake can't hurt anyone. Wear eye protection and a respirator when you chip or grind mortar: the dust contains crystalline silica, which OSHA identifies as a lung hazard.
Repoint crumbling joints
Repointing means raking out the failed mortar and packing in new. The National Park Service's Preservation Brief 2 on repointing is the standard reference, and three of its rules matter most for a retaining wall:
- Rake deep enough. Remove old mortar to at least 2 to 2.5 times the joint's width, and deeper where it's loose. On stone walls with wide joints that can mean several inches.
- Use a mortar softer than the stone. New mortar should be softer than the stones and no harder than the mortar already in the wall. Mortar that's too hard forces movement into the stones, which then crack and spall.
- Fix the cause first. The brief warns that repointing alone won't solve problems caused by something else, such as water or settlement.
For which bag to buy: manufacturers such as Amerimix describe Type S mortar (1,800 psi) for retaining walls and below-grade work, and Type N (750 psi) for above-grade work and soft stone. On a hard granite wall built with modern cement mortar, Type S is the usual match. On an old wall laid in soft, lime-rich mortar, a stiff Type S can be harder than what's there, so match the existing mortar instead. The full method, step by step, is in how to repair cracks in a stone retaining wall.
Reset a loose stone
- Check the stones around it. If the loose stone sits in a bulge, stop here: the problem is behind the wall, and pulling stones out of a bulging section can make it worse.
- Work the stone free. Chisel the old mortar off the stone and out of the pocket it came from.
- Rinse the pocket so it's damp but has no standing water.
- Lay a full bed of mortar in the bottom and back of the pocket, set the stone, and tap it into line with its neighbors using a rubber mallet.
- Pack the joints around it, tool them to match the rest of the wall, and keep the new mortar damp and shaded while it cures.
Stones from a retaining wall are heavy and awkward. Get help, and never work below a stone that could drop.
Clear the drains and stop feeding the wall water
HUD's guide recommends checking weep holes after a reasonably heavy rain. If they aren't discharging water, clean them out and check again after the next storm. Then look above the wall: a downspout emptying at the top, or ground that slopes toward the wall, sends water straight into the soil the wall is holding back. Redirecting that water costs little and protects every other repair.
When it's a rebuild instead of a repair
Repointing restores the joints. It doesn't make the wall stronger, it doesn't drain the soil, and it doesn't straighten a lean. Plan on rebuilding the affected section when you see:
- A bulge or forward lean, especially one that has grown.
- Weep holes that stay blocked or dry even after cleaning, with wet soil behind the wall.
- Cracks that come back in the same place after repointing.
- Stones cracked through, or a base that has sunk, washed out or been undermined.
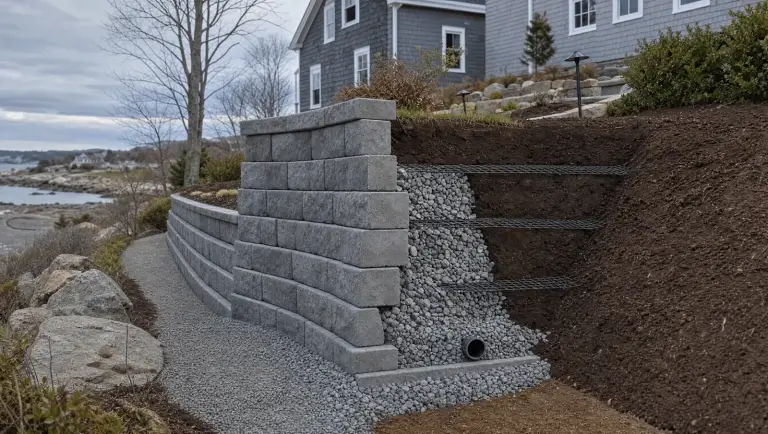
HUD is blunt about the first case. Its guide says the outward movement of the upper part of a retaining wall can only be halted by structural reinforcement, and simply patching the crack won't solve it. Where drainage has failed, it says the remedy is to excavate behind the wall, replace the drainage material and damaged drainage piping, and backfill.
In practice, rebuilding a mortared section means taking it down to stable stone, digging out the soil behind it, and rebuilding on a firm footing. The masonry industry's TEK 15-7B on masonry retaining walls says footings belong on firm undisturbed soil or compacted fill, below the frost line where the ground freezes, with provisions to keep water from building up behind the wall and a cap on top to keep water out. For scale, the Massachusetts residential code lists a 48-inch frost depth for building footings. How deep a garden wall's footing needs to go is a design decision for the builder or engineer, but it shows how far frost reaches here.
Engineered options such as tiebacks and anchors exist for walls that can't be taken down, but they are designed by an engineer for a specific wall. They aren't a DIY product.
Permits, engineers and digging rules in Massachusetts
Retaining walls hold back a lot of weight, and several rules apply before you dig.
- When to get an engineer. HUD's inspection guide says failing retaining walls more than two feet high should be inspected by a structural engineer. That's a low bar on purpose: a failing wall of that height can still hurt someone.
- Building permits. The Massachusetts residential code, 780 CMR, exempts from permits retaining walls not over four feet, measured from the bottom of the footing to the top of the wall, unless the wall supports a surcharge, meaning extra load such as a driveway, parking or a building above it.
- Engineered design. The Massachusetts 10th edition code is based on the 2021 International Residential Code, whose section R404.4 requires engineering design for walls retaining more than 48 inches of unbalanced fill, and for walls over 24 inches that carry loads beyond the soil itself.
- Near water. Under the Wetlands Protection Act, anyone working within 100 feet of a bank or bordering wetland must file with the local conservation commission first, as Mass Audubon's fact sheet on the Act explains. On the coast and near ponds and streams, that can include a garden wall.
- Before digging behind the wall. Dig Safe says Massachusetts law requires property owners and contractors to give 72 hours' notice, not counting weekends and holidays, before disturbing the ground. Call 811.
Rules change and towns add their own, so check with your town's building department before rebuilding anything that holds back real weight.
What repair tends to cost, and getting help
Cost depends far more on which side of the repair-or-rebuild line you're on than on the stone. Repointing a straight wall is mostly labor; rebuilding a section adds excavation, drainage stone, pipe, and hauling. Our guide to what it costs to repair a retaining wall walks through the factors that move the price.
When a wall needs a section rebuilt or replaced, George Hardscaping builds retaining walls in stone, rock, brick and concrete from our base at 74 Essex Ave in Gloucester, for homes across the North Shore from Rockport to Beverly. We also do excavation, so the digging out and the drainage behind a new wall can be part of the same job. Request an estimate or call (781) 222-0805 and tell us what the wall is doing.