Affordable Retaining Wall Solutions: 7 Powerful Budget Ideas 2025
Why Retaining Walls Don’t Have to Break the Bank
Affordable retaining wall solutions are within reach for any homeowner facing erosion challenges or looking to maximize usable space on sloped property. If you’re searching for budget-friendly options, here are the most cost-effective approaches:
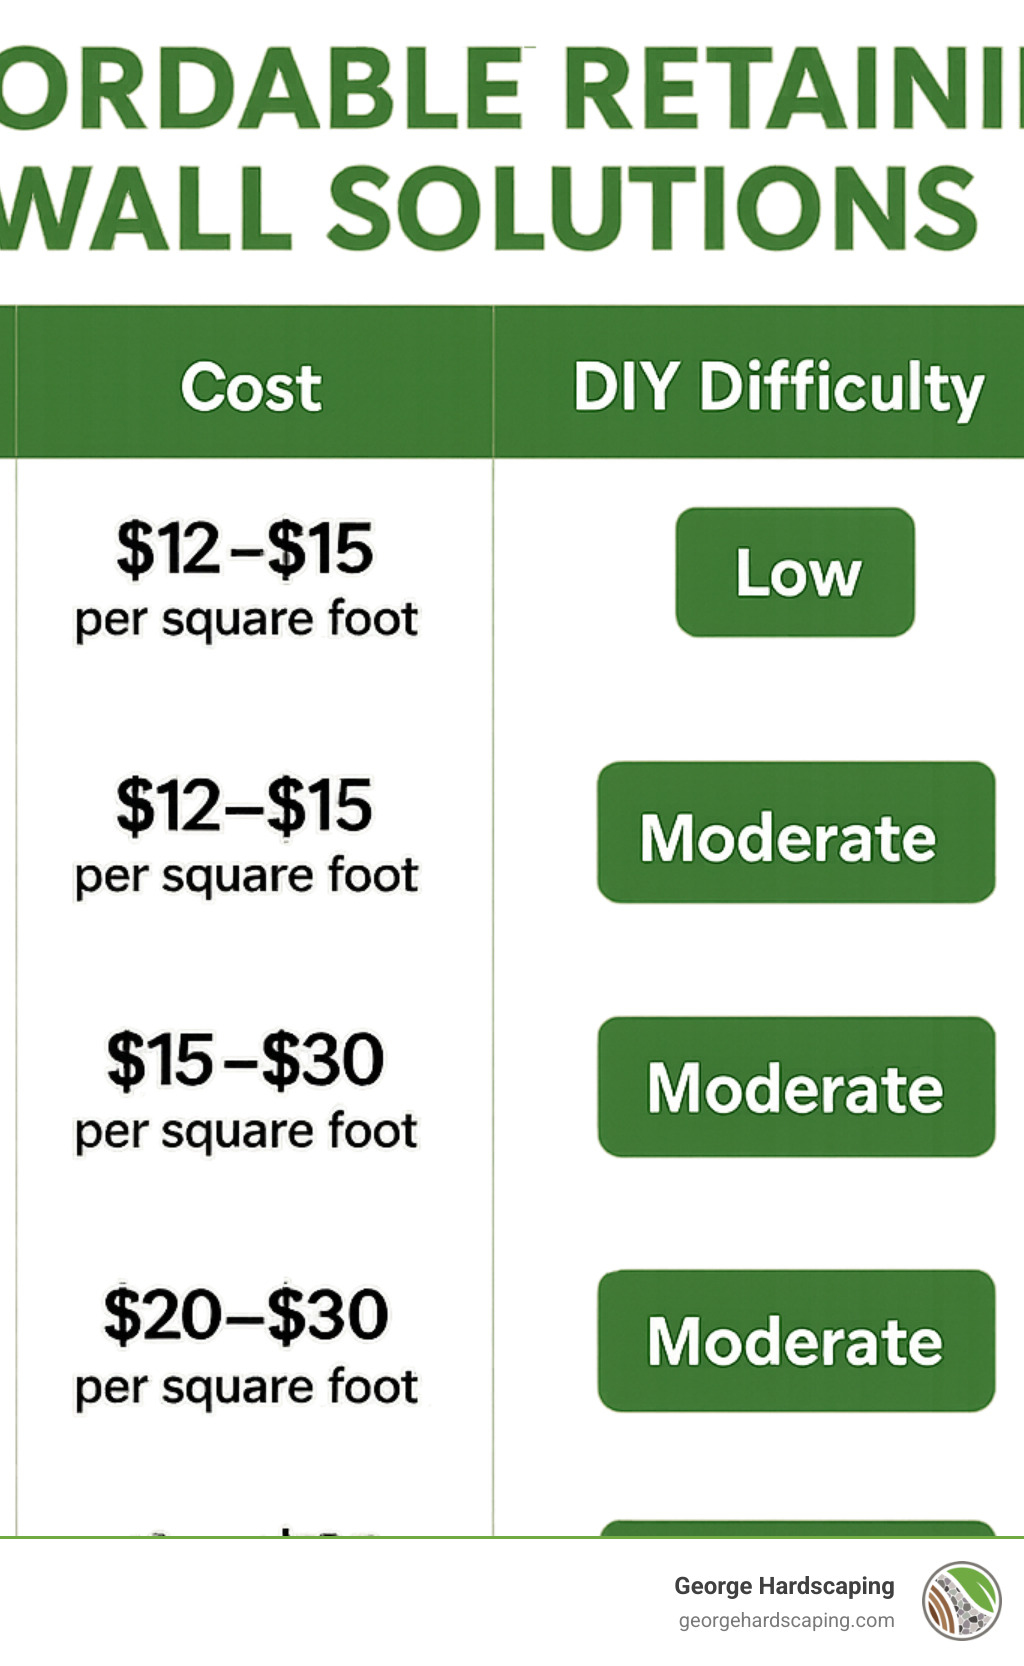
- Concrete blocks: $12-$15 per square foot, DIY-friendly
- Landscape timbers: $12-$15 per square foot, natural appearance
- Gabion walls: $15-$30 per square foot, excellent drainage
- Natural stone: $0-$30 per square foot (if locally sourced)
- Railroad ties: $25-$30 per square foot (be aware of potential chemical concerns)
When erosion threatens your landscape or you’re looking to create level areas in your sloped yard, a retaining wall becomes necessary—but it doesn’t have to drain your savings. The national average cost for retaining walls ranges from $114-$173 per linear foot, but with smart material choices and some DIY effort, you can significantly reduce this expense.
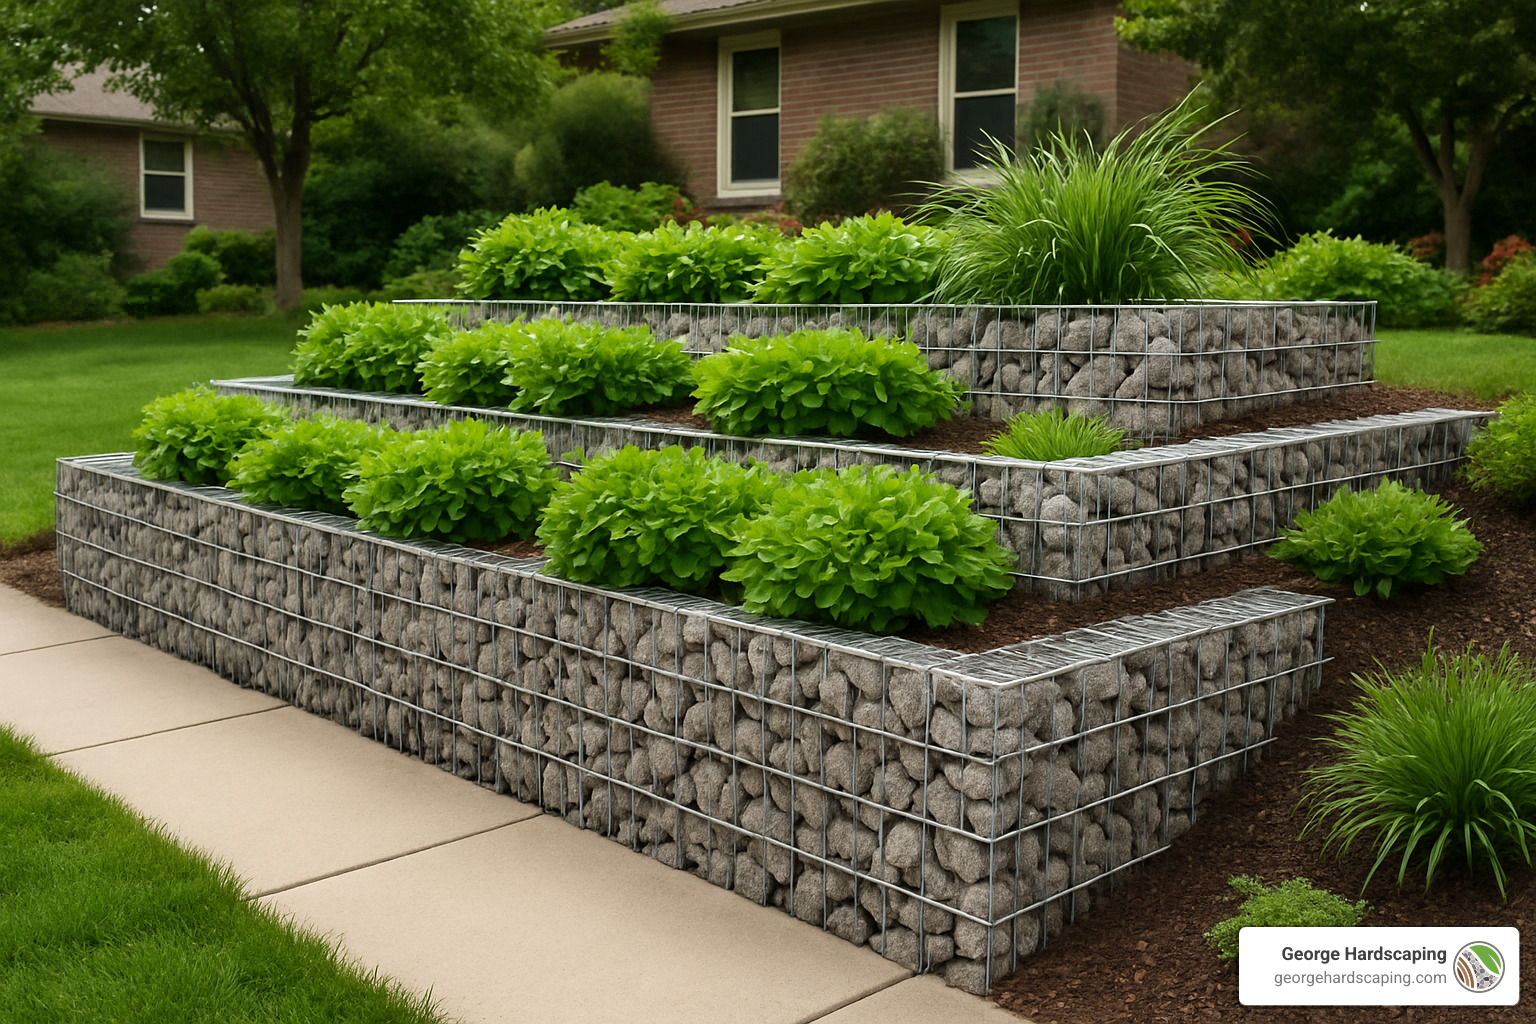
“Gabion walls are often cited by landscape designers as the most affordable retaining wall to build, especially for DIY projects,” according to industry experts. These wire baskets filled with stones provide excellent drainage and stability at a fraction of the cost of traditional masonry walls.
Whether you’re dealing with a gentle slope in your front yard or a steep hill in the back, understanding your options is the first step toward a solution that works for both your landscape and your budget. The right approach depends on your wall’s height, your property’s drainage needs, and how much sweat equity you’re willing to invest.
Affordable retaining wall solutions vocab explained:
– Garden retaining wall ideas
– Modern retaining wall designs
– Natural stone retaining walls
Affordable retaining wall solutions: Top budget materials
Ready to build a retaining wall without emptying your savings account? The material you choose makes all the difference in keeping costs manageable while still getting the job done right. At George Hardscaping, we’ve helped countless Essex County homeowners find that sweet spot between affordability and quality.
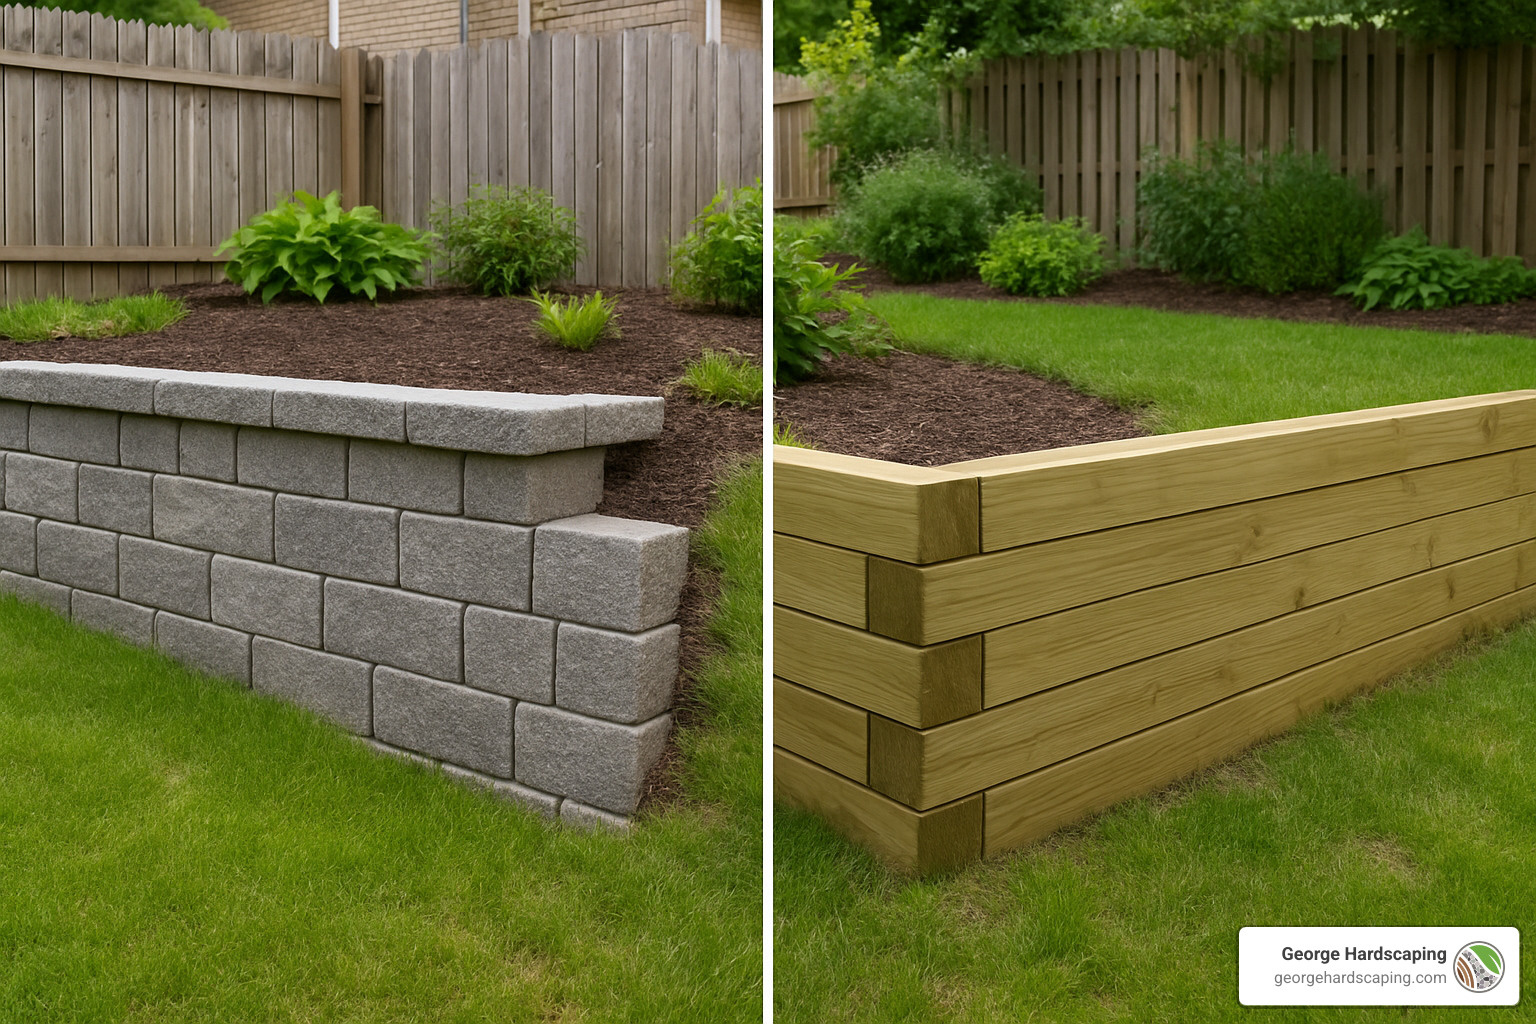
Concrete Blocks
Concrete blocks have become the darling of DIY retaining wall projects—and for good reason. During home improvement store sales, you might snag 4-inch blocks for as little as $1.24 each. They’re lightweight enough for most folks to handle, stack easily, and many come with interlocking features that eliminate the need for mortar.
These interlocking systems can support nearly vertical walls up to about 3 feet tall without additional reinforcement, making them perfect for those garden terraces or modest slopes around your property. Plus, their uniform appearance creates a clean, finished look that complements most landscapes.
Landscape Timbers
For a more natural aesthetic that blends beautifully with garden settings, pressure-treated pine timbers run about $12-$15 per square foot. They’re a weekend warrior’s dream—light enough to carry, simple to cut with basic tools, and straightforward to install.
Just be aware of their limitations. As one contractor we know puts it, “Landscape timbers eventually bow out and rot—blocks are often worth the extra investment in the long run.” If timber speaks to your style, make sure it’s rated for ground contact and consider adding extra preservatives to extend its 15-20 year lifespan.
Gabion Baskets
There’s something wonderfully rustic about gabion walls—those wire cages filled with stone that have become increasingly popular in modern landscaping. At $15-$30 per square foot, they offer excellent drainage properties that naturally prevent water pressure buildup behind your wall.
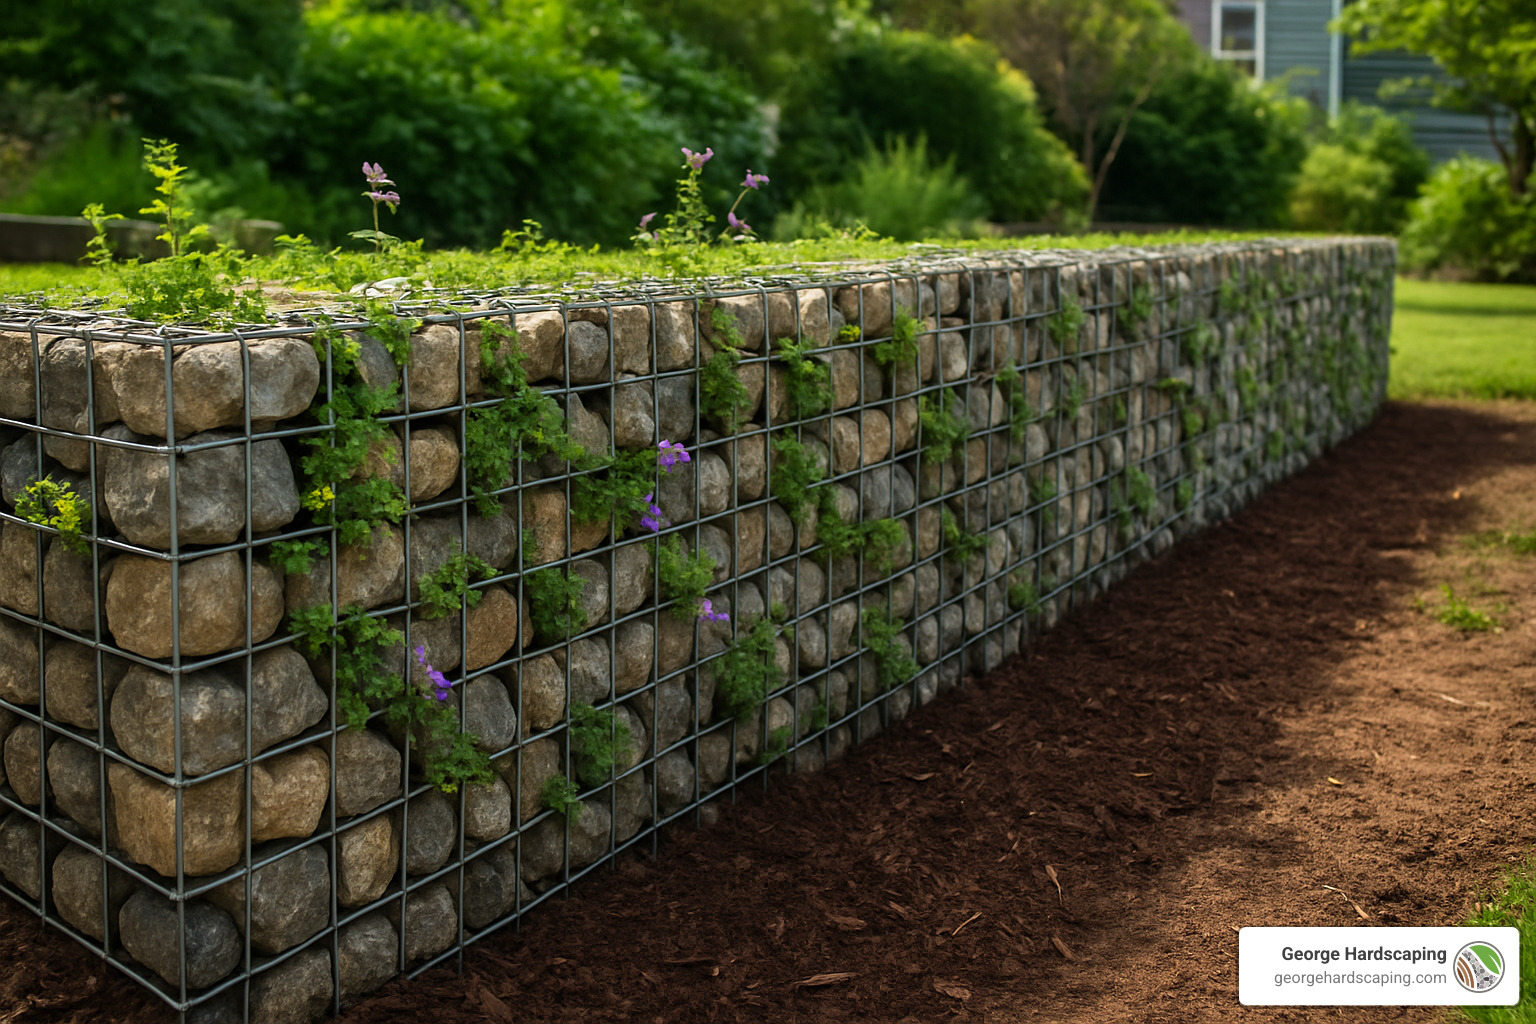
The beauty of gabions is their flexibility—both literally (they can shift slightly without failing) and in terms of your budget. The baskets themselves are relatively inexpensive, and you can fill them with locally sourced stone to keep costs down. For maximum durability, look for galfan-coated baskets, which last 2-3 times longer than standard galvanized options.
Pallets
For the ultimate budget solution, reclaimed wooden pallets can create surprisingly effective retaining walls for heights under 2 feet. Many businesses give these away for free—just check local classifieds or ask around at warehouses and retail stores.
We’ve seen homeowners create charming garden terraces using pallets filled with soil and planted with cascading flowers. With a 3-7 year lifespan, they’re not permanent solutions, but for non-critical applications or temporary needs, you can’t beat the price.
Natural Stone
If you’re blessed with access to local stone—either on your property or through community resources—natural stone walls can range from virtually free to about $30 per square foot. Dry-stacked stone walls have literally stood the test of centuries, with some historic examples still standing after hundreds of years.
The trade-off? Stone walls demand significant labor and some masonry skill. They’re heavy to work with but incredibly durable and timeless when built correctly. For those willing to invest the sweat equity, the results can be breathtaking.
Railroad Ties
At $25-$30 per square foot, recycled railroad ties create a distinctive rustic look that many homeowners love. They’re relatively straightforward to install, but there’s an important consideration: most railroad ties are treated with creosote, a wood preservative that the Environmental Protection Agency has flagged for potential health concerns.
These chemicals can leach into soil over time, so we generally recommend alternative materials if you’re planning to grow edibles nearby or have children who might have frequent contact with the wall.
Recycled Concrete
Breaking up and reusing concrete from demolition projects—sometimes called “urbanite”—can be virtually free if you have access to the material. While labor-intensive, this approach is environmentally friendly and creates an interesting, modern aesthetic when done thoughtfully.
Why Affordable retaining wall solutions start with picking the right material
Your material choice affects far more than your initial investment—it determines how long your wall will last, how much maintenance it’ll need, and whether it’s appropriate for your specific property conditions.
When considering lifespan, natural stone and concrete options typically offer the longest service, often 50-100+ years when properly installed. Timber options generally last 15-25 years, while pallet walls might need replacement after just 3-7 years.
Drainage needs vary by material too. While all retaining walls require proper drainage, some make this easier than others. Gabion walls provide natural drainage through the stone fill, while solid walls need carefully installed drainage pipes and gravel backfill to prevent water pressure buildup.
Your own DIY comfort level should factor heavily in your decision. Landscape timbers, concrete blocks, and pallets are generally accessible for beginners. Gabion baskets and railroad ties require intermediate skills, while natural stone and recycled concrete demand more advanced knowledge and physical strength.
As contractors who regularly partner with homeowners on partial DIY projects, we’ve found that stackable block systems, while slightly more expensive upfront, often prove easiest for DIY beginners to install successfully.
Price snapshot for common low-cost walls
To help with your budgeting, here’s a breakdown of typical costs for various retaining wall materials. These are average costs based on internet data and not actual costs for George Hardscaping. For an accurate quote custom to your specific project in Essex County, we’re happy to provide a personalized consultation.
| Material | Cost Per Sq Ft | 30ft x 3ft Wall Cost Range | DIY Difficulty | Lifespan |
|---|---|---|---|---|
| Landscape Timbers | $12-$15 | $1,080-$1,350 | Low | 15-20 years |
| Concrete Blocks | $20-$30 | $1,800-$2,700 | Low-Medium | 50-100+ years |
| Gabion Baskets | $15-$30 | $1,350-$2,700 | Medium | 50+ years |
| Natural Stone (locally sourced) | $0-$30 | $0-$2,700 | High | 100+ years |
| Railroad Ties | $25-$30 | $2,250-$2,700 | Medium | 15-25 years |
| Poured Concrete | $25-$40 | $2,250-$3,600 | High | 50-100+ years |
| Recycled Concrete | $10-$20 | $900-$1,800 | High | 50+ years |
For high-end custom installations with premium materials and complex designs, costs can jump significantly to $45-$120 per square foot. This means a similar 30ft x 3ft wall could potentially cost $4,050-$10,800 or more, depending on design complexity and site conditions.
To learn more about specific costs for your project, you might find our detailed guide on Retaining Wall Cost helpful as you plan your budget.
DIY Steps to Build a Wallet-Friendly Retaining Wall
Rolling up your sleeves to build your own retaining wall isn’t just satisfying – it’s one of the best ways to create an Affordable retaining wall solution without sacrificing quality. After years of building walls throughout Essex County, we’ve distilled the process into straightforward steps that most homeowners can handle, especially for walls under 3 feet tall.
Tools and Materials You’ll Need:
- Shovel and/or small excavator (rental)
- Tamper (hand or power)
- Level (4-foot recommended)
- Tape measure
- String line and stakes
- Landscape fabric
- Crushed stone (3/4″)
- Perforated drainage pipe (4″)
- Your chosen wall material
- Construction adhesive (for caps)
- Safety gear (gloves, eye protection, dust mask)
Key steps for Affordable retaining wall solutions you can tackle this weekend
1. Mark Your Layout
Start by playing landscape architect with some stakes and string. Map out where your wall will live, following your yard’s natural contours for the most pleasing look. As one designer told me, “Following the slope of your yard creates the most natural-looking and structurally sound retaining wall.” If you’re building near property lines in Essex County, a quick boundary check can save headaches down the road.
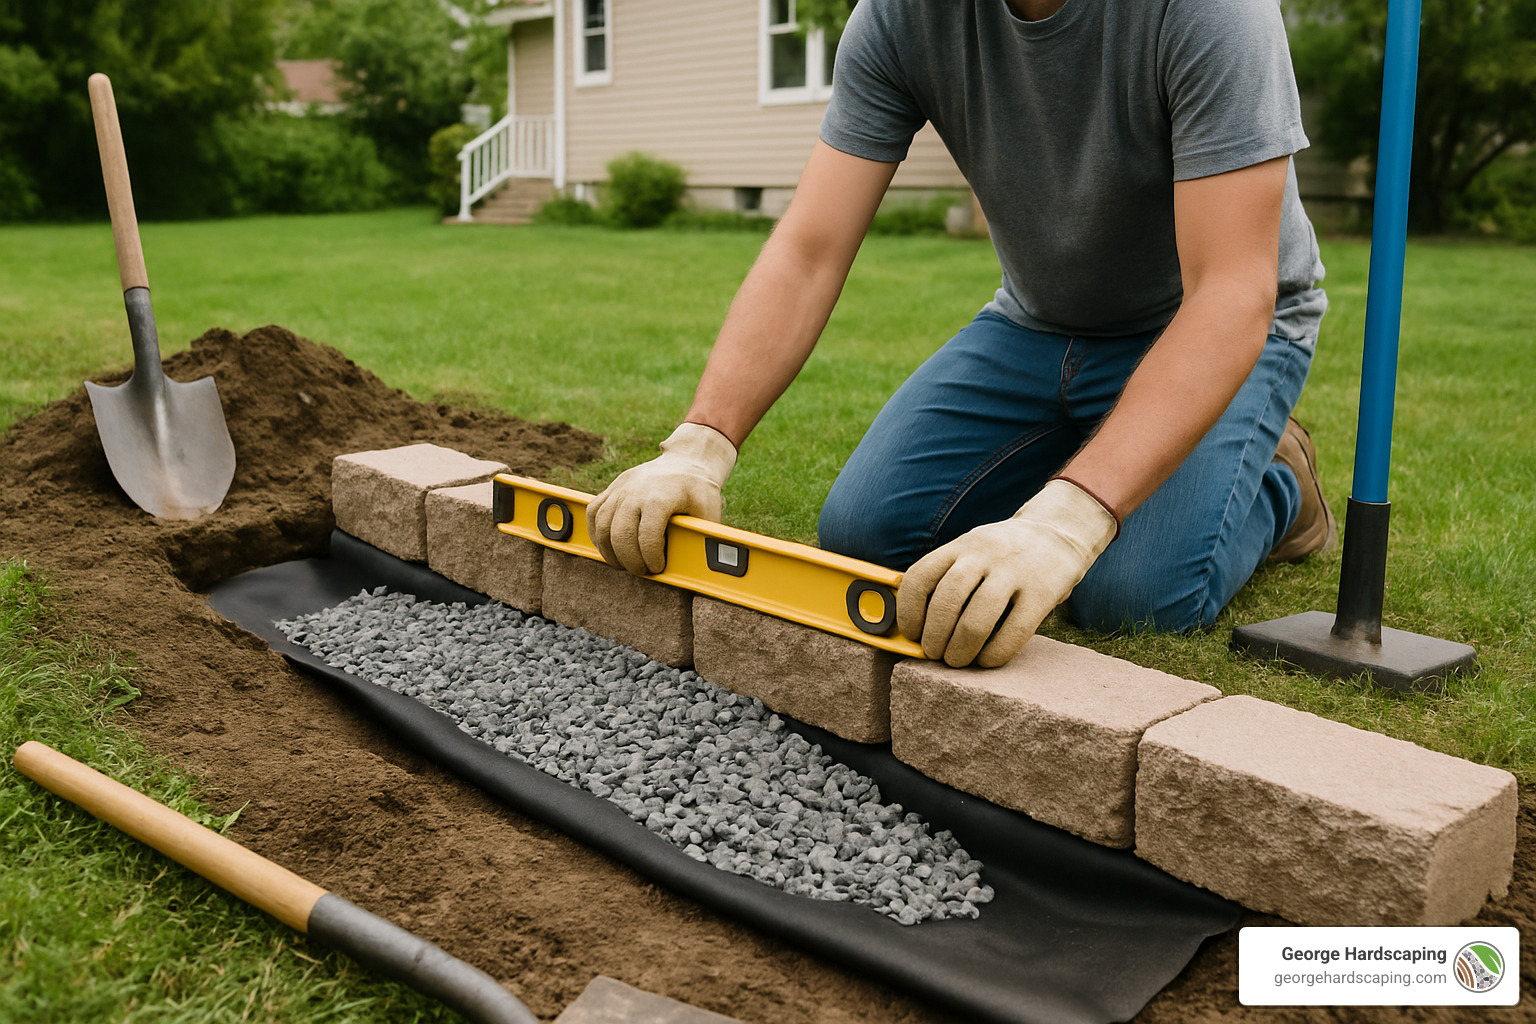
2. Dig the Trench
Time to get your hands dirty! Dig a trench about 6 inches deeper than your first course of material and twice as wide. This extra space might seem excessive, but it’s your insurance policy against settling. For smaller projects, a shovel and some elbow grease will do the trick. As one homeowner finded, “Excavation and labor can account for more than half the total cost of a poured concrete wall,” making DIY digging well worth the effort.
3. Prepare and Compact the Base
Pour 4-6 inches of crushed stone into your trench and compact it thoroughly. Think of this as the foundation of your home – skimp here, and you’ll pay later. Professional installers always emphasize, “Ensure proper footings and level base. This is not the step to rush or cut corners.” A solid, level base is your wall’s best friend.
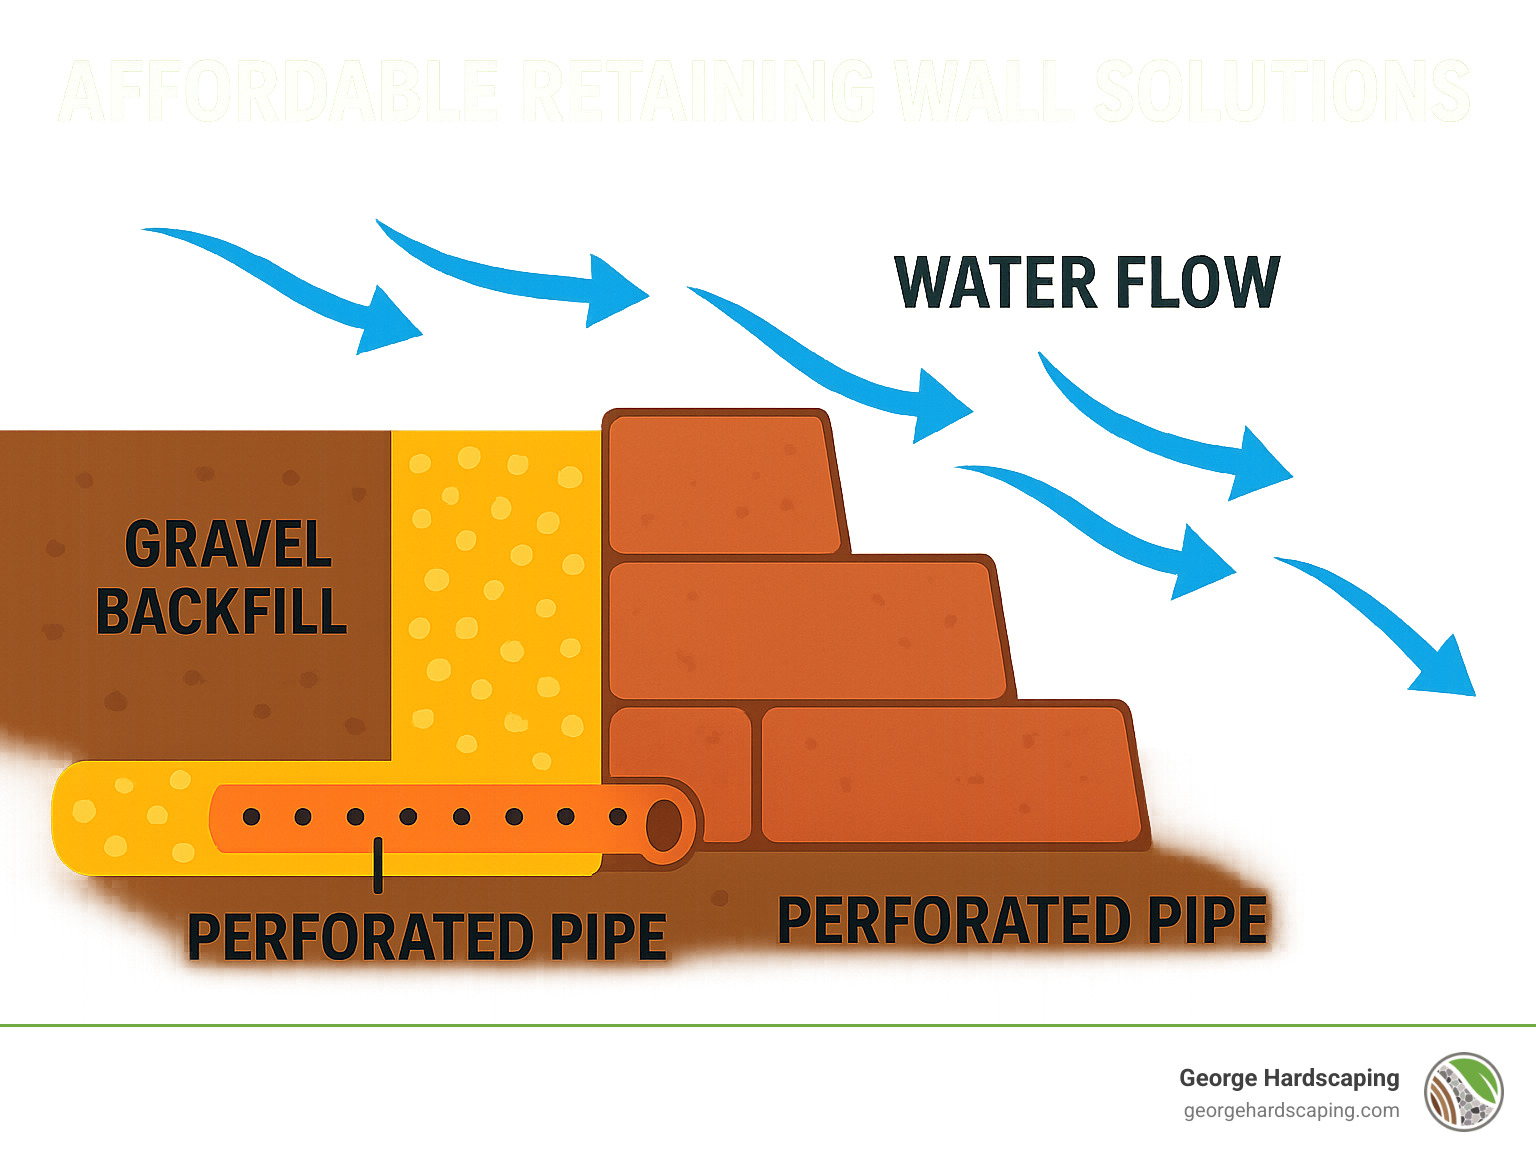
4. Install Drainage System
This step isn’t optional – it’s crucial. Line the hill side of your trench with landscape fabric, then add a 4-inch perforated drainage pipe wrapped in a filter sock. Cover with gravel to create a water escape route. As one contractor put it, “Install a 4-inch socked perforated pipe in gravel behind the wall or leave gaps and backfill with gravel.” Good drainage is the difference between a wall that lasts decades and one that fails in the first heavy rain.
5. Build the First Course
Place your first row of material partially below ground level – this hidden course acts as an anchor for everything above. Use your level religiously here to ensure each piece sits perfectly level from front to back and side to side. “Lay first course below grade for stability” is advice we give to every DIY enthusiast who walks through our door.
6. Stack and Secure Additional Courses
Now the wall starts taking shape! Follow the manufacturer’s guidelines for stacking blocks (usually with a slight setback for each course). For timber walls, secure courses with galvanized spikes. Gabion basket walls? Fill each level completely before moving up. Take your time here – rushing leads to mistakes.
7. Backfill with Drainage Material
As your wall grows taller, add drainage gravel (at least 12 inches) behind it. This creates a pathway for water to flow down to your drainage pipe instead of pushing against your wall. Water pressure is surprisingly powerful – this step helps ensure it doesn’t become your wall’s nemesis.
8. Add Caps or Final Course
Finish with a flourish by adding cap blocks or a secure top course. For block walls, construction adhesive keeps caps from wandering. For timber walls, make sure that top course is locked down tight to the courses below. “Use construction adhesive on caps” is a simple tip that prevents freeze-thaw cycles from gradually shifting your carefully placed top row.
Common mistakes to avoid
Neglecting Drainage is the cardinal sin of retaining wall construction. Even small walls need proper drainage – skip this step at your peril. Water always wins the battle against an improperly drained wall.
Insufficient Base Preparation might tempt you when you’re tired of digging, but this shortcut leads to settling and shifting later. The extra hour spent getting your base perfect saves days of repairs down the road.
Exceeding Material Height Limitations happens when enthusiasm outpaces physics. Each material has its limits: landscape timbers (4 feet), concrete blocks (3-4 feet without reinforcement), railroad ties (3 feet), and gabion baskets (3 feet for DIY). Going higher without proper engineering isn’t brave – it’s risky.
Forgetting Permits can turn your cost-saving project into an expensive lesson. Most Essex County towns require permits for walls over 3-4 feet tall. A quick call to your building department saves potential headaches and fines.
Improper Material Storage might seem minor, but warped timbers and damaged blocks create headaches during installation. Keep everything dry and flat until you’re ready to build.
For more detailed guidance on building with blocks, our Block Retaining Wall Construction page offers step-by-step instructions custom to our New England climate and soil conditions.
Money-Saving Design & Maintenance Hacks
Creating an Affordable retaining wall solution isn’t just about choosing the right materials—it’s also about smart design decisions and proper maintenance that can save you money both now and for years to come.
Design Strategies That Save Money
When planning your retaining wall, consider terracing instead of building one tall structure. Breaking up a steep slope into several shorter walls often costs less overall and creates beautiful planting opportunities between levels.
“Building a series of terrace levels rather than a tall single wall to save on materials” is advice we frequently share with Essex County homeowners facing challenging slopes. These shorter walls typically don’t require expensive engineering or permits, can be built with budget-friendly materials, and create usable garden spaces that improve your property’s appeal.
Mixing materials strategically is another clever way to stretch your budget. Use premium materials only where they’ll be most visible, with more economical options handling the structural work behind the scenes. For instance, a natural stone facing paired with concrete block support gives you the best of both worlds—beauty where it counts and strength where it’s needed.
Adding functionality to your wall design pays dividends in value. Wide cap stones that double as seating around patios or fire pits transform a purely practical structure into a gathering space. Similarly, incorporating planter tiers within your wall design softens the appearance while adding garden space—a technique we’ve used to great effect in Beverly and Marblehead properties.
For very low walls (under 2 feet), consider the power of vegetation for reinforcement. Deep-rooted plants like junipers, bearberry, and ornamental grasses can help stabilize soil and prevent erosion, potentially reducing the height requirements for your retaining structure. This natural approach creates a beautiful transition between levels while performing important structural work.
Don’t overlook eco-friendly options that can be both kind to your wallet and the environment. “Telephone poles or broken foundation concrete can be sourced free/recycled for rustic low walls,” according to many DIY enthusiasts. Here in Essex County, you might check local construction sites (always ask permission first) or online marketplaces for materials that would otherwise end up in landfills.
Maintenance Tips to Extend Wall Life
A well-maintained wall lasts longer, saving you replacement costs down the road. Seasonal inspections twice yearly—ideally in spring and fall—help you catch minor issues before they become major problems. Look for signs of shifting, bulging, or drainage issues that might indicate trouble brewing beneath the surface.
Keeping drainage outlets clear is perhaps the most important maintenance task for any retaining wall. Ensure that drainage pipes remain free of debris, soil, and plant material to maintain proper water flow. Water pressure is the number one enemy of retaining walls, and good drainage is your best defense.
For timber walls, applying wood preservative every 2-3 years significantly extends their lifespan. This simple weekend task can add many years to your wall’s functional life, making even “budget” materials last longer than expected.
When you spot small issues, address them promptly rather than waiting for the next convenient time. A single loose block or slightly shifted timber is much easier and less expensive to fix than a collapsed section or complete wall failure.
Finally, be mindful of how vegetation interacts with your wall. While small plants with shallow root systems can help prevent erosion on and around your wall, large trees with invasive roots can cause significant damage. Monitor plant growth near your wall and remove potentially problematic vegetation before it threatens your structure.
For more creative approaches to incorporating retaining walls into garden settings, visit our Garden Retaining Wall Ideas page, where you’ll find inspiration for turning necessary structures into beautiful landscape features.
Cost Breakdown & When to Hire Pros
Let’s talk dollars and sense when it comes to your affordable retaining wall solution. Understanding the true costs helps you decide whether to tackle this project yourself or call in the professionals.
The national average cost for retaining walls ranges from $114-$173 per linear foot. At the lower end, you might spend $100-$152 per foot, while premium installations can run $159-$261 per foot. These figures include both materials and labor.
For perspective, a typical 60-foot retaining wall would cost between $6,826-$10,353 on average. However, your actual cost might vary significantly based on several factors.
Your wall’s height makes a huge difference – taller walls need deeper foundations and possibly engineering reports. Site accessibility is another major factor – if crews need to haul materials up a steep hill or through narrow passages, labor costs increase. The condition of your soil matters too, as poor soil might require additional foundation work. And don’t forget local permit requirements, especially for walls over 3-4 feet tall in Essex County.
These are average costs based on internet data and not actual costs for George Hardscaping. For high-end custom installations with premium materials and complex designs, costs can range from $135-$390 per linear foot, making a 60-foot wall potentially cost $8,100-$23,400 or more.
DIY vs. Professional Installation Cost Comparison
Here’s how the numbers typically break down for a 30ft x 3ft wall:
| Cost Component | DIY Project (30ft x 3ft wall) | Professional Installation |
|---|---|---|
| Materials | $1,350-$2,700 | $1,350-$2,700 |
| Equipment Rental | $150-$400 | Included |
| Labor | Your time (40-60 hours) | $1,800-$5,400 |
| Design/Engineering | DIY or $300-$600 | Included |
| Permits | $50-$200 (if needed) | Often handled by contractor |
| Total Cost | $1,550-$3,900 | $3,150-$8,700 |
“Labor and excavation often represent over half the cost in poured concrete walls,” which explains why DIY can save you significant money. The tradeoff, of course, is your time and sweat equity versus the peace of mind that comes with professional installation.
Curious about professional installation for your Essex County property? Visit our Retaining Wall Contractor page to learn more and request a quote.
Signs you should bring in a contractor
While I’m all for saving money with DIY projects, some situations simply call for professional expertise:
When your wall will exceed 4 feet in height, it’s time to call the pros. Most Essex County towns require engineering plans and permits for walls this tall, as they face tremendous soil pressure and need proper reinforcement. Those complex designs with multiple curves, corners, or built-in features like stairs? They benefit tremendously from professional experience too.
If your wall needs to support structures, driveways, or other significant weight, professional design isn’t just nice to have – it’s essential. Properties with existing drainage problems typically need comprehensive water management solutions beyond what most DIYers can provide.
And let’s not forget our Massachusetts winters! Taller walls often need deeper footings that extend below the frost line, requiring specialized equipment and expertise that most homeowners simply don’t have.
Money-saving questions to ask a pro
If you decide professional installation makes sense, you can still find ways to keep costs reasonable. Start by asking these smart questions:
Are there alternative materials that would work for my project? Professional contractors often have access to materials at wholesale prices and can suggest cost-effective alternatives that still meet your needs.
Can the project be completed in phases? Breaking a large project into manageable sections helps spread costs over time while still achieving your landscaping goals.
Is it possible to reuse any existing materials on site? Those stones, boulders, or other materials already on your property might be incorporated into the design, saving both money and resources.
Do you offer discounts for bundled projects? “Bundling multiple concrete or landscaping projects with the same contractor can yield cost savings.” If you’re also considering a patio, walkway, or steps, ask about package pricing.
For more detailed cost information, check out our Retaining Wall Construction Cost page or review How much does a retaining wall cost? for national averages.
The cheapest option today isn’t always the most affordable in the long run. A properly built wall might cost more initially but will save you from expensive repairs or complete rebuilds down the road. Our team at George Hardscaping specializes in finding that sweet spot between budget-friendly solutions and lasting quality for our Essex County neighbors.
Frequently Asked Questions about Budget Retaining Walls
Do I need a permit for a short wall?
Navigating permit requirements doesn’t have to be complicated. Here in Essex County, most municipalities don’t require permits for shorter retaining walls, but the exact height threshold varies by town:
- Salem residents can build walls up to 4 feet without permits
- In Gloucester, that limit drops to 3 feet
- Newburyport takes a more nuanced approach, considering both height and how close you’re building to property lines
Even if your wall falls under these thresholds, I always recommend a quick call to your local building department. It’s a five-minute conversation that could save you headaches later, especially if your property includes wetlands or conservation areas. Better to know the rules upfront than face potential fines or reconstruction later!
How do I keep water from pushing the wall over?
Water is the silent enemy of every retaining wall. I’ve seen countless DIY projects fail simply because water management was an afterthought.
The good news? Preventing water damage is straightforward when you know what to do. Start with a good drainage pipe—a 4-inch perforated pipe wrapped in filter fabric at the wall’s base gives water somewhere to go. Make sure it slopes toward either daylight or your drainage system.
Behind your wall, create a buffer zone with at least 12 inches of 3/4-inch clean stone or gravel. This drainage material prevents water pressure from building up. For solid walls like concrete or stone, don’t forget to incorporate weep holes that allow moisture to escape.
“No retaining wall solution, no matter how affordable, will last without proper drainage,” is something we tell every client at George Hardscaping. If you’re looking for natural drainage, gabion walls are particularly effective since water flows freely through the stone-filled baskets.
Which low-cost material lasts the longest?
When balancing budget and longevity, not all affordable retaining wall solutions offer equal value. Natural stone stands as the clear winner, potentially lasting 100+ years when properly constructed. This explains why you’ll still find stone walls from the 1800s dotting the Essex County landscape!
Concrete blocks come in a close second, with expected lifespans of 50-100+ years. They offer remarkable durability at a reasonable price point, making them one of our most frequently recommended materials for budget-conscious homeowners.
Gabion baskets will serve you well for about 50+ years if you invest in galfan coating (standard galvanized versions last about half as long). Recycled concrete also performs admirably at around 50+ years.
Wood options offer the lowest upfront costs but shorter lifespans. Pressure-treated timber typically lasts 15-20 years, while railroad ties might stretch to 25 years. Wooden pallets, while nearly free, will need replacement in just 3-7 years.
A natural stone wall might cost more initially, but when you divide that cost over its century-long lifespan, it often represents the best long-term value. As one client beautifully put it, “The effect of a round stone-paver patio surrounded by a low retaining wall is rustic yet sophisticated,” creating a legacy feature that can be enjoyed for generations with minimal maintenance.
For most homeowners seeking that sweet spot between affordability and longevity, concrete blocks or locally sourced stone typically provide the best overall value. Your specific choice should consider not just your budget today, but how long you plan to enjoy your outdoor space.
Conclusion
Creating an affordable retaining wall solution doesn’t mean settling for something that looks cheap or falls apart quickly. With the right approach, you can build a wall that not only protects your property from erosion but also improves your landscape—all while keeping your budget intact.
Think of your retaining wall project as a balancing act between cost, durability, and aesthetics. The good news? You have plenty of options that won’t drain your savings account.
Start by honestly assessing what your property truly needs. Is this wall primarily for controlling erosion on a gentle slope, or are you dealing with a steeper grade that requires something more substantial? The height and purpose of your wall will guide many of your decisions moving forward.
Next, revisit the budget-friendly materials we’ve discussed. Concrete blocks offer longevity and DIY-friendliness, while landscape timbers bring natural warmth at a similar price point. Gabion baskets provide excellent drainage, and if you’re lucky enough to have access to local stone, you might create a wall that lasts generations without breaking the bank.
Plan thoroughly before lifting a single stone or timber. A well-designed wall with proper drainage will save you thousands in potential repairs down the road. Even the most affordable wall becomes expensive if you have to rebuild it in a few years due to poor planning.
For walls under 3 feet tall, the DIY route can significantly reduce your costs while providing the satisfaction of creating something lasting with your own hands. For taller walls or more complex situations, professional installation from an experienced contractor like George Hardscaping ensures your investment stands the test of time.
When budgeting, be comprehensive in your calculations. Beyond just materials, factor in equipment rentals, drainage supplies, permits (if needed), and the value of your time if going the DIY route. A realistic budget helps prevent unpleasant surprises midway through your project.
Here in Essex County, we’ve seen how properly built retaining walls transform sloped, challenging properties into beautiful, usable outdoor spaces. Whether you’re in Beverly with its historic homes, Salem’s unique landscapes, or the coastal terrain of Gloucester, a thoughtfully constructed retaining wall adds both function and value to your property.
Even the most affordable retaining wall solutions require careful execution to perform well over time. Consider your wall an investment—one that prevents costly erosion damage, creates new usable space, and improves your property’s curb appeal for years to come.
Ready to start your retaining wall project or need professional guidance? Visit our Retaining Wall Contractor page to learn more about our services throughout the North Shore. Whether you’re tackling this project yourself or looking for expert installation, we’re here to help you create a lasting solution that works for both your landscape and your budget.
