
Walkway Design Tips: 6 Steps to Your Dream Path
Why Walkway Design Tips Matter for Your Home
Effective walkway design tips can lift your property from ordinary to extraordinary. A well-designed walkway is more than just a path; it’s a key landscape feature that improves curb appeal, improves day-to-day functionality, and can even increase your home’s value. It guides visitors, connects outdoor living areas, and ensures safe passage in all weather.
Your walkway is often the first impression guests have of your home. A thoughtfully designed path using quality materials like natural stone or interlocking pavers provides decades of reliable service and boosts curb appeal. The key is balancing practical needs like width, slope, and drainage with aesthetic choices like materials and patterns—and planning for New England’s freeze-thaw climate.
Why it matters now:
- Safety and accessibility: Proper widths, smooth surfaces, and gentle slopes reduce hazards year-round.
- Return on investment: Improving entry experience and outdoor living often ranks highly with buyers; national research on outdoor projects highlights the value of well-designed hardscapes and curb appeal improvements. According to research by Virginia Tech landscape architects, a well-landscaped home can have a price advantage of 5.5% to 12.7% over a home with no landscaping.
- All-weather reliability: In Massachusetts, materials and installation must withstand ice, snow, and summer heat.
Essential Walkway Design Tips:
- Plan for purpose: Determine if it’s a primary path (48″+ minimum width) or an auxiliary route (36″ ideal).
- Choose durable materials: Select natural stone, pavers, or brick for longevity and visual appeal.
- Mind the slope and drainage: Keep primary walkways near a 1–2% slope for safety and water management.
- Add visual interest: Use curves, patterns, border details, and complementary landscaping.
- Include proper lighting: Favor low-voltage LED for safety and ambiance.
- Plan for maintenance: Pick materials and joint treatments that match your upkeep goals.
This complete guide expands on six essential steps—from planning and material selection to lighting integration and long-term maintenance—so you can achieve professional results and avoid common pitfalls. Along the way, we’ll reference best-practice resources from recognized authorities like the ADA guidelines for accessibility, EPA recommendations for sustainable stormwater management, ASLA landscape design principles, the ICC building codes, the Illuminating Engineering Society standards, and the masonry and hardscapes industry best practices.
For local, done-right installation in Essex County and the North Shore, explore our in-depth resources and services:
- Stone Walkway Installation Guide: https://georgehardscaping.com/stone-walkway-installation-guide/
- Base for Flagstone Walkway: https://georgehardscaping.com/base-for-flagstone-walkway/
- Cost to Install Stone Walkway: https://georgehardscaping.com/cost-to-install-stone-walkway/
- Walkway Paving Contractor: https://georgehardscaping.com/walkway-paving-contractor/
Strong CTA: Ready to plan a safe, beautiful walkway that fits your home and budget? Request a design consult and estimate: https://georgehardscaping.com/request-estimate/.
Step 1: Plan Your Path’s Purpose and Function
The foundation of any successful project is planning. Before choosing materials, think through how people actually move on your property—where they arrive, park, cut through, unload, and gather. A well-planned path creates natural flow, guides foot traffic, and makes navigation intuitive. Will it be a high-traffic route for your family or a leisurely garden stroll? The answers influence width, shape, materials, edging, lighting, and maintenance.
Define the Walkway’s Role
Every walkway has a specific purpose that shapes its design.
- Primary walkways: These are the main arteries, such as the path from the driveway to the front door, or the route from your back door to your main patio. They must be wide, durable, and well-lit. See patio integration ideas: https://georgehardscaping.com/patio-design-installation/.
- Auxiliary paths: These support routes include side yard access, garden strolls, or a connector to a custom fire feature: https://georgehardscaping.com/custom-outdoor-firepits/. They can be narrower and more relaxed, but should still be safe and well-drained.
Use inspiration to explore roles and styles:
- Front Yard Walkway Ideas: https://georgehardscaping.com/front-yard-walkway-ideas/
- Backyard Paver Walkway Ideas: https://georgehardscaping.com/backyard-paver-walkway-ideas/
Planning prompts:
- Users and frequency: Family, guests, deliveries, strollers, mobility devices?
- Destinations: Entry doors, garage, patio, grill, shed, garden, firepit.
- Everyday tasks: Bringing in groceries, trash bins, snow removal routes.
- Aesthetic goals: Formal vs. informal, rustic vs. refined, modern vs. classic.
- Winter realities: Where does snow get piled? Will the path get sun for melting?
Designing for Accessibility
Creating walkways that welcome everyone adds tremendous value. Accessibility supports anyone using strollers, wheelchairs, or wheeled luggage—and makes daily life easier for all.
- Smooth, stable surfaces: Choose concrete pavers, brick, or large-format natural stone with tight joints for easy rolling and fewer trip points.
- Ramps vs. steps: For modest elevation changes, a ramp with a gentle grade is more universally usable. The ADA suggests a maximum 1:12 slope for ramps (about 8.33%); for everyday residential comfort, many homeowners prefer gentler grades wherever feasible. ADA guidance: https://adata.org/.
- Widths: A 48-inch minimum on primary routes allows comfortable passing and side-by-side walking. On larger properties, consider 60-inch passing areas at intervals.
- Steps done right: Where stairs are unavoidable, prioritize consistent riser heights (generally 6–7 inches) and ample treads. We specialize in safe, handsome steps and brick stairs.
- Handrails and edges: On longer step runs or steeper grades, handrails and well-defined edges add security and confidence.
Smart Site Analysis
- Desire lines: Observe how people already cut across your yard; align designs to those routes when possible.
- Drainage mapping: After rain, note pooling or run-off. Plan path elevations and slopes to avoid wet feet and winter ice.
- Entry moments: Frame views toward your front door or backyard focal points; align with architectural symmetry or choose a garden meander based on your home’s style.
- Utilities and code: Call before you dig; confirm local requirements for egress, step geometry, and handrails. The International Residential Code (via the ICC) is a helpful reference hub: https://codes.iccsafe.org/.
If you’re unsure how to balance roles, styles, and code considerations, we can help you plan a safe, attractive route from the first sketch. Start with our Walkway Paving Contractor page: https://georgehardscaping.com/walkway-paving-contractor/.
Step 2: Master Proportions, Scale, and Safety
Getting the proportions right is critical. A path that is too narrow feels cramped, while one that is too wide can overwhelm the landscape. These fundamentals—proper width, safe slopes, and well-designed transitions—create comfort and confidence in every step.
Getting the Width Right
- Primary walkways: Minimum 48 inches is strongly recommended for residential paths to main entrances. This allows two people to walk comfortably side-by-side and accommodates mobility devices. In snow country, a bit more width improves shoveling efficiency.
- Auxiliary paths: 36 inches feels comfortable for a single traveler, tools, or a wheelbarrow. Narrower garden paths (30 inches) can work in low-traffic areas but plan pull-offs or wider landings near features.
- Door landings and turns: Provide a 48–60 inch clear landing at entries and consider gentle flares or widened sections where a path turns, meets steps, or intersects with driveways.
- Passing spaces: On long, narrow routes, occasional 60-inch passing bays provide breathing room.
Managing Slopes and Adding Steps
- The 1–2% slope rule: A subtle grade across most residential walkways is critical for drainage without creating discomfort. A 2% slope drops about 2.4 inches every 10 feet—barely noticeable but key to shedding water.
- Cross slope: Keep cross slopes gentle and consistent to avoid ankle-tilting surfaces, particularly with larger stone slabs.
- Steps: Inconsistent step heights are a top trip hazard. Keep risers uniform (6–7 inches) and provide a deep, comfortable tread. For code background, see the ICC resource hub: https://codes.iccsafe.org/.
- Landings: For changes in grade, add periodic landings to rest and to break long runs. Landings should be at least as wide as the path and 36–60 inches deep.
Edges, Borders, and Containment
- Edge restraint: Pavers and many stone systems require robust edging (hidden spikes with a PVC/metal edge, a poured concrete toe, or a soldier course border) to prevent lateral creep—especially on curves.
- Border function: A contrasting border improves aesthetics and defines the walking surface for safer nighttime navigation.
Special Conditions: Slopes and Freeze–Thaw
- Sloped sites: Combine ramps with low, comfortable steps where needed. We build attractive, durable solutions for challenging terrain—see how to build a paver walkway on a slope: https://georgehardscaping.com/how-to-build-a-paver-walkway-on-a-slope/.
- Freeze–thaw durability: New England soils heave. Proper base depth and compaction safeguard the surface against seasonal movement.
For properties with significant elevation changes, our experience in building stone steps ensures safety, code-informed geometry, and visual harmony with your landscape.
Step 3: Choose the Perfect Walkway Materials
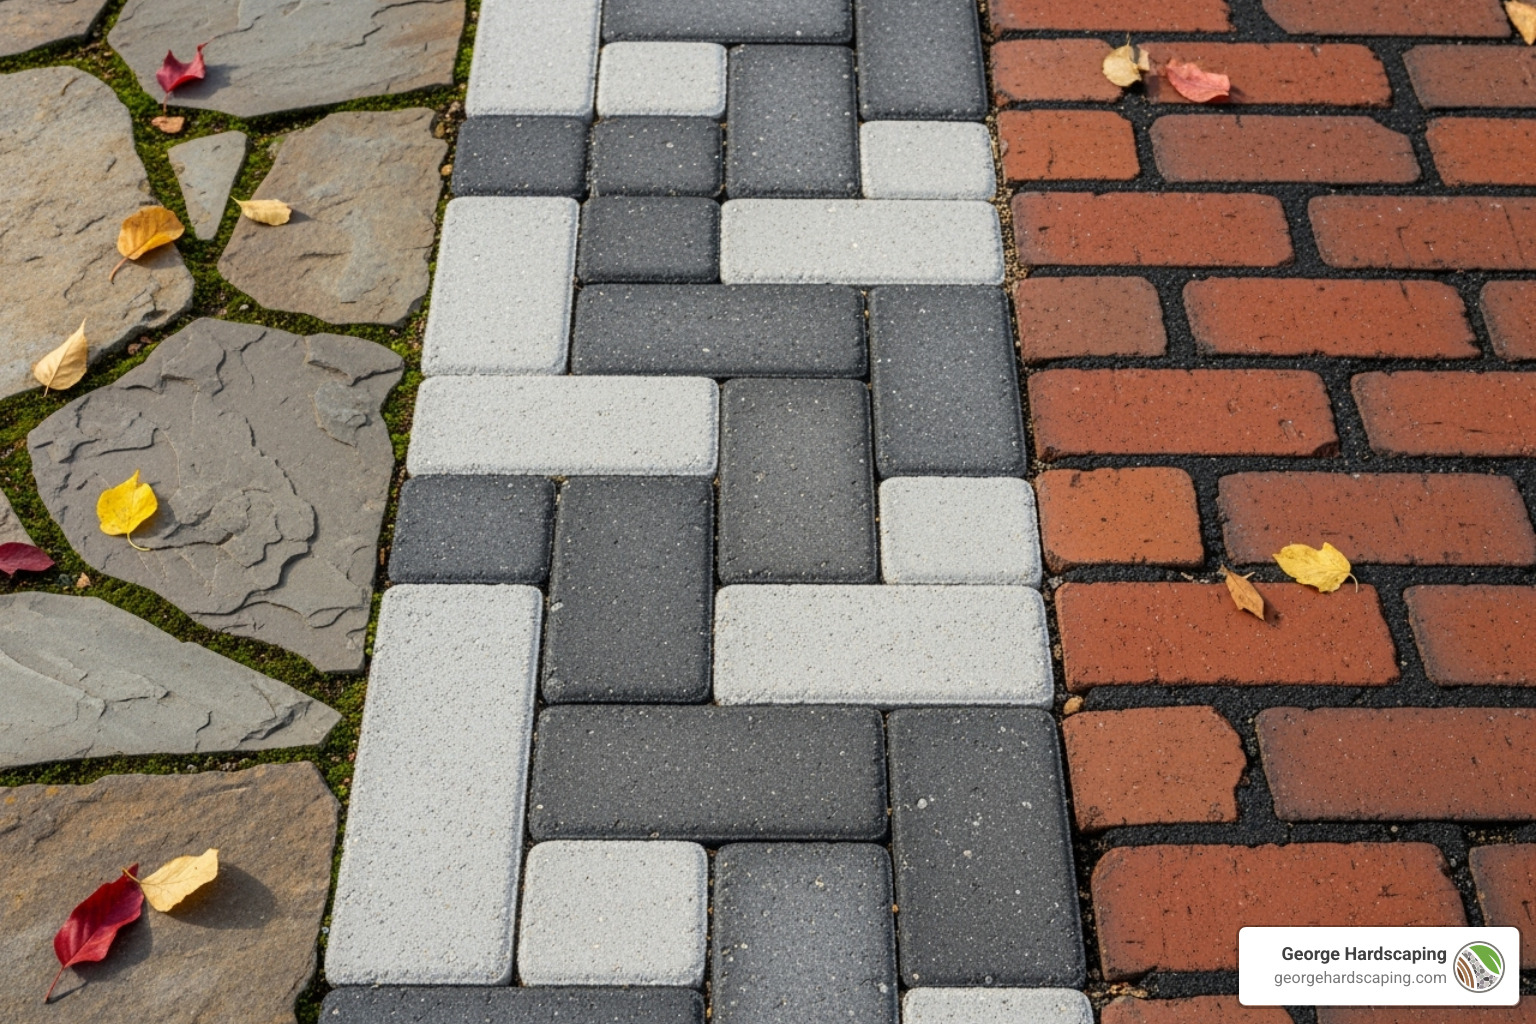
Choosing the right material is one of the most impactful decisions in walkway design. Your choice affects cost, durability, traction, maintenance, and overall style. In Essex County—where weather swings from hot summers to icy winters—performance is as important as appearance.
Three Top-Performing Categories
- Natural stone: Flagstone (irregular or cut), bluestone, and granite offer distinctive character and excellent durability. Dense stones with low absorption handle freeze–thaw cycles well and provide excellent traction in wet conditions. Explore our Flagstone Walkway Installation Service: https://georgehardscaping.com/flagstone-walkway-installation-service/.
- Concrete pavers: Modern interlocking pavers come in an extensive range of colors, sizes, and textures. They allow for creative patterns like running bond, basket weave, or herringbone, and damaged units can be replaced individually.
- Clay brick pavers: Timeless and warm, brick fits both traditional and modern homes. Quality clay pavers age beautifully and can achieve a classic look with crisp borders.
Performance Considerations (What Pros Look For)
- Freeze–thaw resistance: In New England, dense materials and proper installation prevent spalling and cracking.
- Surface texture and slip resistance: Lightly textured finishes provide safe footing in rain and snow.
- Colorfastness and finish: Factory-colored pavers and natural stone hold color differently; select with your long-term look in mind.
- Thickness and interlock: Pedestrian pavers typically 2 3/8 in. (60 mm) thick; thicker units may be specified for mixed-use areas. Brick pavers are often 2 1/4 in. with tight sanded joints.
- Edge restraint: Paver systems require perimeter containment to maintain pattern integrity.
Industry Standards and Best Practices
- Interlocking concrete pavers are manufactured to rigorous standards (see ASTM standards referenced by the hardscape industry). For technical background and guidance, the trade association for the sector is a useful hub: https://www.masonryandhardscapes.org/.
- For stormwater benefits, permeable paver systems can be used to allow water to pass through into a prepared base rather than shedding to the surface. Learn more from the U.S. EPA: https://www.epa.gov/soakuptherain/soak-rain-permeable-pavement.
Comparing Your Options
- Pavers: $10–$30+ per sq ft installed ranges (project variables apply), 25–50+ year lifespan, medium maintenance (sweeping, occasional weeding, sealing optional), high design flexibility. See ideas: https://georgehardscaping.com/paver-stone-walkway-ideas/.
- Natural stone: $20–$60+ per sq ft installed ranges, 50–100+ year lifespan, low–medium maintenance (sweeping, occasional sealing).
- Brick: $15–$40+ per sq ft installed ranges, 50–100+ year lifespan, medium maintenance.
Note: Ranges above are based on internet averages and not George Hardscaping quotes. For a tailored figure, see our guide on How Much a Paver Walkway Costs: https://georgehardscaping.com/how-much-does-a-paver-walkway-cost/.
Sustainability and Stormwater
- Permeable pavers reduce runoff and can support local stormwater goals. They require specific base construction and joint infill stone rather than traditional sand. EPA resource: https://www.epa.gov/soakuptherain/soak-rain-permeable-pavement.
- Reclaimed brick or locally quarried stone reduce shipping impacts.
When in doubt, build for longevity. Premium materials with correct installation often cost less over the life of the walkway than budget options that fail early. We’re glad to recommend the right structure and finish for your site and style.
Strong CTA: Have a material in mind? Let’s confirm it’s the best match for your site conditions and budget. Start here: https://georgehardscaping.com/walkway-paving-contractor/.
Step 4: Creative Walkway Design Tips for Visual Appeal
With the fundamentals in place, you can focus on the artistic elements that give your walkway its unique character. Thoughtful choices about shape, pattern, and edging transform a functional path into a standout landscape feature.
Shape and Form: Straight vs. Curved Paths
- Straight walkways: Convey formality, order, and elegance. Perfect for classic architecture where aligned axes reinforce symmetry. Add interest with a contrasting border, scoring joints, or subtle widening near the entry.
- Curved walkways: Create a relaxed, naturalistic feel. Gentle S-curves can slow the approach, expand perceived space, and reveal the destination gradually. Keep curves generous; tight, kinked bends feel awkward and can encourage cutting corners.
Design Principles that Elevate the Experience
- Proportion and rhythm: Vary path width slightly at features like planters, house numbers, mailboxes, or lighting nodes to create visual beats.
- Focal points: Align views to a front door, specimen tree, water feature, or garden sculpture. Curved routes can frame those focal points.
- Transitions: Where your walkway meets a driveway, patio, or steps, use a distinct border or soldier course to signal the change and protect edges from snow shovels and foot traffic.
Patterns and Edging Details
- Patterns: Herringbone offers outstanding interlock and a traditional feel; running bond reads clean and modern; basket weave creates a heritage look. Diagonal layouts can visually widen narrow runs.
- Mixed materials: Consider a natural stone field with a brick border or pavers with a cut-stone band. Material contrast adds depth and sophistication.
- Edging and restraint: Integrate a soldier course, concealed edge restraint, or a low masonry curb to keep patterns tight and crisp for the long term.
Regional Inspiration and Craftsmanship
In New England, where architecture ranges from Colonial to contemporary, material palettes and patterns can be tailored to match your home’s character. For examples of well-executed blends of shape, pattern, and edging, browse our local projects: https://georgehardscaping.com/paver-walkways-andover-ma/.
Idea to try: A subtle compass inlay or house-number inlay near the entry can add a bespoke touch without overwhelming the design.
Step 5: Integrate Your Walkway with Landscaping and Lighting
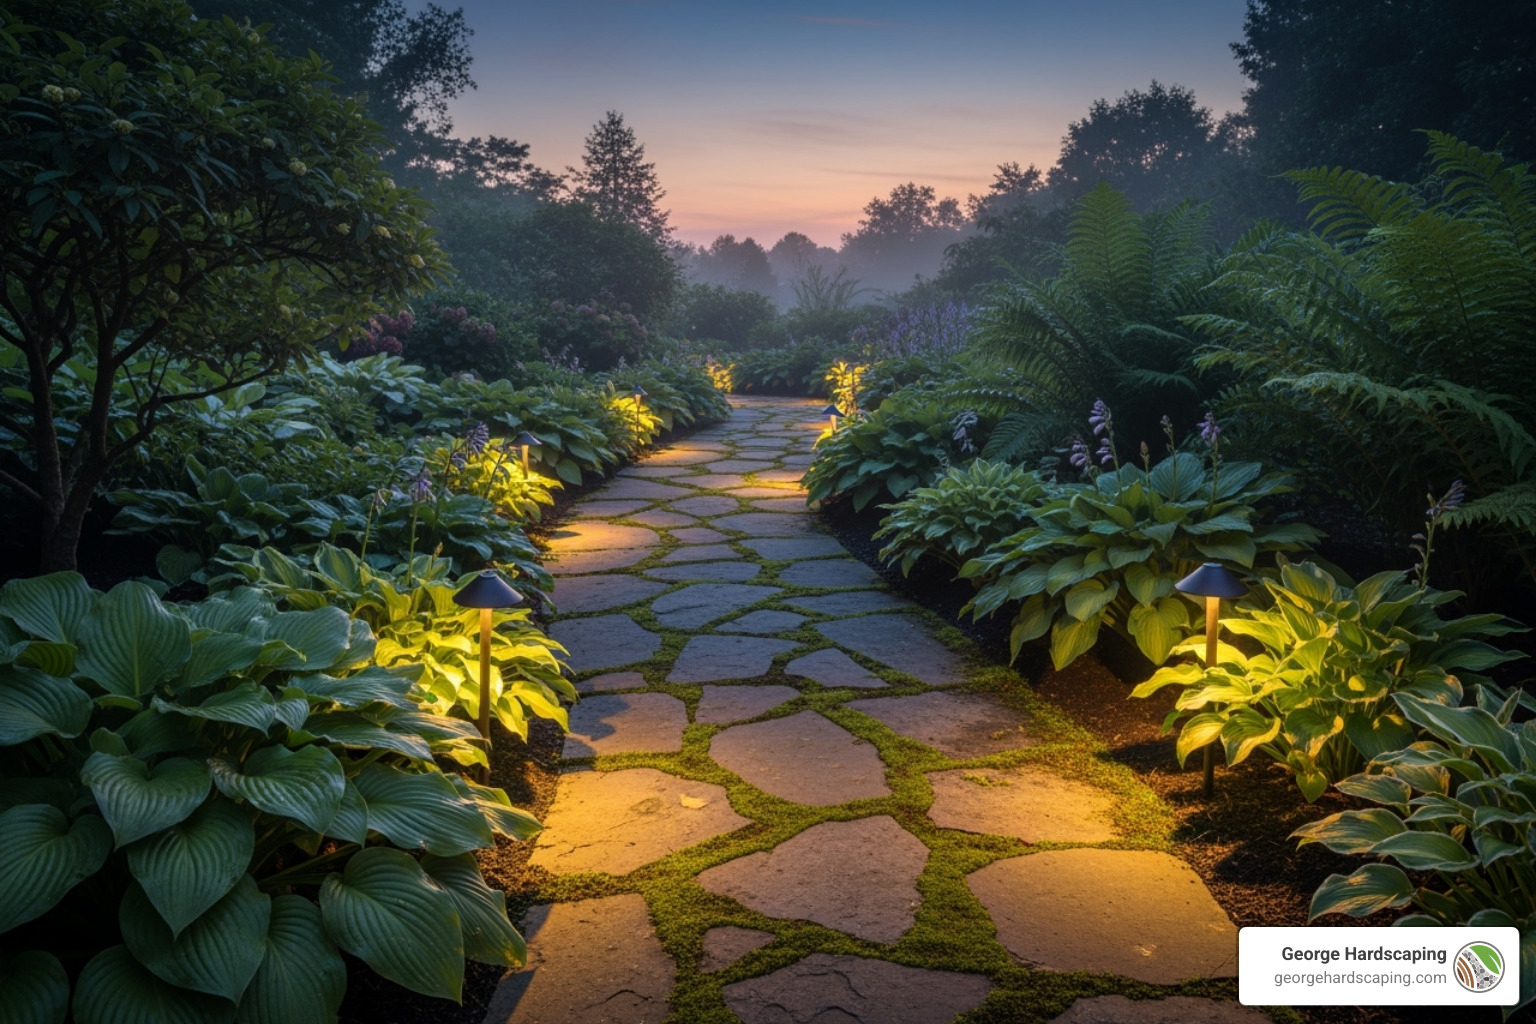
A great walkway doesn’t exist in a vacuum; it integrates seamlessly with the surrounding landscape and lighting. The most effective walkway design tips emphasize the harmony between the path, planting, and illumination. This integration transforms a simple route into an immersive experience.
Landscape Integration
- Border plants: Use low, layered plantings to define edges—hostas and ferns for shade; lavender, thyme, and dwarf grasses for sun. These soften hard lines, guide the eye, and offer seasonal texture.
- Groundcovers: Between stepping stones or in adjacent beds, creeping thyme, Irish moss, or low sedums blend hardscape and landscape.
- Right plant, right place: Choose species suited to your light, soil, and USDA plant hardiness zone (Massachusetts ranges roughly zones 5–7). Check the USDA plant hardiness zone map: https://planthardiness.ars.usda.gov/.
- Maintenance awareness: Avoid aggressive spreaders along tight paths. Plan for mulch or stone topdressing that won’t spill onto pavers.
- Irrigation: Keep drip lines at least a few inches off hard edges to avoid wetting the path and encouraging algae in shady areas.
- Sustainable planting: For regional best practices and plant selection guidance, see UMass Extension Landscape resources: https://ag.umass.edu/landscape.
Lighting for Safety and Ambiance
- Path lighting: Low-voltage LED path lights spaced to overlap pools of light reduce dark gaps. Aim beams onto surfaces rather than directly into eyes.
- Step and wall lights: Integrate downlights in step risers or along low walls to reveal elevation changes clearly.
- Downlighting: Mount fixtures in trees or overhangs for a soft, moonlight effect that highlights texture and form.
- Color temperature and glare control: Warm-white (2700–3000K) feels inviting; shield fixtures to prevent glare.
- Controls: Timers, photocells, and smart controllers add convenience and energy savings.
- Design standards: For lighting fundamentals and safety-oriented design practices, consult the Illuminating Engineering Society (IES): https://www.ies.org/.
Why Low-Voltage LED Beats Solar
- Consistency: Hardwired LED delivers reliable brightness in all seasons and weather.
- Flexibility: Transformer-based systems allow zoning, dimming, and future expansion.
- Longevity: Quality fixtures and lamps last for years with minimal maintenance.
CTA: Want a cohesive plan that blends walkway, plantings, and lighting into one polished design? Request a consultation: https://georgehardscaping.com/request-estimate/.
Step 6: Avoid Common Mistakes and Plan for Maintenance
Even the best design can fail without proper installation and care. Avoiding common pitfalls and committing to a simple maintenance routine will protect your investment and keep your walkway beautiful for decades. As a leading Walkway Paving Contractor in Essex County, MA, we’ve seen what works and what doesn’t: https://georgehardscaping.com/walkway-paving-contractor/.
Common Design and Installation Pitfalls
- Improper base preparation: The #1 cause of failure is an underbuilt or poorly compacted base. Depth depends on site soils and load; in New England, a typical pedestrian walkway might require 6–8 inches of compacted, open-graded base plus a bedding layer—more where soils are weak or drainage is poor. See our Stone Walkway Installation Guide: https://georgehardscaping.com/stone-walkway-installation-guide/ and Base for Flagstone Walkway: https://georgehardscaping.com/base-for-flagstone-walkway/.
- Skipping geotextile where needed: Separation fabric can prevent base stone from migrating into subsoil in clay or loam conditions, preserving the base’s structural thickness.
- Poor drainage planning: Without a consistent 1–2% surface slope or subsurface drainage, you’ll see pooling, ice, and material degradation. Consider perimeter swales or French drains where grading alone can’t move water.
- Weak edge restraint: Pavers rely on solid, continuous edge restraint to prevent spread. Borders or concealed restraint systems are not optional.
- Choosing the wrong material: Not all stone is suitable for freeze–thaw cycles. Vet materials for density and durability before purchase.
- Awkward geometry: Sharp turns, pinch points, or sudden slope changes interrupt flow and encourage shortcuts across the lawn.
Professional Process Highlights
- Subgrade prep: Excavate uniformly, remove organics, ensure subgrade is uniformly compacted.
- Base installation: Place base in lifts and compact thoroughly with proper moisture; verify final elevations to achieve the desired slope.
- Bedding layer: Set pavers or stone over a consistent bedding layer; screed for a flat, even surface.
- Laying and jointing: Maintain tight, consistent joints suited to the material. For pavers, sweep in polymeric sand, activate per manufacturer guidance, and protect from rain until set.
- Sealing: Select breathable, high-quality sealers compatible with your materials and climate.
For broader technical background and standards that inform these practices, consult the national masonry and hardscapes association: https://www.masonryandhardscapes.org/.
Your Essential Maintenance Routine
- Regular sweeping: Keep debris out of joints to reduce weeds and staining.
- Prompt weed removal: Pull small weeds before they establish; polymeric sand greatly reduces joint germination. See our how-to: https://georgehardscaping.com/how-to-install-stone-walkway/.
- Periodic washing: Gentle power washing (wide fan tip) once or twice a year refreshes surfaces. Avoid high-pressure, close-range blasting that can erode joints.
- Sealing schedule: Depending on exposure and preference, seal every 2–4 years to resist stains, enhance color, and shed water.
- Joint sand top-ups: For paver walkways, check and replenish polymeric joint sand where needed.
- Winter care: Use calcium chloride-based de-icers labeled safe for concrete, stone, and vegetation; avoid rock salt where possible. Apply sand for traction during storms. For a science-based overview of de-icers, see University of Minnesota Extension: https://extension.umn.edu/maintenance/choosing-deicers.
- Snow removal techniques: Use plastic shovel edges or blower paddles to avoid chipping borders. Shovel along the length of the path to avoid prying at edges.
When to Call a Pro
- Settlement or heaving: If sections become uneven after frost, professional lifting and relaying may be needed.
- Drainage changes: After major storms or yard projects, reassess grading and drainage.
- Sealant troubleshooting: If a DIY sealer turns hazy or traps moisture, we can identify the fix and timing for reapplication.
Explore more in our Building a Walkway resource: https://georgehardscaping.com/building-a-walkway/.
Frequently Asked Questions about Walkway Design
What is the best low-maintenance walkway material?
Concrete pavers and high-quality natural stone (like granite or bluestone) top the list. Dense, durable materials with lightly textured surfaces resist weathering and provide traction. Set with polymeric sand for fewer weeds and easier upkeep. Proper installation is the biggest maintenance reducer.
How wide should a front walkway be?
A primary front walkway should be a minimum of 48 inches (4 feet) wide for comfort and accessibility. Consider 54–60 inches for very active households, snow shoveling efficiency, or where luggage and strollers are common.
What slope should a walkway have?
Target a 1–2% slope for drainage without discomfort. Keep changes gradual and consistent. Where steeper grades exist, incorporate properly proportioned steps and intermediate landings.
Are permeable pavers a good idea in Massachusetts?
Yes—when designed and installed correctly. Permeable systems reduce runoff and can recharge groundwater. They use specific base materials and joint stone, not sand. Learn more from the U.S. EPA: https://www.epa.gov/soakuptherain/soak-rain-permeable-pavement.
What patterns are strongest for pavers?
Herringbone (laid at 45 or 90 degrees) provides excellent interlock and is often preferred for high-traffic or vehicle-adjacent areas. Running bond suits modern aesthetics and pedestrian applications; basket weave offers classic charm.
Do I need lighting on a short path?
Short paths still benefit from lighting at transitions—door landings, step treads, and turns. Low-voltage LED with warm color temperature (2700–3000K) looks inviting and improves safety. For lighting fundamentals and best practices, see the IES: https://www.ies.org/.
What’s the typical timeline for a new walkway?
Small projects can be completed in a few days once materials are on site; larger or sloped projects with steps and drainage details may take a week or more. Weather and lead times for stone affect scheduling.
How much does a walkway cost?
Cost varies with materials, base requirements, access, and design complexity. Consult our detailed primer on paver walkway costs to get oriented: https://georgehardscaping.com/how-much-does-a-paver-walkway-cost/.
How do I pick materials that won’t be slippery in winter?
Choose lightly textured pavers, split-face or thermal-finished stone, or brick with sand-molded textures for grip. Avoid highly polished stone outdoors in cold climates.
Can you replace my cracked concrete with pavers or stone?
Absolutely. We remove the existing slab, correct grades and drainage, install a proper base, and lay your chosen surface with robust edge restraint. See our Walkway Paving Contractor page to get started: https://georgehardscaping.com/walkway-paving-contractor/.
How do ADA guidelines apply to residential walkways?
Private homes aren’t strictly bound by ADA rules, but they offer excellent design targets for accessibility (gentle slopes, adequate widths, smooth transitions). Review guidance here: https://adata.org/.
What about landscaping—any plant do’s and don’ts?
Favor compact varieties that won’t overgrow the path. Keep taller shrubs back from the edge to maintain sightlines and snow clearing access. For local planting guidance, see UMass Extension: https://ag.umass.edu/landscape and confirm your USDA zone: https://planthardiness.ars.usda.gov/.
Do you provide design help?
Yes. We offer planning support from concept through material selection and lighting layout, ensuring safety, style, and long-term performance. Request a consult: https://georgehardscaping.com/request-estimate/.
Conclusion: Bring Your Dream Walkway to Life
Following these essential walkway design tips ensures you create a path that is both beautiful and built to last. From setting the right width and slope to selecting durable materials and integrating thoughtful lighting, each decision contributes to safety, comfort, and curb appeal.
In a region with real winters, experience matters. Our team plans drainage and base structure to handle freeze–thaw cycles, specifies materials for traction, and designs lighting for confidence at night. Whether your style is formal and symmetrical or natural and meandering, we craft walkways that feel right for your home—and hold up for decades.
- Explore service pages, ideas, and how-tos:
- Walkway Paving Contractor: https://georgehardscaping.com/walkway-paving-contractor/
- Building a Walkway: https://georgehardscaping.com/building-a-walkway/
- Stone Walkway Installation Guide: https://georgehardscaping.com/stone-walkway-installation-guide/
- How Much Does a Paver Walkway Cost?: https://georgehardscaping.com/how-much-does-a-paver-walkway-cost/
Strong CTA #1: Ready to start building a walkway that’s safe, stunning, and suited to New England? Request your consultation and estimate today: https://georgehardscaping.com/request-estimate/.
Strong CTA #2: Prefer to talk through materials, patterns, and lighting options first? Contact our team—your local experts in Essex County—for a no-obligation design review: https://georgehardscaping.com/walkway-paving-contractor/.
We proudly serve homeowners across the North Shore—from Beverly and Salem to Andover and Newburyport—delivering craftsmanship that stands up to Massachusetts weather and daily family life. Let’s create a walkway that gives your home the welcome it deserves.
