Outdoor Kitchens Installation: 5 Powerful Tips for Easy Success 2025
Transform Your Backyard: Why Outdoor Kitchens Are Worth It
Outdoor kitchens installation is a project that can transform your backyard into an entertainment hub while potentially increasing your home’s value. If you’re looking for quick guidance on installing an outdoor kitchen, here’s what you need to know:
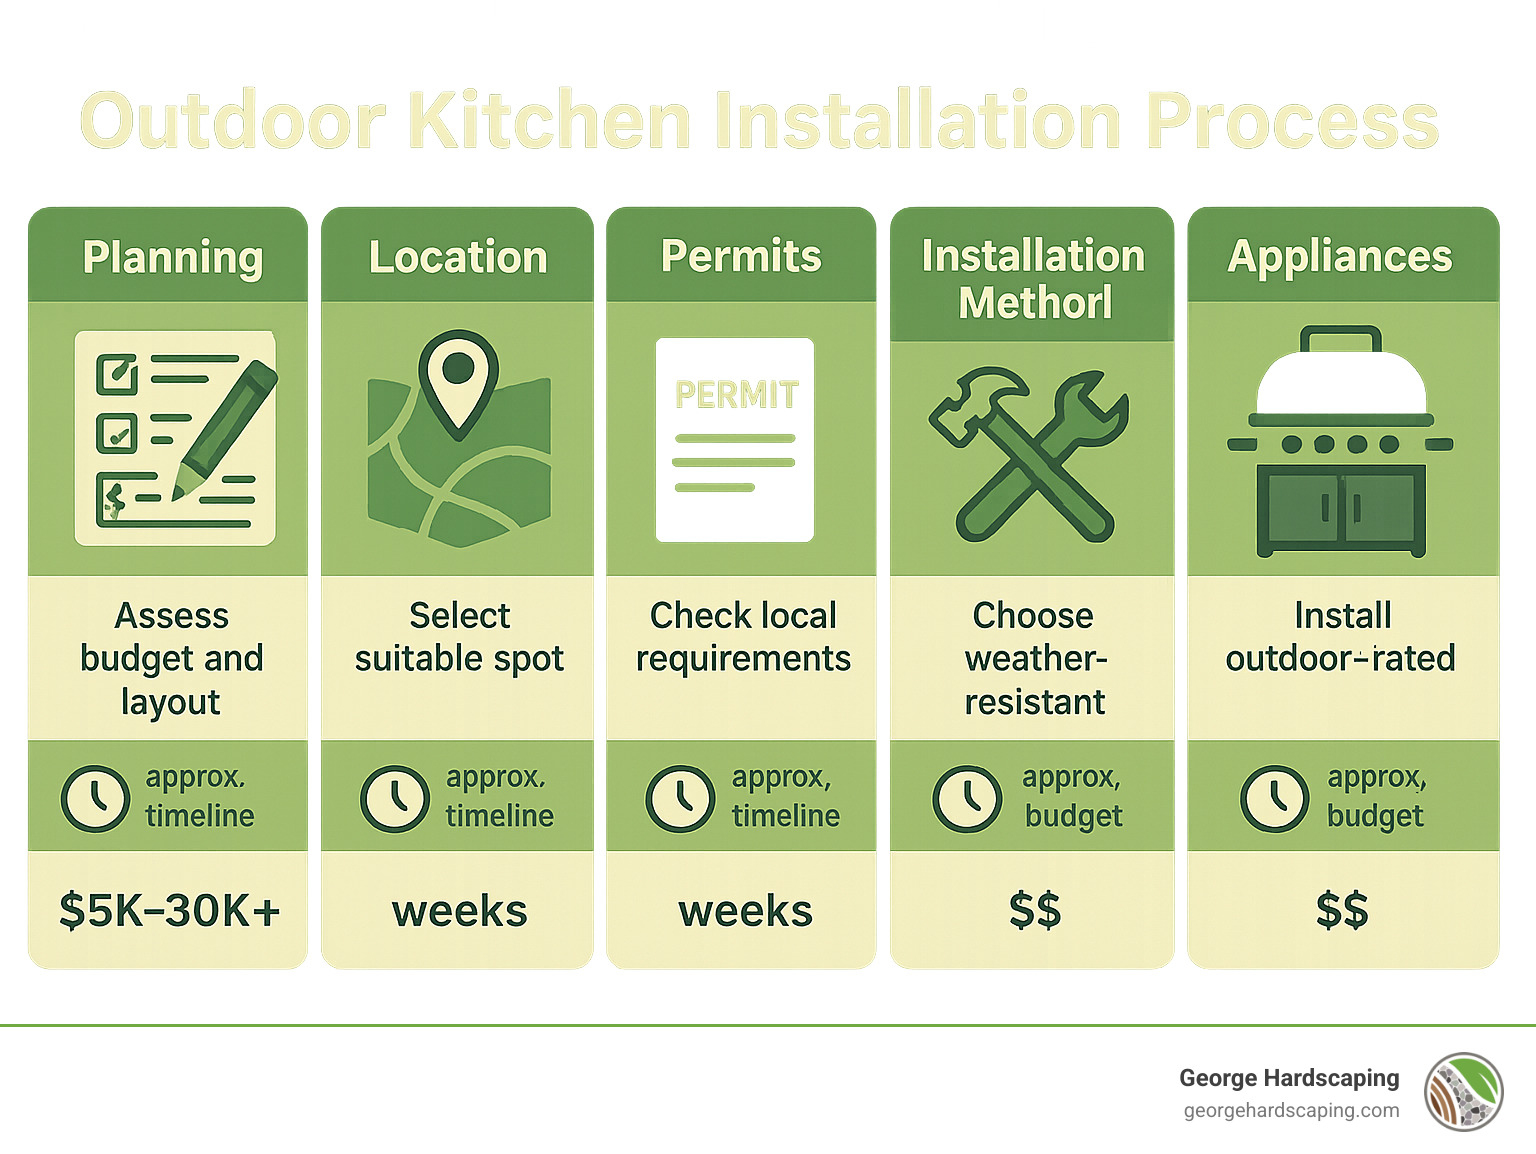
Quick Guide to Outdoor Kitchen Installation:
1. Planning: Determine your budget ($5,000-$30,000+), layout, and required utilities
2. Location: Choose a spot at least 10 feet from combustible structures with access to utilities
3. Permits: Check local codes for building, electrical, and plumbing requirements
4. Installation Method: Decide between DIY (saving 20-40% on labor) or professional installation
5. Materials: Select weather-resistant materials suitable for your climate
6. Appliances: Install outdoor-rated equipment with proper clearance and ventilation
Who can resist the aroma of food cooking on the grill as it wafts through the neighborhood? An outdoor kitchen extends your living space and creates a natural gathering spot for family and friends. Whether you’re considering a simple grill station or a fully equipped cooking area with refrigeration and sink, the right outdoor kitchen can become the crown jewel of your backyard.
According to the National Association of Realtors, homes with outdoor kitchens sell for higher prices and move faster than those without them. With ROI ranging from 55% to 200% depending on your location, it’s an investment that can pay off in both lifestyle improvement and property value.
The average outdoor kitchen costs around $16,145, but prices range from modest $5,000 DIY projects to luxury installations exceeding $30,000. Your specific costs will depend on size, materials, appliances, and whether you tackle the project yourself or hire professionals.
Before you get ahead of yourself, there’s a lot to consider: layout options, utility requirements, material durability, and safety codes. But don’t worry—even if you’re not particularly handy, there are options from movable units to ready-to-assemble kits that make installation straightforward.
Outdoor Kitchens Installation definitions:
– adding a sink to outdoor kitchen
– installing stone veneer on outdoor kitchen
– installing blackstone griddle in outdoor kitchen
Outdoor Kitchens Installation 101: Types, Benefits & Costs
Ready to transform your backyard into a culinary oasis? Let’s explore your outdoor kitchens installation options. Whether you’re dreaming of a simple grilling station or a chef-worthy outdoor cooking space, understanding the basics will help you make informed decisions.
Most homeowners choose from three main outdoor kitchen types:
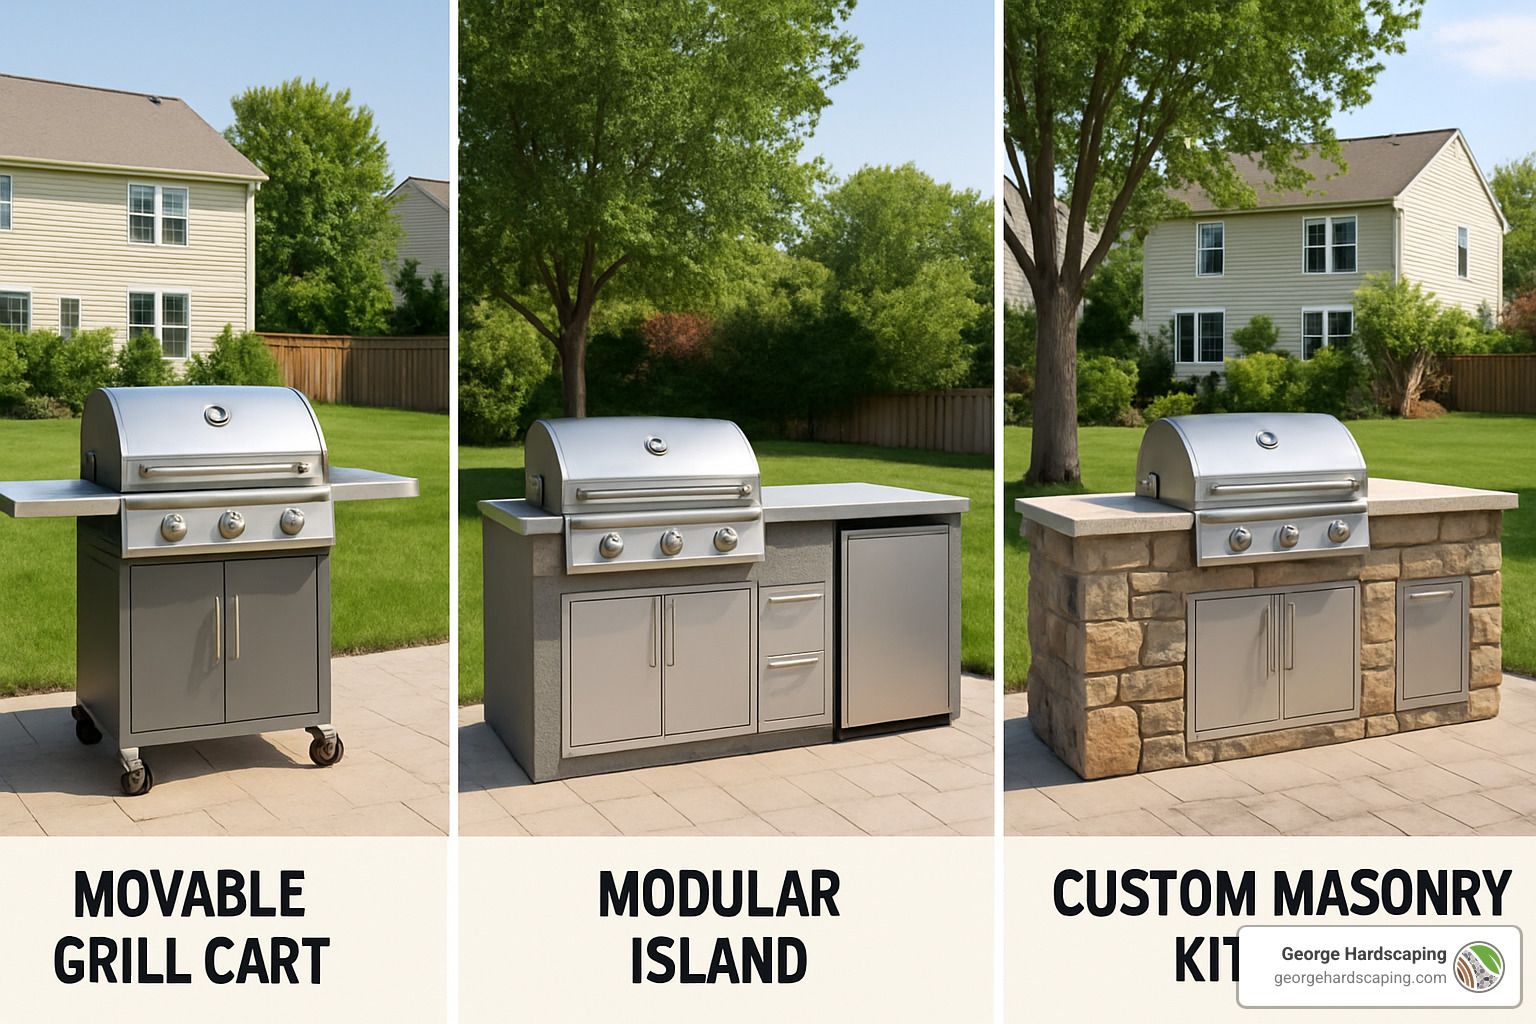
Movable kitchens offer flexibility and affordability, starting around $1,000-$3,000. These rolling carts or portable grill stations can be repositioned at will—perfect if you’re renting or not quite ready for a permanent installation. They’re also ideal for smaller spaces or homeowners who like to reconfigure their outdoor setup seasonally.
Prefabricated islands strike a balance between convenience and customization. Ranging from $3,000-$15,000, these ready-to-install units come either pre-assembled or in kit form. Many homeowners find they can complete installation in a weekend, making them perfect for the DIY enthusiast with some basic skills.
Custom masonry kitchens represent the gold standard in outdoor cooking spaces. Built from scratch using materials like stone, brick, or concrete block, these permanent installations typically range from $10,000-$50,000+. While they require the most extensive installation process, they also offer unlimited customization possibilities and best durability.
Most outdoor kitchens need about 20 feet of linear space, though clever L-shaped designs can fit essential appliances and counter space into an 8×8-foot area. This configuration works well for smaller yards while still accommodating a grill, sink, and compact refrigerator.
Why an Outdoor Kitchen Beats a Stand-Alone Grill
“Since installing our outdoor kitchen, we’re out there several times a week, even in early spring and late fall,” one Essex County homeowner told us. This isn’t surprising when you consider the advantages over a simple grill.
An outdoor kitchens installation effectively adds usable square footage to your home by creating a functional outdoor room. You’ll have everything at your fingertips when entertaining, eliminating those constant trips back to the house for supplies or food prep.
Even in New England’s variable climate, a thoughtfully designed outdoor kitchen with proper coverage can extend your outdoor season significantly. Imagine enjoying your space from early spring through late fall instead of just during summer’s peak.
The cooking versatility alone justifies the investment for many food enthusiasts. Beyond basic grilling, you can incorporate pizza ovens, smokers, side burners, and warming drawers to expand your culinary horizons. And when it’s time to sell, that investment often pays off handsomely, with ROIs ranging from 55% to 200% depending on your location.
Cost Factors & Sample Budgets
When budgeting for your outdoor kitchens installation, several key factors will influence the final price tag:
Appliances typically consume 20-40% of your budget. Entry-level built-in grills start around $1,000-$3,000, while mid-range options with side burners run $3,000-$6,000. High-end grill stations can easily exceed $7,000-$15,000. Other popular additions include refrigerators ($500-$5,000) and pizza ovens ($1,500-$9,000).
Utilities installation can significantly impact costs. Running gas lines typically costs $500-$2,000, water and drainage systems add another $500-$2,000, and electrical work ranges from $1,000-$3,000.
Materials quality and type greatly affect both aesthetics and longevity. Expect to pay $50-$200 per square foot for countertops, $5-$50 per square foot for veneer and facing materials, and $200-$1,000 per linear foot for outdoor-rated cabinetry.
Labor vs. DIY decisions can save you 20-40% of the total project cost. By taking the DIY route, you might pocket $1,500-$6,000 or more, depending on your project’s scope and complexity.
Permits and fees add $250-$2,000 to most projects. Deck or patio permits typically cost $220-$500, while plumbing permits range from $50-$500.
Here’s a sample budget breakdown for a mid-range L-shaped outdoor kitchen:
– Built-in 36″ grill: $3,000
– Small refrigerator: $1,000
– Sink and faucet: $500
– Countertops (15 sq ft): $1,500
– Cabinetry and structure: $3,500
– Veneer/facing: $2,000
– Utilities installation: $2,500
– Permits: $500
– Labor (if hired): $3,500
Total with professional installation: ~$18,000
Total DIY: ~$14,000
Note: These are average costs based on internet data and not actual costs for George Hardscaping. Your specific project may vary significantly based on your choices and local conditions.
According to Angi average cost data, most homeowners spend between $5,000 and $30,000 on their outdoor kitchen projects, with premium installations easily exceeding this range.
Plan & Design Like a Pro: Location, Permits, Utilities, Materials & Safety
Ready to start your Outdoor Kitchens Installation project? Hold that thought! A little planning now will save you major headaches later. Let’s walk through the essentials of creating an outdoor kitchen that’s both beautiful and functional.
Finding the perfect spot for your outdoor kitchen isn’t just about aesthetics—it’s about safety first. Most building codes require at least 10 feet of clearance between your grill and anything that could catch fire. This includes your home’s siding, wooden fences, and those lovely shade trees with low-hanging branches.
Think about your yard’s natural microclimate too. Is that corner of your patio a wind tunnel every afternoon? Does the spot you’re considering turn into a solar oven during summer cookouts? Nobody wants to flip burgers while sweating through their shirt! Consider how the sun tracks across your yard and whether you’ll need to add some shade structures.
Your outdoor kitchen will need proper utilities, which is where many DIYers hit their first roadblock:
Electrical needs include GFCI-protected outlets on dedicated circuits. You’ll want these for appliances, lighting, and that all-important blender for margaritas!
Gas connections require proper shutoff valves whether you’re running a natural gas line or setting up propane tanks. This isn’t a DIY job unless you’re a licensed professional.
Water supply and drainage must comply with local codes. You can’t just let sink water run into your lawn—proper drainage solutions are essential.
When choosing materials for your outdoor kitchen structure, consider this comparison of common framing options:
| Frame Material | Pros | Cons | Best For |
|---|---|---|---|
| Steel/Metal | Durable, non-combustible, precise dimensions | Can rust in coastal areas, higher cost | Long-term installations, professional builds |
| Concrete Block | Extremely durable, fire-resistant, stable | Heavy, requires skilled masonry, less flexibility | Permanent installations, load-bearing needs |
| Wood | Affordable, easy to work with, DIY-friendly | Susceptible to rot/insects, fire concerns, shorter lifespan | Budget projects, temporary installations, DIY |
Our Essex County climate throws everything at your outdoor kitchen—freeze-thaw cycles, coastal salt exposure (especially in Marblehead and Gloucester), and dramatic temperature swings. Choose materials that can handle these challenges for years of trouble-free enjoyment.
Outdoor Kitchens Installation Location Checklist
When scouting your yard for the perfect kitchen location, consider these crucial factors:
Find a spot that’s protected from strong winds but offers enough natural ventilation to carry smoke away. Balance shade and sun exposure for comfort during peak cooking hours.
The sweet spot for distance from your indoor kitchen is about 15-20 feet—close enough to shuttle forgotten ingredients but far enough that your outdoor space feels distinct.
If you’re considering a deck installation, be aware that outdoor kitchens are heavy—typically 200-400 pounds per linear foot! Your deck will likely need structural reinforcement. A ground-level patio often provides a simpler foundation solution.
Position your kitchen where you can see it from inside your home, which is handy for monitoring both the cooking process and your guests. Ensure there’s enough space (minimum 8-foot diameter) for comfortable movement around the cooking area.
Don’t forget to orient seating to capture your yard’s best features or views. After all, the ambiance is half the appeal of outdoor dining!
Many of our clients throughout Essex County find that Custom Patios provide the ideal foundation—both beautiful and structurally sound enough to support heavy appliances and countertops.
Permit & Code Essentials
I know, I know—permits aren’t the exciting part of your project. But skipping this step can lead to fines, removal orders, or problems when selling your home. Here’s what you might need:
Building permits are required for permanent structures, especially those with roofs or attached to your home. Electrical permits cover any new wiring work. Plumbing permits handle water supply and drainage installations. And gas line permits are essential for natural gas connections—this is non-negotiable for safety reasons.
Expect to pay between $250-$2,000 for permits, depending on your location and project scope. Towns across Essex County—from Beverly to Salem to Newburyport—have different requirements and fee structures, so check with your local building department early in your planning process.
All electrical components must be UL-rated specifically for outdoor use. Those GFCI outlets aren’t just a good idea—they’re required by code. Gas lines need proper shutoff valves installed by licensed professionals, and proper ventilation is essential for any covered cooking area.
For specific electrical safety standards, UL electrical safety provides comprehensive information that can help ensure your installation meets code requirements.
Budget & Timeline for Outdoor Kitchens Installation
Be realistic about your timeline—outdoor kitchens aren’t weekend projects unless you’re going with a simple prefab unit. Here’s a typical schedule:
Your design phase will take 2-4 weeks as you conceptualize your layout, research materials and appliances, and gather quotes from contractors if you’re not going DIY.
The permitting process typically runs 2-6 weeks from application submission through review to final approval. This varies widely by municipality, so build in some buffer time.
Ordering and delivery can be the most frustrating wait—2-8 weeks for appliances (often with surprisingly long lead times), custom countertops, and specialty materials. Order early!
The actual construction and installation takes 1-6 weeks depending on complexity: site preparation (1-3 days), foundation/base construction (2-5 days), utility installation (1-3 days), appliance and countertop installation (1-3 days), and finishing work (2-7 days).
Here’s a pro tip that could save you money: Plan your outdoor kitchen during the off-season (fall or winter). You’ll often find better pricing on materials and more contractor availability if you’re aiming for spring installation.
With careful planning and attention to these details, your Outdoor Kitchens Installation will result in a beautiful, functional space that meets safety standards and provides years of enjoyment—not to mention the significant boost to your property value!
Step-by-Step Guide: DIY vs Professional Outdoor Kitchens Installation
Whether you’re a weekend warrior excited to tackle a project or someone who prefers leaving it to the experts, understanding what goes into an Outdoor Kitchens Installation will help you make smarter decisions about your backyard change.
There are three main approaches when installing an outdoor kitchen, each with different skill requirements and time commitments:
Scratch-Built kitchens start with basic materials like concrete block or steel studs. This approach offers maximum customization but requires the most skill and time. Think of it as building a small house for your grill!
Ready-to-Finish (RTF) kits provide pre-made frames that you then finish with your chosen materials. It’s like getting the skeleton already assembled, and you just need to add the “skin.”
Ready-to-Assemble (RTA) modules come mostly pre-finished and snap together like adult Legos. These are perfect for DIYers who want results without months of weekend work.
No matter which route you choose, everything starts with a solid foundation. In our New England climate, where winter freeze-thaw cycles can wreak havoc on outdoor structures, a concrete footer or pad at least 4 inches thick is non-negotiable. I’ve seen too many beautiful outdoor kitchens develop cracks and shifts after just one winter because someone skipped this crucial step.
The basic installation process follows a logical sequence: prepare the site by clearing and leveling; pour your concrete base with proper drainage slope; run your utility lines; set and level your frames; apply cement board sheathing; cut precise openings for appliances; add your facing materials like stone or stucco; install countertops; place appliances; make final connections; and add finishing touches like cabinet doors and trim.
DIY Path: From Frame to Finish
If you’re rolling up your sleeves for this project, you’ll need some essential tools: a reliable tape measure and level (precision matters!), impact driver and drill, angle grinder with diamond blade for cutting stone, flat and notched trowels for mortar work, mixing buckets, and safety equipment to protect your eyes, hands, and lungs.
Materials for a typical DIY outdoor kitchen include cement board as your base layer, self-drilling lath screws, builder’s felt for weather protection, wire lath for mortar adherence, mortar mix, your chosen veneer materials, and composite shims for perfect leveling.
One technique that separates professional-looking stonework from amateur attempts is “back-buttering.” This involves applying mortar to both the wall and the back of each stone before placement. It might seem like overkill, but this approach creates a strong bond and prevents water from working its way behind your veneer—critical in our harsh Essex County winters.
Here’s a tip we use at George Hardscaping: Score your scratch coat of mortar with horizontal lines before it fully sets. This creates tiny “shelves” that give your veneer pieces something to grip onto for a stronger mechanical bond.
The DIY approach typically saves 20-40% on labor costs—potentially $1,500-$6,000 for an average outdoor kitchen. But be honest about your skills and available time. Even an experienced DIYer might spend 2-3 full weekends on a moderately complex outdoor kitchen. As one of our clients joked, “I saved $4,000 but aged 10 years in the process!”
When to Call the Pros
While there’s plenty you can tackle yourself, some aspects of Outdoor Kitchens Installation should be left to licensed professionals. This isn’t about skill—it’s about safety and legal requirements.
Always hire professionals for gas line installation and connections. An improperly installed gas line can lead to dangerous leaks. Similarly, electrical wiring and circuit installation requires proper knowledge of outdoor-rated components and code requirements.
Plumbing that connects to your home’s systems should be handled by a licensed plumber, especially if you’re installing a sink with drainage. And if your outdoor kitchen requires structural modifications to existing decks or patios, professional engineering might be needed to ensure everything is properly supported.
At George Hardscaping, we often recommend a hybrid approach for many of our Essex County clients: let us handle the foundation, utility rough-ins, and masonry work, while you tackle cabinet assembly and some finishing touches. This partnership approach often delivers the best balance of cost savings and professional results.
All completed work—especially gas and electrical—should be inspected and approved by your local building department before use. This step ensures both safety and compliance with building codes, and it can prevent headaches if you ever sell your home.
For more information about how we can help with your outdoor kitchen project, check out our Hardscaping Services page or contact us for a consultation. We’ve helped countless homeowners throughout the North Shore create outdoor cooking spaces that stand up to our unique New England conditions while delivering years of enjoyment.
Design, Materials & Safety Essentials
Creating an Outdoor Kitchens Installation is like choreographing a beautiful dance between form and function. Just as with indoor kitchens, the layout needs thoughtful planning to make cooking and entertaining flow naturally.
The time-tested “kitchen triangle” works wonderfully outdoors too. Position your grill, sink, and refrigerator in a triangle formation with no side longer than 10 feet. This creates an intuitive workflow that makes cooking a joy rather than a chore.
“When we designed our outdoor kitchen, placing the grill, sink and refrigerator in that triangle pattern made all the difference,” shares one Essex County homeowner. “Now I can prep, cook, and clean up without constantly crossing back and forth.”
You have several layout options to consider based on your available space:
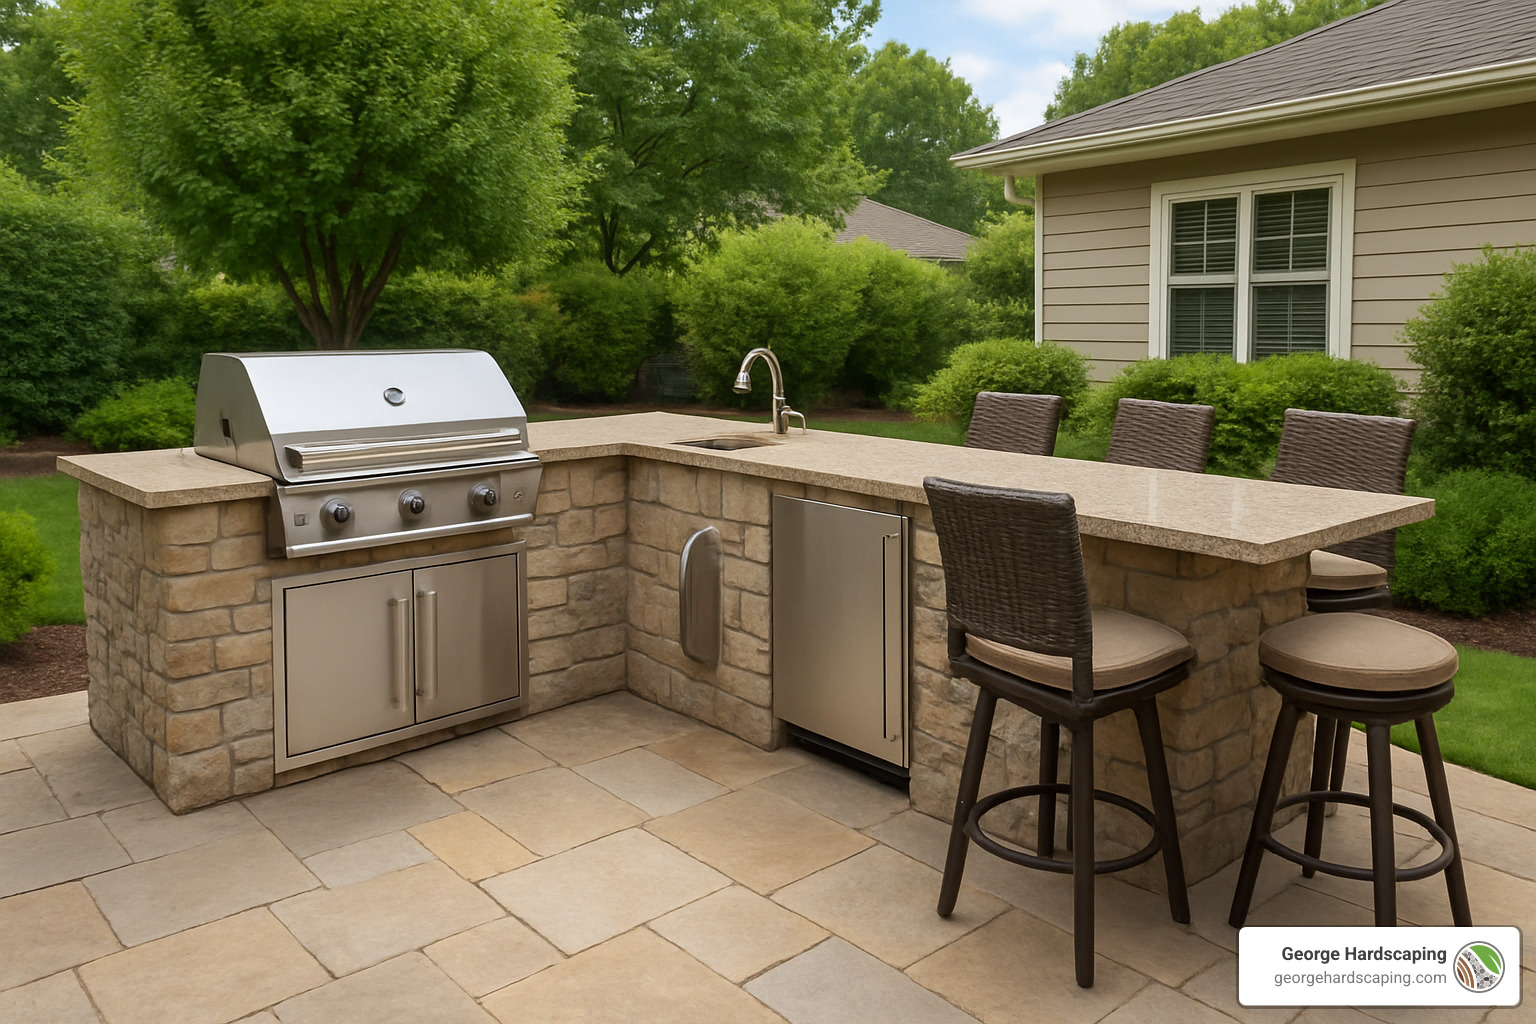
A straight-line layout works well in smaller spaces (at least 7 feet of linear space), while an L-shape offers more counter space and helps define your cooking zone (ideal for 8×8-foot areas). For those with more room, a U-shape provides maximum workspace and storage (typically needing at least 10×10 feet), and an island creates a central cooking station accessible from all sides.
Don’t forget to include some social elements in your design. Bar seating creates a natural gathering spot where friends can chat with you while you cook. An overhead structure like a pergola not only provides welcome shade but extends your outdoor cooking season. If your kitchen is covered, a vent hood becomes essential for removing smoke and cooking odors. And task lighting ensures you can see what you’re grilling even after the sun goes down.
Safety should never be an afterthought. Always keep a fire extinguisher mounted in an easily accessible spot. Use non-combustible materials around heat sources, maintain proper clearances around appliances, and install slip-resistant flooring – especially important around water sources.
Countertops & Cabinets That Last Outdoors
New England’s weather can be tough on outdoor materials. Between coastal salt spray, freezing winters, and humid summers, your Outdoor Kitchens Installation needs materials that can withstand the elements.
For countertops, granite remains the champion choice. It handles extreme heat, resists staining, and stands up to weather beautifully – though it does need annual sealing to maintain its protection. Concrete countertops offer unlimited design possibilities and can be colored to match any aesthetic, but like granite, they require yearly sealing. Porcelain has become increasingly popular as it’s virtually maintenance-free and comes in styles that mimic natural stone. Soapstone works well too, with its naturally non-porous surface, though it’s softer than granite.
“After five New England winters, our granite countertops still look brand new,” says a Beverly homeowner. “Just a quick annual sealing and they’re good to go for another year.”
What you should definitely avoid outdoors: laminate, wood, or indoor-grade quartz countertops. None of these materials can withstand outdoor conditions and will quickly deteriorate.
For cabinets and structures, stainless steel remains the gold standard for durability, though even 304-grade stainless may eventually show some corrosion in coastal areas like Gloucester or Marblehead. Marine-grade polymer cabinets offer complete weather resistance with zero maintenance. Concrete block creates an extremely durable base when properly finished, while aluminum provides a lightweight, rust-resistant alternative. Budget-conscious homeowners might consider a treated wood frame with weather-resistant cladding, though this requires more maintenance.
When shopping for outdoor cabinets, look for products with lifetime warranties specifically for outdoor use. Many manufacturers now offer specialized cabinetry designed to withstand the elements while maintaining their good looks.
Must-Have Appliances & Nice-to-Haves
Your appliance choices will define what’s possible in your outdoor kitchen. Start with the essentials, then add luxury items as your budget allows.
Every outdoor kitchen begins with a quality built-in grill – the centerpiece of your cooking area. Whether you prefer gas, charcoal, or a hybrid model, invest in the best quality you can afford. You’ll also need weather-resistant storage for utensils and supplies, and generous countertop space – aim for at least 24 inches on each side of cooking areas for food prep and plating.
From there, consider valuable additions that improve functionality. A side burner lets you prepare sauces and side dishes without running back inside. A sink makes cleanup infinitely easier (though it requires proper plumbing). An outdoor-rated refrigerator keeps ingredients and beverages close at hand, eliminating frequent trips indoors.
For those who love to entertain, luxury improvements take your outdoor kitchen to the next level. A pizza oven (wood-fired or gas) adds incredible versatility to your cooking options. A dedicated smoker creates mouthwatering slow-cooked barbecue. Warming drawers keep food at perfect serving temperature while you finish other dishes. And a beer tap or wine cooler transforms your space into the ultimate entertainment zone.
One critical note: all appliances must be specifically rated for outdoor use. Indoor appliances will quickly fail when exposed to the elements and may create serious safety hazards.
Safety First—Fire, Electrical & Ventilation
Safety forms the foundation of every successful Outdoor Kitchens Installation. Without proper attention to these details, your beautiful outdoor space could become dangerous.
Fire safety starts with smart positioning. Keep grills and cooking surfaces at least 10 feet from combustible structures including your home, wooden fences, and overhanging tree branches. Use non-combustible materials around and under heat sources. Install a fire extinguisher within easy reach of cooking areas, and for covered kitchens, consider a fire suppression system.
Electrical safety is equally important. All outlets must be GFCI-protected and weatherproof to prevent shock hazards. Major appliances should run on dedicated circuits, and outlets should be on separate circuits from lighting. Every electrical component should carry a UL rating specifically for outdoor use, and all systems must be properly grounded.
Proper ventilation prevents smoke buildup and reduces fire risk. For kitchens under roofs or pergolas, install appropriately sized vent hoods. Position vent plates based on the number and size of your cooking appliances, and ensure proper clearance above grills (always check manufacturer specifications). When planning your layout, consider prevailing winds to help naturally direct smoke away from seating areas.
Gas safety requires particular attention. Install automatic shut-off valves to prevent leaks, use flexible lines with proper fittings, and have all gas connections professionally tested before use. Always provide easy access to a manual shut-off valve in case of emergency.
For Essex County residents, especially those in coastal communities, we recommend additional corrosion protection for all metal components. The salt air that gives our region its charm can also accelerate wear on outdoor kitchen elements without proper protection.
With thoughtful design, durable materials, and proper safety measures, your outdoor kitchen will provide years of enjoyment and add significant value to your home. The investment in quality components pays dividends in longevity and performance, especially in our challenging New England climate.
Maintenance, Winterizing, Warranty & FAQs
Taking care of your outdoor kitchen isn’t complicated, but it does require consistent attention—especially here in New England where our seasons can be tough on outdoor installations. With proper maintenance, your alfresco cooking space will remain beautiful and functional for many years to come.

How Do I Maintain My Outdoor Kitchen Year-Round?
Your Outdoor Kitchens Installation requires different care as the seasons change. After each use, wipe down your countertops with appropriate cleaners—what works for granite might damage other materials, so check manufacturer recommendations. Don’t forget to clean your grill grates and burners regularly according to their specific care instructions.
For general cleaning, a garden hose usually does the trick, though occasionally you might need a low-pressure power washer for tougher spots. Just be careful not to damage grout or seals with excessive pressure.
Each season brings its own maintenance needs. In spring, you’ll want to inspect everything for winter damage and do a thorough cleaning before the cooking season begins. Summer requires regular cleaning and checking for unwelcome critters who might find your outdoor kitchen appealing. Come fall, start thinking about winterization while cleaning any gutters above your kitchen area.
Don’t forget your annual maintenance tasks: resealing countertops if needed (particularly important for granite and concrete), inspecting ventilation systems, checking utility connections, lubricating hinges, and touching up any damaged finishes. These simple steps will dramatically extend the life of your investment.
What’s the Best Way to Winterize in New England?
Essex County winters can be brutal on outdoor installations, making proper winterization crucial. Start by shutting off and draining all water lines to prevent freezing and potential pipe bursts. Turn off the gas supply at the source—never leave it connected during winter months.
Thoroughly clean all appliances before covering them with manufacturer-recommended covers. If possible, remove components like burners and store them in a dry location indoors. Your countertops might benefit from breathable covers if they’re exposed to direct snow or rain.
“The most common mistake I see homeowners make is forgetting to disconnect and store their propane tanks,” notes one of our installation specialists. “These should always come indoors for the winter.”
Proper drainage around your kitchen area is also essential to prevent ice damage. Consider how melting snow will flow and ensure it moves away from your installation rather than pooling around it.
For those of you in coastal communities like Marblehead, Swampscott, and Gloucester, the salt air requires extra protection measures. A light coating of marine-grade protectant on metal surfaces can prevent corrosion during storage.
Does DIY Void My Product Warranty?
This is one of our most frequently asked questions, and the answer isn’t always straightforward. For most appliances, warranties remain valid as long as you’ve followed the manufacturer’s installation specifications—regardless of who did the work. The key is proper installation, not who performed it.
Cabinetry is a different story. Some manufacturers specifically require professional installation to maintain warranty coverage. Countertops, especially those with seams, often fall into this category as well.
Prefabricated kitchen kits are typically designed with DIY installation in mind, so warranty concerns are minimal. Always review warranty documentation before starting your project—this small step can save significant headaches later.
Most residential outdoor kitchen cabinets come with impressive lifetime warranties, while commercial installations typically carry 5-year terms. Powder-coated finishes often have tiered coverage: fully covered for the first three years, then 50% covered for years three through five.
When in doubt, a quick call to the manufacturer or an authorized dealer can clarify warranty requirements before you begin your Outdoor Kitchens Installation.
Homeowners often ask us about the ideal size for their outdoor kitchen. While it depends on your specific needs, most functional spaces require at least 12 feet of linear space. The average installation runs closer to 20 feet, and U-shaped designs need at least 5 feet of clearance on all sides.
Building on top of existing pavers? You’ll need additional support. While pavers create a beautiful surface, they alone can’t support the substantial weight of an outdoor kitchen. A concrete footer placed directly beneath the structure is essential for proper support and longevity.
Safety considerations should guide your placement decisions. Keep your grill at least 10 feet from your house unless you have a proper vent hood directed away from the structure. This distance helps prevent fire hazards and keeps smoke from entering your home.
With proper material selection and regular maintenance, your outdoor kitchen will remain beautiful for years to come. Stone and brick kitchens with appropriate metal components offer the best resistance to rust—an important consideration for our coastal New England climate.
An Outdoor Kitchens Installation is an investment in your home and lifestyle. Taking the time to properly maintain it ensures you’ll enjoy countless meals and gatherings in your outdoor space for many years to come.
Conclusion
There’s something magical about cooking outdoors—the sizzle of food on the grill, fresh air all around you, and friends gathered nearby with drinks in hand. An Outdoor Kitchens Installation isn’t just a project; it’s an investment in a lifestyle that brings the joy of outdoor living right to your backyard.
As you plan your outdoor kitchen, think about how your family will actually use the space. Are you the neighborhood grill master who needs professional-grade equipment? Do you host summer parties where guests always congregate around the food? Or perhaps you’re dreaming of quiet family dinners under the stars? Let your specific needs guide your design choices rather than following trends that might not serve your lifestyle.
One piece of wisdom we’ve gained from years of installations across Essex County: always think ahead. Consider leaving space or installing utility rough-ins for features you might want to add in the future. Maybe you’ll start with just a grill island but eventually want to add a pizza oven or refrigerator. A little foresight during the initial build can save you significant hassle and expense down the road.
Throughout the North Shore, from the coastal homes of Marblehead to the historic properties in Salem, we’ve helped countless homeowners transform their outdoor spaces. What starts as a simple cooking area often becomes the heart of outdoor living—a place where memories are made and everyday meals become special occasions.
The beauty of an outdoor kitchen is how it bridges the gap between your home’s interior and the natural world around it. It extends your living space, creates a natural gathering spot, and transforms how you experience your property. In our New England climate, a well-designed outdoor kitchen can extend your outdoor season by months, letting you enjoy your investment from early spring through late fall.
For more information about combining an Outdoor Kitchen and Fireplace into a cohesive outdoor living area, reach out to George Hardscaping for a free consultation. Our team understands the unique challenges of New England weather and can help design an outdoor kitchen that stands up to our climate while complementing your home’s architecture.
The most successful outdoor kitchen isn’t necessarily the most expensive—it’s the one that fits your lifestyle, respects your budget, and makes the most of your available space. With thoughtful planning and quality construction, you’ll soon be enjoying the pleasures of alfresco cooking and entertaining in your own backyard paradise. Fire up the grill and enjoy!
