how to make mosaic stepping stones: 8 Easy Steps for Stunning Results 2025
Transform Your Garden with Mosaic Magic
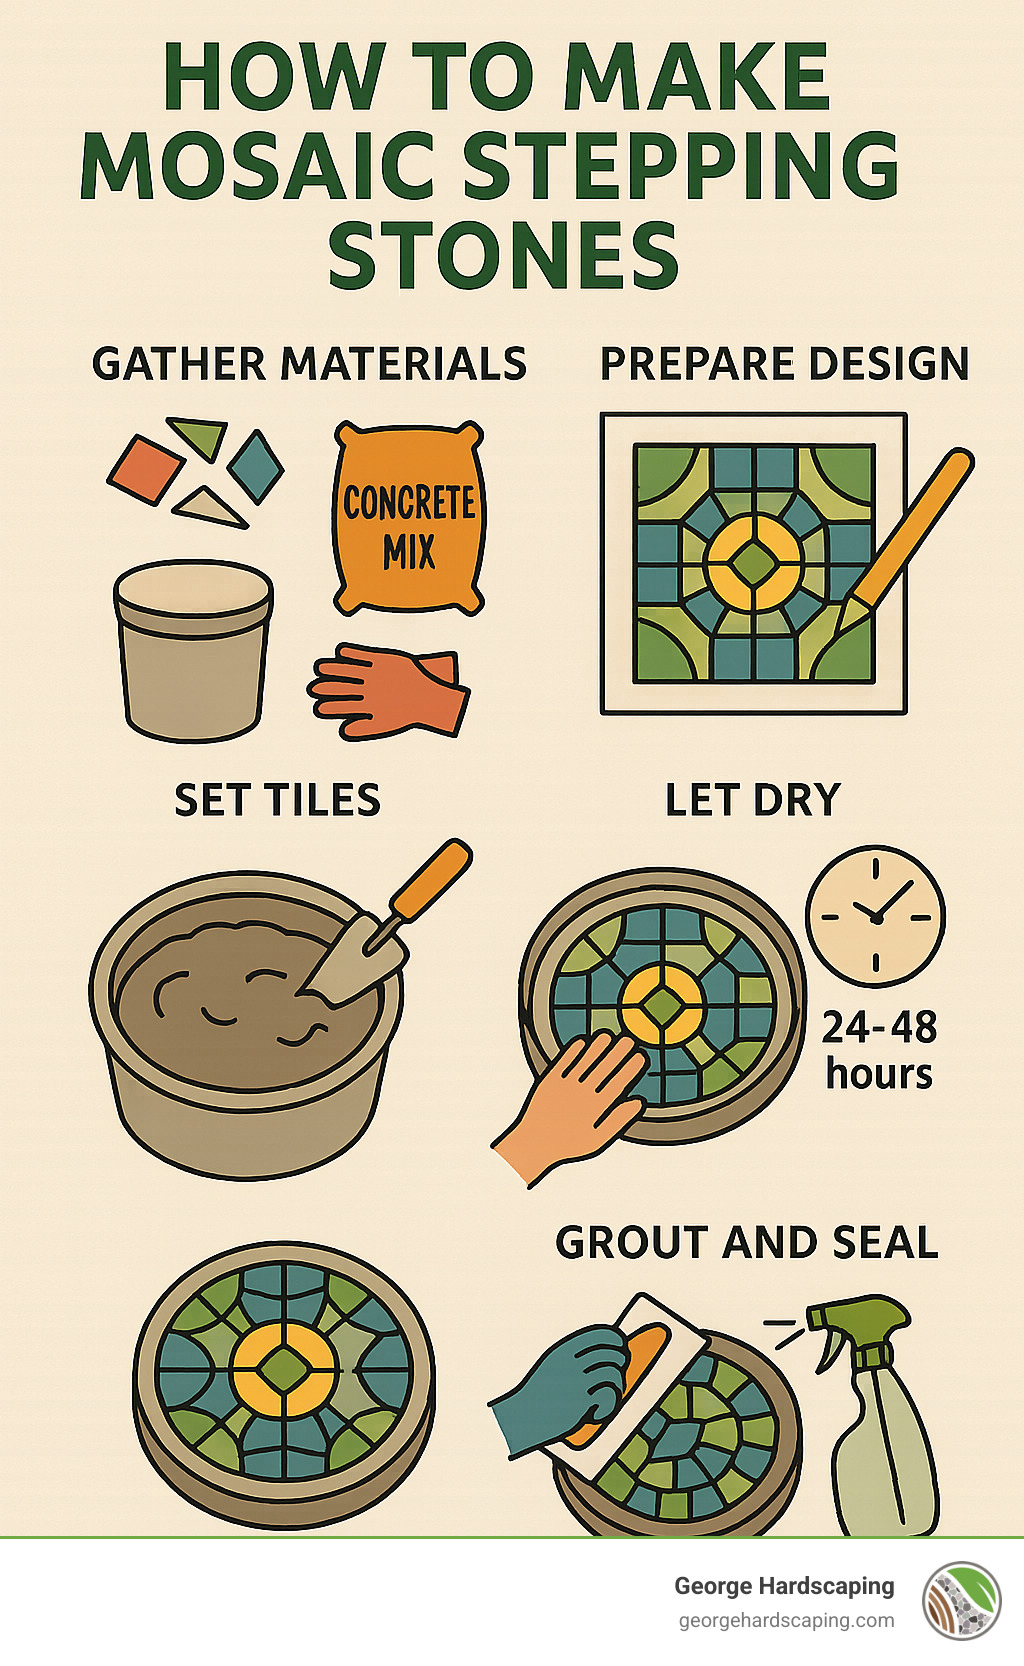
How to make mosaic stepping stones in 6 simple steps:
- Gather materials: Tiles/broken ceramics, concrete mix, mold, safety gear
- Prepare design: Sketch pattern or arrange pieces beforehand
- Mix concrete: Achieve peanut butter consistency (or use pre-cast paver)
- Set tiles: Press pieces into wet concrete or adhere to existing paver
- Let dry: Allow 24-48 hours before demolding
- Grout and seal: Fill gaps, clean surface, apply weatherproof sealer
Creating your own mosaic stepping stones is a wonderful way to add personality to your garden while recycling broken ceramics and glass. These decorative pathways combine art and function, turning ordinary garden spaces into vibrant showcases of color and design.
I started making stepping stones because I couldn’t bear to throw away my favorite vase after it broke,” shares one enthusiast whose sentiment echoes across the mosaic-making community. This creative repurposing not only saves beloved items from the landfill but transforms them into lasting outdoor art.
What makes mosaic stepping stones special is their accessibility—they’re suitable for both beginners and experienced crafters. With just a few basic supplies and some creativity, you can create durable garden accents that cost a fraction of store-bought versions. A full bag of concrete (about $6) can make 8-12 stepping stones, compared to commercial kits that cost $25-45 per stone.
Whether you prefer geometric patterns, floral designs, or even personalized stones with names or handprints, the possibilities are endless. And the best part? No two stones are ever exactly alike.
Ready to get started? The following sections will guide you through two proven methods: using pre-cast pavers or casting your own concrete base from scratch.
Why Make Mosaic Stepping Stones?
There’s something magical about creating with your hands, and mosaic stepping stones capture that magic perfectly. I’ve watched countless gardeners light up as they describe the joy of seeing their handcrafted stones nestled among their plants, catching the sunlight in unexpected ways.
“Mosaic sparkling in the sunshine makes you enjoy having it underfoot,” one enthusiast told me after creating a series of stones for her garden path. That’s the beauty of these colorful creations—they transform an everyday garden stroll into a moment of delight.
How to make mosaic stepping stones isn’t just about creating pretty garden decorations. These personalized works of art offer so much more:
Creative expression flows naturally as you arrange colorful pieces into patterns that reflect your personality. Each stone becomes a small canvas where you can experiment with color, texture, and design without pressure to be perfect.
Sustainable upcycling gives broken dishes and forgotten trinkets new purpose. That chipped teacup from your grandmother? Those broken tiles from your bathroom renovation? All can find new life in your garden instead of a landfill.
Family-friendly crafting brings everyone together. Children as young as five (with supervision) can participate, making this a wonderful multi-generational activity. One middle school art teacher shared, “I had a growing pile of leftover fired ceramics—finally I decided to smash them up with kids and make a mosaic!” Her story perfectly captures how this craft transforms waste into wonder while creating memorable experiences.
Cost-effective beauty is another compelling reason to make your own stones. DIY versions typically cost $10-15 each versus $25-45 for commercial versions based on internet data. A full bag of concrete (about $6) can yield 8-12 stepping stones, making this an affordable way to improve your landscape.
Mindfulness benefits emerge naturally from the focused, repetitive nature of setting tiles. Many crafters describe the process as meditative—a welcome respite from our digital world.
Benefits at a Glance
The versatility of mosaic stepping stones extends far beyond basic garden decor. They can become:
Unique walkways that guide visitors through your garden with personality and charm. In Essex County, where historic homes and gardens abound, these personal touches help maintain the character that makes our communities special.
Pollinator-themed stones featuring bees, butterflies, or hummingbirds can complement a wildflower garden. One gardener created a series of these near her vegetable garden, beautifully combining aesthetics with function by attracting beneficial insects.
Memorial stones offer a touching way to honor loved ones or commemorate special events. Incorporating meaningful items—a broken piece of favorite dishware or special trinkets—creates lasting tributes that bring comfort with each glance.
Personalized gifts that last for years make thoughtful presents for birthdays, housewarmings, or holidays. Unlike many handmade gifts that end up in a drawer, these become cherished parts of someone’s everyday environment.
As one enthusiast beautifully put it, “A beautifully constructed pebble mosaic in a world of asphalt and gray concrete captures attention and admiration.” In our increasingly standardized world, these handcrafted elements bring personality and warmth to outdoor spaces that mass-produced items simply cannot match.
Materials, Tools & Safety Gear Checklist
Ready to start your mosaic stepping stone trip? Let’s gather everything you’ll need for a successful project. When I made my first stone, I was surprised by how common most of these items are – you might already have many of them around your home!
Essential Materials:
Your mosaic stepping stone begins with a good foundation. You’ll need either pre-cast concrete pavers or concrete mix (Quikrete works beautifully). For adhesive, thin-set mortar is perfect when working with pre-cast pavers, while ready-mix concrete serves dual purposes as both base and adhesive when casting from scratch.
The fun part comes with choosing your decorative elements – glass tiles create vibrant colors, ceramic pieces offer texture, while pebbles, marbles, and shells add natural charm. Don’t forget sanded grout specifically rated for outdoor use (it comes in various colors to complement your design).
If you’re casting your own stones, you’ll need molds – cake pans and plastic plant saucers work wonderfully as budget options. A little petroleum jelly or cooking spray prevents sticking, and wire mesh adds crucial reinforcement. Finally, a quality penetrating stone sealer protects your creation from New England’s challenging weather.
Tools:
Creating mosaics requires some basic tools. For mixing, gather a bucket, trowel, and mixing stick (or a drill with mixer attachment for larger batches). Cutting tools like tile nippers and glass cutters help shape your materials precisely.
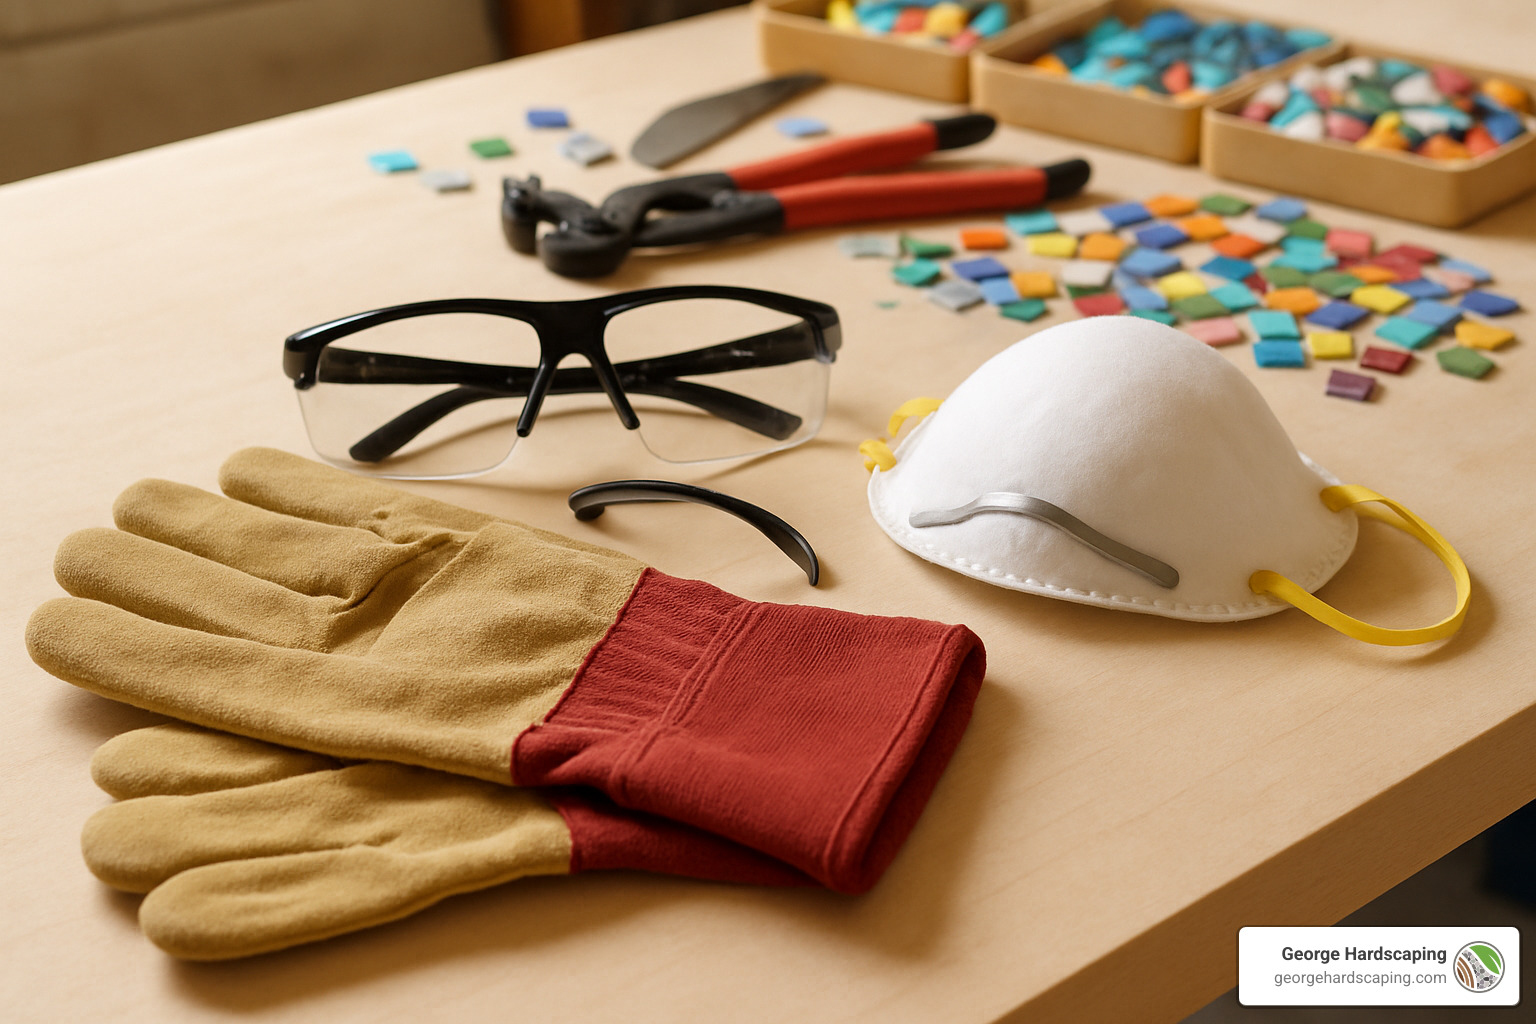
Safety gear is non-negotiable – heavy-duty gloves protect your hands, safety glasses shield your eyes, and a dust mask prevents inhalation of harmful particles. For application, you’ll want a notched trowel (3/16-inch works well), rubber spatula, and grout float. Finish your supply list with cleaning essentials: sponges, an old toothbrush, soft cloths, and a water bucket.
Material Comparison Table
| Material | Durability | Freeze-Thaw Resistance | Slip Resistance | Cost | Ease of Use |
|---|---|---|---|---|---|
| Glass Tiles | Excellent | Excellent (non-porous) | Poor (unless textured) | $$$$ | Moderate |
| Ceramic Tiles | Good | Fair (check if frost-resistant) | Good | $$ | Easy |
| Porcelain Tiles | Excellent | Excellent | Good | $$$ | Moderate |
| Pebbles/Stones | Excellent | Excellent | Excellent | $ | Easy |
| Marbles | Good | Good | Poor | $$ | Easy |
| Broken China | Fair | Poor-Fair | Good | Free-$ | Easy |
“Glass tiles are non-porous and therefore resistant to freeze-thaw damage,” explains one expert mosaic artist I consulted. This quality makes them particularly valuable for withstanding our harsh New England winters. While ceramic pieces may be easier to work with, they can be more vulnerable to cracking during freeze-thaw cycles unless specifically rated for outdoor use.
Sourcing & Budget Tips
Creating beautiful mosaic stepping stones can be surprisingly affordable. I’ve found thrift stores to be treasure troves for inexpensive plates and ceramics – often less than $1 each. Your kitchen likely has potential molds like cake tins or plastic containers, and a single 60-80 pound bag of premixed dry mortar (about $10) provides enough base for multiple stepping stones.
Check with local tile shops for discontinued samples or remnants – they’re often happy to give these away or sell them at steep discounts. Nature offers free materials too – interesting pebbles, shells, or sea glass add unique character to your designs.
“A $6 bag of concrete can make about 8-12 stepping stones, compared to commercial kits that cost $25-45 per stone,” notes one DIY enthusiast. The total cost for a DIY mosaic stepping stone typically ranges from $10-15 when using repurposed materials, or $15-20 per stone using new supplies.
For Essex County residents, we recommend exploring local beaches (where permitted) for interesting stones and sea glass, or visiting community reuse centers for recycled materials.
Breaking & Prepping Tiles Safely
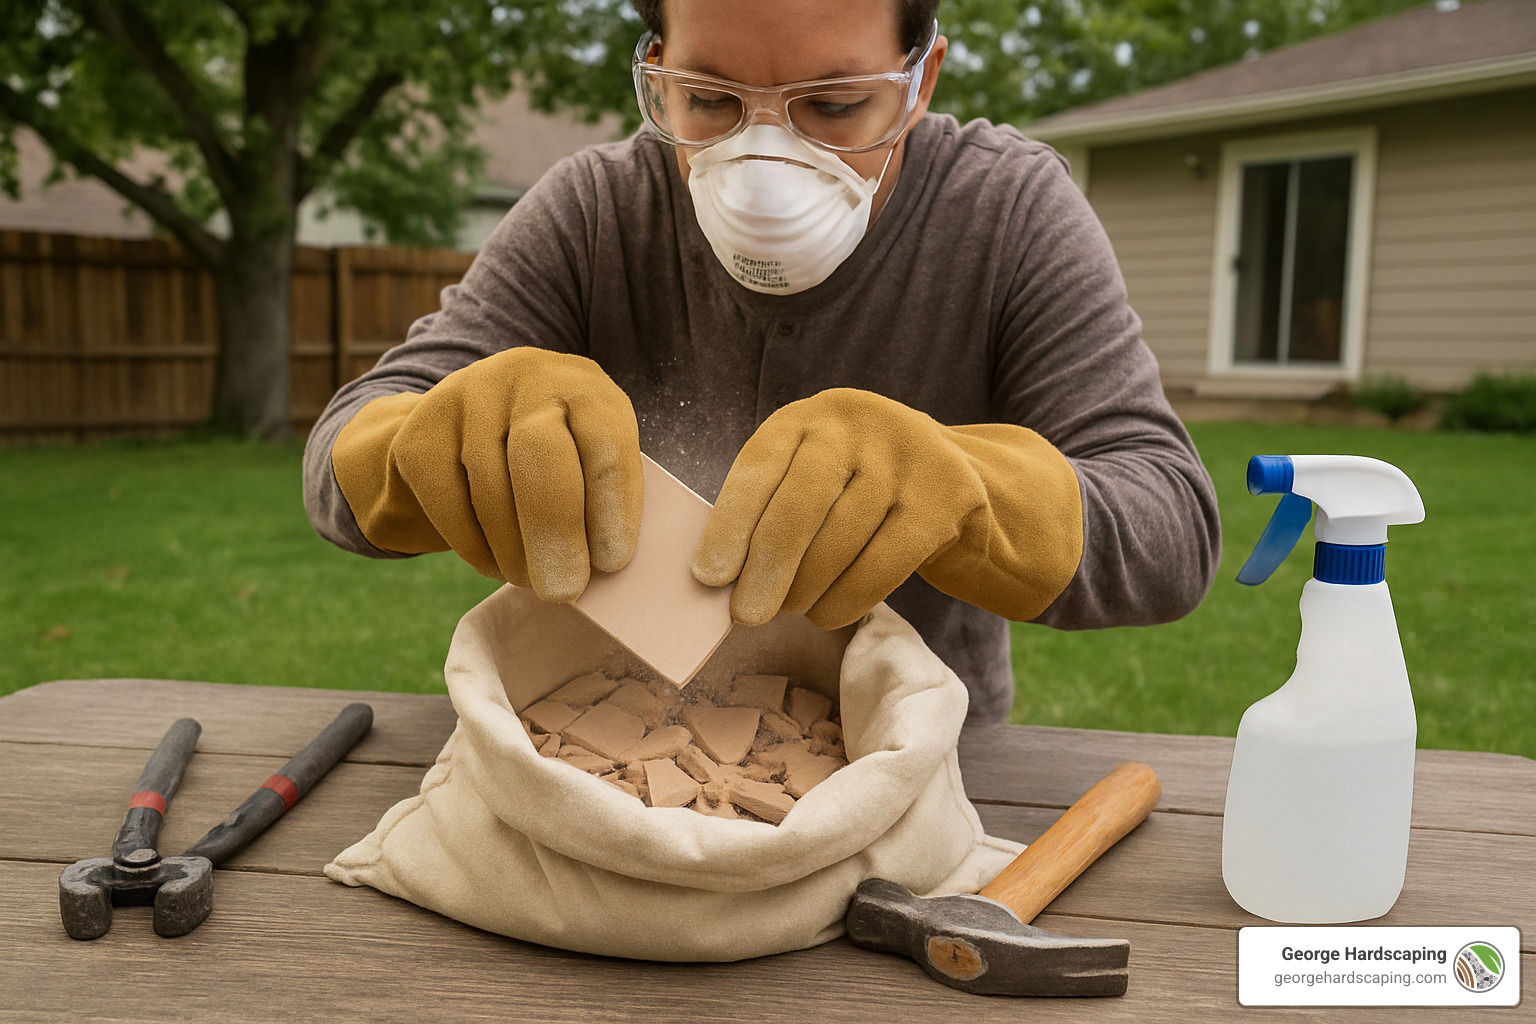
Working with broken ceramics requires careful attention to safety. Begin by setting up a dedicated work area outdoors or in a well-ventilated space with a drop cloth. Always wear your safety gear – glasses, heavy-duty gloves, and a dust mask protect you from sharp edges and harmful dust.
To contain flying pieces when breaking tiles, place them in a cloth bag or wrap in an old t-shirt before breaking. Use tile nippers for precise cuts and a hammer for rough breaks. Keep a spray bottle of water handy to minimize dust, and always collect tiny shards in a sealed container before discarding.
“Using a t-shirt as a containment bag when hammering pottery helps control shards,” suggests an experienced mosaic artist. This simple technique prevents dangerous pieces from flying and makes cleanup much easier.
For detailed work, proper tools make all the difference: “Use proper glass-cutting tools: cutter, breaking pliers, running pliers, scythe stone,” recommends an enthusiast who creates intricate mosaic designs. These specialized tools give you greater control and precision, resulting in cleaner edges and less waste.
How to Make Mosaic Stepping Stones – Two Proven Methods
Creating your own mosaic stepping stones can follow one of two paths – using pre-made pavers or casting your own concrete base from scratch. Both methods produce beautiful results, but your choice will depend on your comfort level with materials, your timeline, and how much customization you want.
Before we dive into the specifics, let’s talk about what makes a great base for your mosaic creation. Thin-set mortar (that magical blend of portland cement, fine sand, and polymers) provides excellent adhesion for your tiles. For outdoor stepping stones, you’ll want a substantial base – about 3 inches thick is ideal for withstanding New England’s freeze-thaw cycles.
“The slower concrete cures, the stronger it becomes,” explains a local hardscaping professional. This patience-requiring truth is why proper curing time is non-negotiable for durable stones. And don’t forget to tap out those air bubbles – they’re the enemies of structural integrity!
For those wanting to learn more about concrete bases beyond stepping stones, our detailed guide on concrete stepping stones provides additional insights.
Method 1: How to Make Mosaic Stepping Stones on a Pre-Cast Paver
This beginner-friendly approach uses a store-bought concrete paver as your canvas. It’s perfect if you’d rather skip the concrete mixing and get straight to the artistic part.
Start by thoroughly cleaning your paver and letting it dry completely. Many mosaic artists recommend soaking the paver briefly before applying mortar – this prevents the dry concrete from pulling moisture from your adhesive too quickly. For extra adhesion, you might want to lightly roughen the surface with sandpaper.
Next, mix your thin-set mortar to a peanut butter-like consistency and spread a 1/4 to 1/2-inch layer onto the paver using a notched trowel. Work in manageable sections so the mortar doesn’t dry before you can place your tiles.
As you press your mosaic pieces into the mortar, work from the outside in for a clean border. “Leave space between tiles for grout to avoid creating a slippery surface,” advises a longtime mosaic artist. That 1/8-inch spacing not only improves traction but also defines your design more clearly.
After placing your tiles, let the mortar set undisturbed for a full 24 hours. Then mix your grout according to package directions, work it into all the gaps, and clean excess with a damp sponge. The grout needs about 48 hours to cure properly.
Finally, don’t skip the sealing step! A quality concrete and grout sealer is absolutely essential for outdoor durability, especially with our challenging New England weather conditions.
Method 2: How to Make Mosaic Stepping Stones by Casting Your Own Base
This method gives you complete creative control over size, shape, and thickness – perfect for the DIYer who wants truly custom results.
Begin by preparing your mold, whether it’s a cake pan, plastic container, or commercial stepping stone form. A generous coating of petroleum jelly or cooking spray will ensure your creation releases easily when dry.
When mixing concrete, follow a typical 5:1 ratio of concrete mix to water, aiming for that “thick brownie batter” consistency. Pour concrete halfway, add wire mesh for reinforcement (this is crucial for durability!), then continue filling based on your chosen technique.
You have two options for adding your mosaic pieces:
With the press-in method, you’ll fill to about 1/2 inch from the top, wait 30-45 minutes until the concrete is partially set, then press your tiles into the surface. This technique works well for simple designs and when using thicker materials.
The upside-down method offers more precision for detailed patterns. Arrange your tiles face-down in the mold (many artists use contact paper sticky-side up to hold pieces in place), then pour concrete over them. This technique gives a perfectly flat finished surface.
“Use a plywood board and step on it to level stones evenly with the form,” suggests an experienced DIYer. This neat trick ensures your tiles are embedded at a consistent depth.
After 24-48 hours, carefully demold your creation. For the press-in method, you’ll need to apply grout as described in Method 1. Then comes the crucial curing period – allow your stone to cure for 7-10 days before placing any weight on it, followed by a thorough sealing.
Designing Your Pattern & Laying Tiles
The design phase is where your personality shines through your stepping stones. Many artists start with a paper template by tracing their mold shape and sketching a design. Tech-savvy creators might use digital design tools like Cricut or Silhouette for precise paper patterns.
“Sort shards glaze-side up by color and size ahead of design for workflow efficiency,” recommends a seasoned mosaic artist. This simple organization step can transform a potentially chaotic process into a smooth creative flow.
When placing your tiles, remember these fundamental principles: maintain consistent spacing for grout, position tiles flat to avoid sharp edges, and work from the outside in for defined shapes and borders.

As one artist beautifully put it, “Designing a mosaic is like building a puzzle.” This mindset helps you approach the process with the perfect balance of patience and creativity – placing each piece deliberately while seeing how it contributes to your overall vision.
Grouting, Curing & Sealing for New England Weather
If you’ve ever experienced a New England winter, you know our weather can be brutal on outdoor elements. Those freeze-thaw cycles that crack our roads can do the same to your beautiful mosaic stepping stones if they’re not properly finished. But don’t worry—with the right approach, your creative garden additions will withstand whatever Mother Nature throws their way.
Grouting Your Mosaic
Grout does more than just fill gaps—it’s the protective framework that holds your design together and keeps moisture from sneaking in where it shouldn’t.
“The grout is what transforms separate pieces into a cohesive whole,” explains one local mosaic artist who creates garden installations throughout Essex County.
For outdoor mosaics, sanded grout is non-negotiable. The sand provides strength against temperature fluctuations and prevents cracking. While standard gray works beautifully, colored grouts can dramatically transform your design—imagine how a deep blue grout might make ocean-themed tiles pop!
When mixing your grout, follow package directions precisely, then let it slake for 10 minutes before application. This resting period might seem like an unnecessary delay when you’re eager to finish, but it allows the chemicals to properly activate and improves workability. Apply using a rubber float held at a 45-degree angle, pressing firmly to fill all gaps completely.
After 15-30 minutes, once the grout begins to haze over, clean the surface with a damp sponge using circular motions. Rinse your sponge frequently—dirty water makes for dirty grout! One practical tip from an experienced mosaic maker: “Scrape excess grout into the trash before washing your tools. Your plumbing will thank you.”
Proper Curing
Patience during curing is perhaps the most challenging part of creating mosaic stepping stones, but rushing this process is a recipe for disappointment.
Your stone needs 24-48 hours before demolding or grouting, another 72 hours after grouting before light handling, and a full 7-10 days before placement in your garden. This might seem excessive, but there’s science behind it—concrete continues to gain strength for weeks after pouring.
“The slower the mortar cures, the stronger and more durable the mosaic will be,” notes a veteran hardscaper with decades of experience in our region’s challenging climate. To encourage this slow curing:
- Keep your stone in a cool, shaded area during initial curing
- Occasionally mist with water, especially during hot summer days
- Consider wrapping in plastic to maintain moisture in dry weather
Think of curing like a good marinade—the longer you wait, the better the result. Your patience will be rewarded with stepping stones that last for years rather than months.
Sealing for Durability
In New England’s challenging climate, sealing isn’t optional—it’s essential protection against our wet springs, humid summers, and freezing winters.
A quality penetrating stone sealer creates an invisible shield that prevents moisture absorption while allowing the stone to “breathe.” Look specifically for products that mention freeze-thaw resistance and UV protection to prevent fading of your colorful design.
When applying sealer, ensure your stone is completely dry and clean—any trapped moisture or dirt will compromise the seal. Most products require 2-3 thin coats with drying time between applications. Resist the urge to apply heavily; puddles of sealer can create a cloudy appearance on your beautiful tiles.
“I mark my calendar to reseal my garden mosaics every two years,” shares one homeowner whose stepping stones have survived fifteen New England winters. “It’s easier to maintain than to replace.”
For those interested in the science behind mortar strength and durability factors, the Better Homes & Gardens guide on tile-topped stepping stones offers excellent technical information that goes deeper into the chemistry involved.
Proper sealing is especially important if your stepping stones will face snow shovels in winter. Even the most careful shoveling can damage unsealed grout lines, so that extra protection is well worth the effort.
Installation & Long-Term Care
Proper installation ensures your beautiful mosaic stepping stones remain level, stable, and intact through New England’s seasonal changes. At George Hardscaping, we’ve seen how well-installed stepping stones can last for decades, while poorly placed ones may crack or shift within a single season.
Preparing the Ground
The secret to long-lasting stepping stones starts below the surface. Begin by excavating an area approximately 4-5 inches deep where your stone will sit, making the hole about an inch wider than your stepping stone on all sides.
Next, create a stable base by adding 2 inches of compacted crushed gravel or stone dust. This crucial layer provides drainage and prevents settling that could crack your beautiful creation. Tamp the gravel firmly using a hand tamper or even the bottom of a 4×4 post – the more compact this base, the better your stone will hold up over time.
“I learned the hard way that skipping proper base preparation leads to wobbly, cracked stones after just one winter,” shares a Massachusetts homeowner. “Taking the extra 15 minutes per stone to do it right has made all the difference.”
When positioning your stone, place it carefully on the prepared base and use a level to ensure it sits flat. The surface should be flush with or slightly above ground level – this prevents water pooling and reduces tripping hazards. A professional hardscaper advises, “Ensure proper drainage by grading site at approximately 2 percent grade if needed.” This slight slope helps water run off rather than collecting around your stones.
Spacing and Arrangement
For comfortable walking, space stones about 24 inches apart on center. If your path will be used by children or those with a shorter stride, consider reducing this to 18-20 inches. The natural rhythm of walking should guide your placement – too far apart and people will walk around your stones; too close and they’ll feel awkward.
Many gardeners find that arranging stones in gentle curves rather than straight lines creates a more inviting path that encourages mindful walking through your garden. This approach also allows you to work around existing plants or features without disturbing them.
Seasonal Maintenance
New England’s distinct seasons each bring their own maintenance needs for your mosaic stepping stones:
Spring welcomes renewal but also reveals winter’s damage. Check for any loose tiles and repair with appropriate adhesive. Clean off accumulated dirt and debris with a soft brush and water. This is also the perfect time to inspect for any frost heaving that may have tilted your stones.
During summer, periodically clean your stones with mild soap and water to keep their colors vibrant. Remove any plant growth between tiles, as roots can gradually force pieces loose. Check for cracking from heat expansion, especially in darker stones that absorb more sunlight.
When fall arrives, clear leaves and debris to prevent staining from decomposing plant matter. If it’s been a year or two since your last application, apply fresh sealer before winter sets in. Ensure proper drainage around stones by clearing any built-up soil or mulch.
Winter brings the greatest challenges. Use plastic snow shovels rather than metal to avoid scratching your beautiful mosaics. Avoid de-icing chemicals which can damage grout and concrete – sand provides traction without harmful effects. For particularly precious or detailed mosaics, some gardeners cover them during extreme weather.
“For long-term maintenance, I reattach any loose pebbles using thin-set, cleaning up excess material right away,” suggests one mosaic creator who has maintained garden installations for over a decade. “It’s much easier to fix one loose piece than to repair a stone that’s been neglected for years.”
High-quality mosaic stepping stones should be resealed every 2 years to maintain their weather resistance. This simple maintenance step protects your artistic investment and keeps your path looking fresh and vibrant.
For more information about building complete walkways that incorporate your mosaic stepping stones, visit our guide on building a walkway.
Common Mistakes & How to Avoid Them
We’ve all been there—excited about a new project only to encounter some unexpected challenges along the way. After helping countless homeowners create beautiful mosaic stepping stones, I’ve noticed several common pitfalls that can turn your garden masterpiece into a frustrating experience. Let’s walk through these mistakes so your project can shine from the start.
1. Insufficient Grout Spacing
That beautiful pattern you’ve created needs room to breathe! Many first-timers place tiles too close together, leaving inadequate space for grout. This not only compromises your stone’s structural integrity but can create a slippery surface when wet.
“Leave consistent crevices between pieces for even grouting,” advises a professional mosaic artist I interviewed recently. Aim for approximately 1/8-inch gaps between all pieces—this width provides enough space for grout to bond properly while maintaining the visual flow of your design.
2. Exposed Sharp Edges
Nothing ruins a barefoot garden stroll faster than a sharp tile edge! This happens when vertical tile edges remain exposed on your stepping stone surface.
One safety-conscious creator shared this wisdom: “Position tiles horizontally to ensure no sharp edges are exposed.” Always run your fingers gently across your finished surface before grouting to check for potential hazards. Your future barefoot self will thank you!
3. Creating a Slippery Surface
That gorgeous glass mosaic can become treacherous when wet if you’re not careful. Many beginners create what I call a “glass blanket”—covering the entire surface with smooth glass tiles without texture or adequate grout lines.
The solution is simple: incorporate textured materials alongside glass elements, ensure proper grout spacing, and consider using a textured sealer if your design is predominantly glass. Safety and beauty can absolutely coexist in your garden.
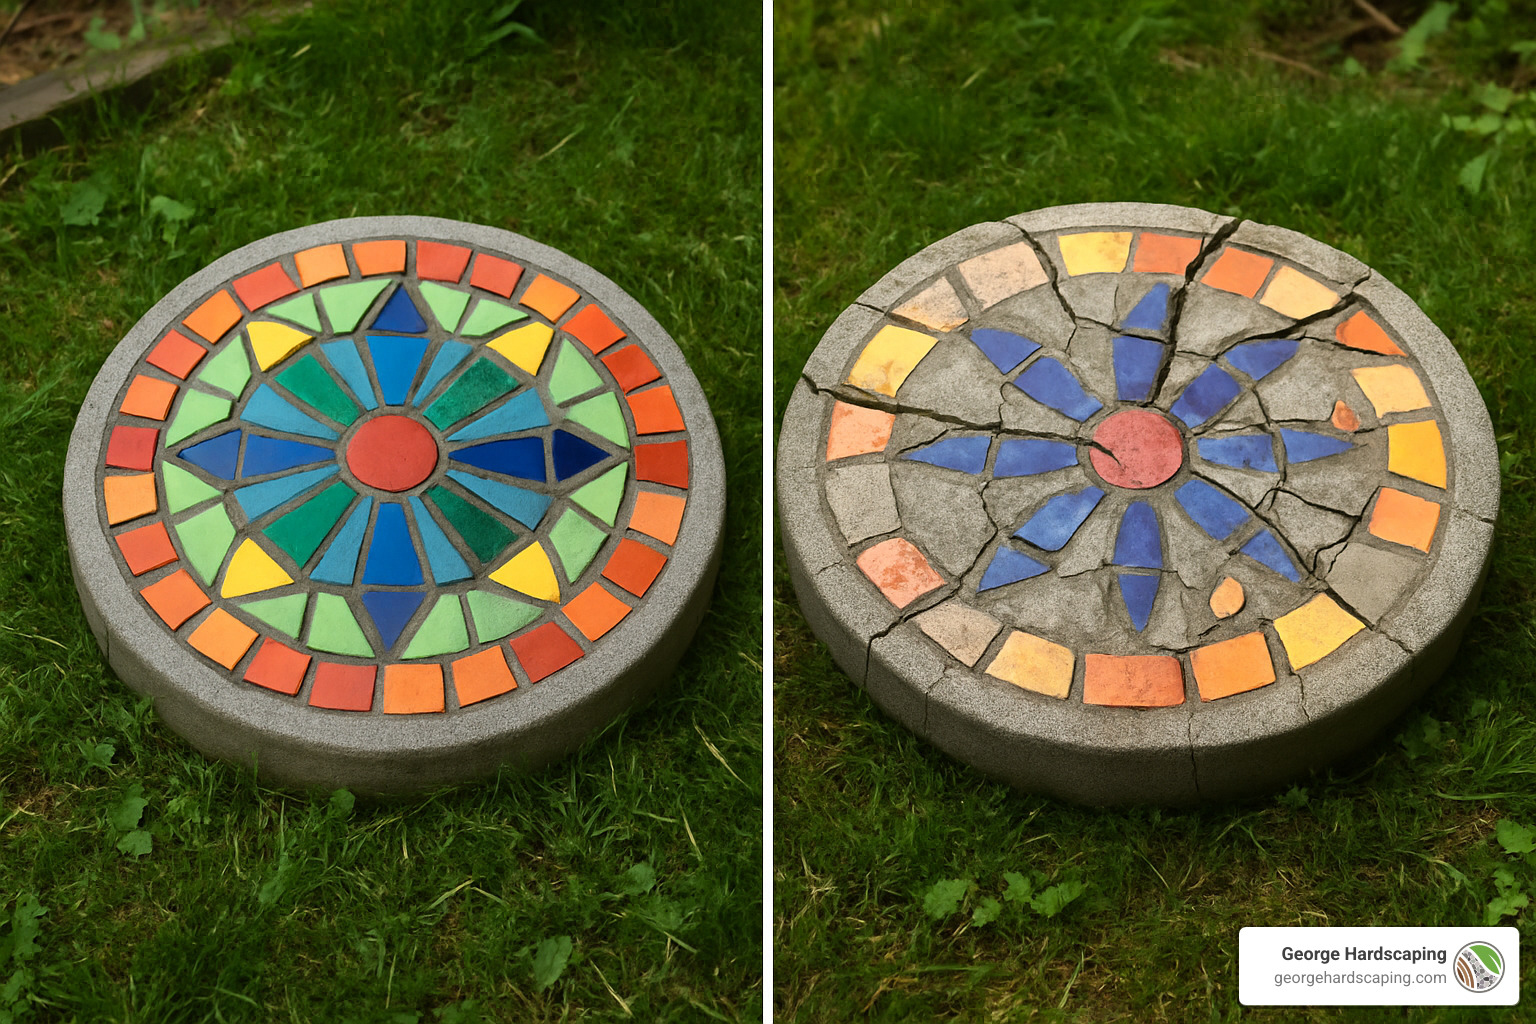
4. Rushing the Curing Process
Patience truly is a virtue when making mosaic stepping stones. Using your creation before it’s fully cured is a recipe for disappointment, leading to cracking and tile loss.
“Allow mortar to cure slowly, wetting the surface frequently for a few days,” suggests an expert with decades of experience. Full strength requires that 7-10 day cure time before placing any weight on your masterpiece. This waiting period is especially important in our New England climate where temperature fluctuations can affect curing times.
5. Skipping Reinforcement
That beautiful stepping stone needs internal strength to withstand seasonal changes, especially in our freeze-thaw New England cycles. Unreinforced concrete is significantly more prone to cracking.
“Insert a piece of wire reinforcement into the wet concrete to give it structure and reduce cracking,” advises a mosaic stepping stone creator who has weathered many Massachusetts winters. This simple addition dramatically improves durability with minimal added cost or effort.
6. Forgetting Mold Release
There’s nothing more frustrating than creating the perfect mosaic only to have it stuck permanently in the mold! Concrete adheres strongly to uncoated molds, sometimes making removal impossible without damage.
A practical DIYer shared this simple fix: “Coat molds with dish soap or Vaseline before pouring for easy release.” This five-second step can save hours of frustration later.
7. Using Inappropriate Materials
Not all materials can handle New England’s demanding weather conditions. Using indoor-rated ceramics or adhesives outdoors often leads to premature deterioration and disappointment.
“Select frost-resistant ceramic tiles or non-porous glass tiles to prevent cracking,” cautions an experienced mosaic artist who creates year-round installations throughout the Northeast. This careful material selection pays dividends in longevity.
I remember chatting with one mosaic enthusiast who perfectly captured the learning curve: “Concrete mixing with a ticking clock felt intimidating at first, but the working time was actually quite generous.” Taking your time and not rushing any step of the process might just be the most important advice of all.
By avoiding these common mistakes, your how to make mosaic stepping stones project will result in beautiful, durable garden accents that will bring joy for many seasons to come.
Frequently Asked Questions about Mosaic Stepping Stones
How thick should the stone be?
Creating a stepping stone that withstands both foot traffic and New England weather requires proper thickness. For most garden applications, aim for 2-3 inches of concrete thickness in your stepping stone.
“The recommended thickness for the mortar base is about 3 inches for outdoor mosaics, with 2 inches of compacted crushed rock underneath for stability,” explains an experienced hardscaper who’s installed hundreds of garden pathways.
Here in Essex County, where freeze-thaw cycles are particularly harsh, I recommend going for the full 3-inch thickness with reinforcement. This extra bit of material makes a significant difference in durability without adding much to your material costs. Think of it as insurance against premature cracking!
How long before I can step on it?
Patience truly rewards you when making mosaic stepping stones. While it’s tempting to place your creation in the garden immediately, proper curing ensures years of enjoyment instead of disappointment.
Here’s the timeline I share with all my clients:
– 24-48 hours: Initial set (safe to remove from mold)
– 72 hours: Grout cure (can be handled gently)
– 7-10 days: Full cure (ready for foot traffic and installation)
“I ruined my first stepping stone by walking on it too soon,” confessed one gardener at a recent workshop. “The second one I let cure for the full 10 days, and four years later, it still looks perfect.”
Concrete continues strengthening for weeks after pouring. Those extra days of patience translate directly into years of durability in your garden.
What prevents tiles from popping off in winter?
New England winters can be brutal on outdoor installations, with temperatures swinging from freezing to thawing repeatedly. Several factors work together to keep your mosaic intact through these challenging conditions.
Proper material selection makes a huge difference. “Glass tiles are non-porous, preventing water penetration and freeze-thaw damage,” explains one mosaic artist whose installations have survived 15 Massachusetts winters. If using ceramics, make sure they’re rated for outdoor use.
Quality adhesive provides the foundation for longevity. Thin-set mortar designed for outdoor use contains polymers that maintain flexibility through temperature changes, allowing slight movement without cracking.
Complete grout coverage prevents water infiltration. When water gets beneath tiles and freezes, it expands and pushes tiles upward. Properly filled grout lines block this moisture pathway.
Regular sealing creates a crucial water-resistant barrier. Most experts recommend resealing annually before winter arrives. “I mark it on my calendar every October,” shares one enthusiast. “Ten minutes of maintenance saves hours of repairs later.”
Proper base preparation prevents shifting that can crack your creation. “In frost-prone areas like Essex County, a deeper gravel base or a concrete slab can prevent frost heave and cracking,” notes a hardscaping expert with decades of New England experience.
Can I use any broken dishes for mosaics?
While that broken family heirloom plate might seem perfect for your garden mosaic, not all ceramics can withstand outdoor conditions equally well.
“Softer ceramic tiles are more susceptible to frost damage in outdoor applications,” cautions a mosaic artist who teaches workshops throughout the Northeast. For best results, be selective about your materials:
Porcelain and stoneware generally outperform earthenware in outdoor settings. That sturdy dinner plate will likely last longer than a delicate teacup. Dishes with thicker, more durable glazes resist moisture better, making them less prone to freeze-thaw damage.
For sentimental pieces or focal points of your design, consider placing them in protected areas of your mosaic – toward the center rather than at vulnerable edges. Some artists even apply extra sealer to special pieces for additional protection.
One creative solution I’ve seen: “I use my grandmother’s broken china for indoor stepping stones and commercial tile for outdoor ones,” shares a mosaic enthusiast. “This way I preserve the memories without fighting nature.”
How do I repair a damaged mosaic stepping stone?
Even the best-made stepping stones may eventually need repairs, especially after several harsh winters. Fortunately, minor damage is usually fixable.
For loose or missing tiles, start by thoroughly cleaning the area with a stiff brush. Apply outdoor-rated tile adhesive or thin-set mortar to the base, then press the original piece (or a replacement) firmly into position. Allow it to set for at least 24 hours before re-grouting if necessary, then seal the repaired area.
“I keep a small container with extra tiles and materials from each project,” recommends one forward-thinking creator. “Makes repairs much easier when everything matches.”
For cracked bases, unfortunately, complete replacement is often necessary, as structural cracks tend to worsen over time. Consider it an opportunity to create something new!
Can I add color to my concrete base?
Absolutely! Adding color to your concrete base creates a cohesive look that improves your mosaic design. There are several approaches, each with unique benefits:
Concrete colorant mixed directly into wet concrete provides consistent color throughout. If a piece chips, the color remains visible. “I like to tint my base a complementary color to my tiles,” shares one artist. “It makes the whole piece feel more intentional.”
Acrylic concrete stain applied after curing offers more control and can create interesting effects. Some creators even use multiple colors for a marbled look.
Colored grout provides a subtle tint between tiles that can dramatically change the overall appearance of your mosaic. Black grout makes colors pop, while matching grout creates a more seamless look.
“Let your imagination determine what material you use,” encourages an artist whose stepping stones have become neighborhood attractions. This playful approach to color is what makes how to make mosaic stepping stones such a rewarding creative outlet – each one truly becomes a unique expression of your personal style.
Conclusion
There’s something magical about stepping across your garden on stones you’ve crafted with your own hands. Creating mosaic stepping stones isn’t just a craft project—it’s a way to weave your personality into the very fabric of your outdoor space.
As we’ve seen throughout this guide, learning how to make mosaic stepping stones involves thoughtful preparation, creative expression, and a bit of patience. From selecting durable materials to allowing proper curing time, each step contributes to creating garden art that will bring joy for years to come.
“I love watching visitors find my stepping stones for the first time,” shared one enthusiast from Ipswich. “They always slow down to appreciate each design, which is exactly what I wanted—a garden path that encourages mindful walking.” This sentiment captures the dual purpose these colorful creations serve: practical pathways that double as conversation pieces.
Timing matters when working with concrete and mortar. “Working on overcast days or in the shade extends workable time before mortar sets,” advises a seasoned creator from Beverly. This simple tip can make your crafting experience much more relaxed and enjoyable.
Once you’ve mastered basic stepping stones, your creative horizons expand dramatically. The same techniques can transform terra-cotta pots, bird baths, garden benches, and countless other outdoor features. Many enthusiasts find that mosaic-making becomes an addictive hobby that gradually improves every corner of their landscape.
At George Hardscaping, we’ve seen how these personalized elements can lift the overall impact of a professional landscape design. Our clients who incorporate handcrafted elements like mosaic stepping stones alongside our professional hardscaping often achieve the most distinctive and personally meaningful outdoor spaces.
If you’re looking to integrate your artistic creations into a more comprehensive landscape plan, our expert team can help design the perfect setting. Whether you need a properly prepared base for your stepping stone path or want to incorporate your mosaics into a broader hardscape design, we bring the technical expertise that ensures your creative work will stand the test of time.
For more information about incorporating your mosaic stepping stones into a professionally designed walkway or to explore options for custom stone steps that complement your artistic creations, visit our guide on steps and brick stairs or reach out for a personalized consultation.
Your garden should be as unique as you are—and with these mosaic stepping stones, you’ve taken a beautiful step in that direction.
