Installing an Outdoor Kitchen: 5 Best Thrilling Tips
Transform Your Backyard with an Outdoor Kitchen
Installing an outdoor kitchen is a fantastic way to transform your backyard into a culinary haven and entertainment hub. Whether you’re a seasoned griller or new to outdoor cooking, creating an outdoor kitchen adds not only functionality but also significant value to your property. Here’s a quick overview to get you started:
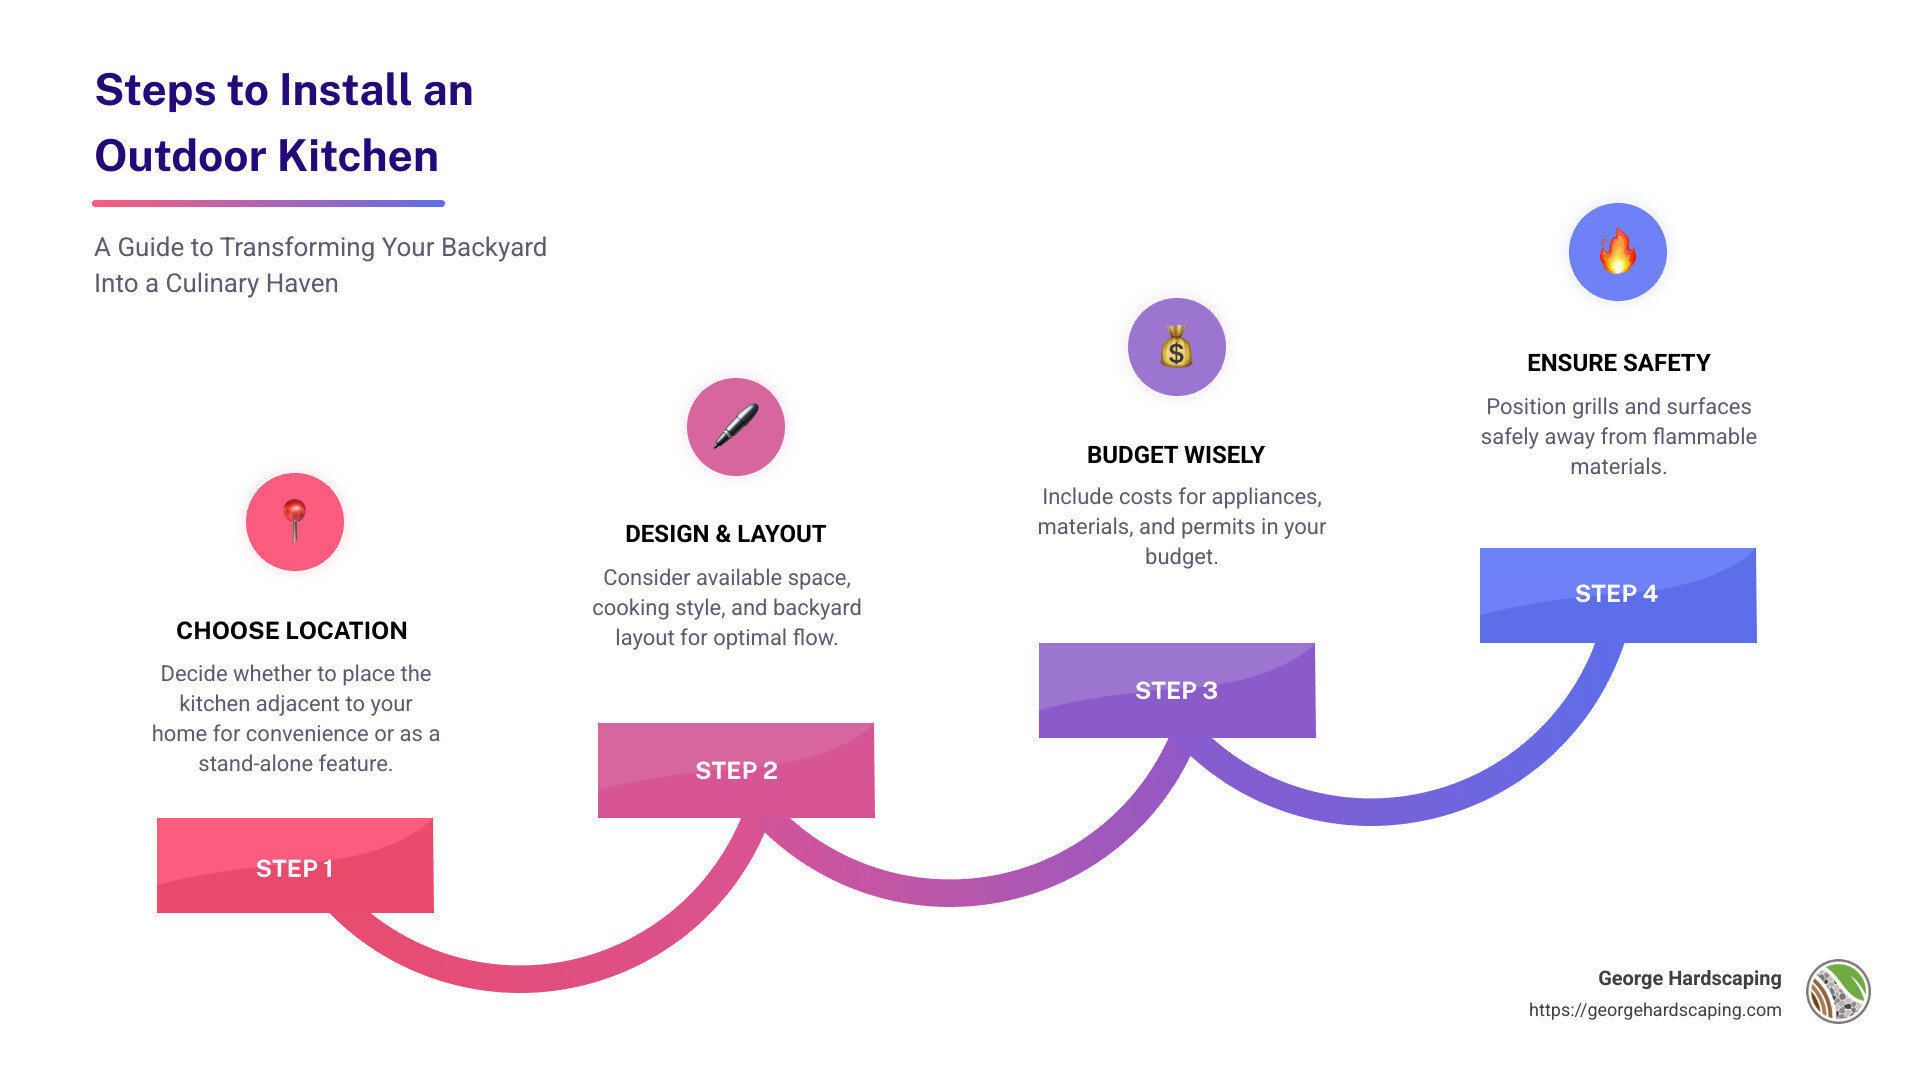
- Choose Your Location: Decide whether your outdoor kitchen will be adjacent to your home for convenience or as a stand-alone feature for a more immersive experience.
- Design and Layout: Consider the space available, your cooking style, and the flow of your backyard layout.
- Budget Wisely: Factor in costs for appliances, materials, and any necessary permits.
- Safety Precautions: Ensure all grills and cooking surfaces are positioned safely, away from flammable materials.
By making these considerations, you can efficiently plan an outdoor kitchen that meets your needs and improves your outdoor lifestyle.
Building an outdoor kitchen is about more than just cooking outside. It’s about creating an inviting space where family and friends can gather for meals, celebrations, or quiet evenings under the stars.
Planning Your Outdoor Kitchen
Creating your dream outdoor kitchen starts with careful planning. Consider these key factors to ensure a smooth process and a beautiful result.
Space and Layout
Begin by assessing how much space you have. Measure carefully to determine the area available for your outdoor kitchen. This will impact your design choices and the appliances you can include. Think about how you want your kitchen to function. Do you envision a simple grill station or a fully equipped cooking area with a sink and refrigerator?
- Adjacent to the Home: Placing your kitchen near the house offers easy access to indoor utilities and protection from the elements. However, ensure that grills and cooking surfaces are at least 10 feet away from the house to prevent fire hazards.
- Stand-Alone Setup: This option allows for more creativity and flexibility in design. It can create an intimate setting but may require extra effort to extend utilities like water and electricity.
Budget Considerations
Your budget is a crucial part of the planning process. Outdoor kitchen costs can vary widely based on size, materials, and features. A modest setup might start around $5,000, while luxury options can exceed $30,000. The average cost is typically about $12,000-$13,000.
Plan for additional expenses such as:
- Utilities: Running plumbing and electrical lines can add to the cost.
- Permits: Check local regulations to see if you need permits for construction, especially if utilities are involved.
- Labor: Decide if you will hire professionals or tackle a DIY project. DIY can save money but requires more time and skill.
Permits
Before you start building, check local building codes and secure any necessary permits. This is especially important if you plan to install plumbing, gas, or electrical lines. Failing to do so can result in fines or having to redo work to meet legal standards.
- Contact Local Officials: They can provide information on specific requirements for your area.
- Homeowners Association: If applicable, verify if there are any additional rules or restrictions.
Planning your outdoor kitchen carefully ensures that you create a space that is both functional and beautiful. It also helps avoid unexpected costs or legal issues down the road. Now that you have a plan, let’s move on to choosing the essential components for your outdoor kitchen.
Essential Components of an Outdoor Kitchen
Designing an outdoor kitchen involves selecting key components that create a functional and inviting space. Here are the essentials you’ll need:
Grill
The grill is the heart of any outdoor kitchen. It’s where the cooking magic happens. Choose a grill that fits your cooking style and space. Options range from simple charcoal grills to advanced gas models with multiple burners and features like rotisseries.
Key Considerations:
- Size and Capacity: Ensure the grill size matches your cooking needs and space.
- Fuel Type: Decide between gas, charcoal, or electric based on convenience and flavor preference.
- Placement: Allow enough clearance around the grill for safety and airflow. Ensure it’s positioned away from combustible materials.
Countertops
Countertops provide essential workspace for food preparation and serving. They also add style to your outdoor kitchen. Choose materials that withstand weather and are easy to clean.
Popular Materials:
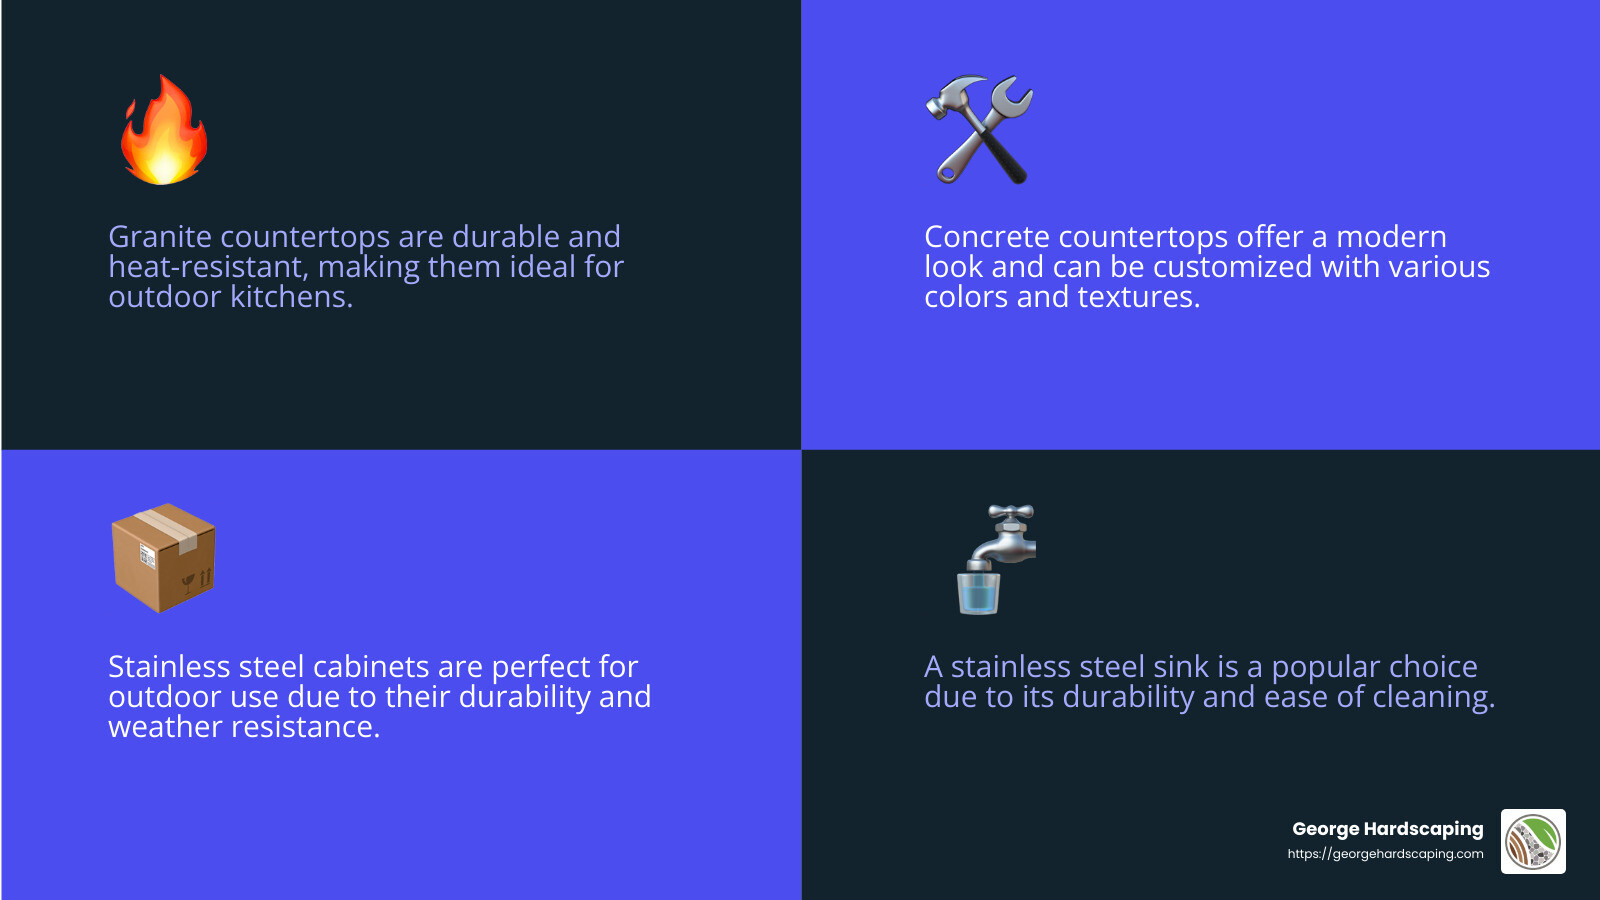
- Granite: Durable and heat-resistant, granite is a top choice for outdoor countertops.
- Concrete: Offers a modern look and can be customized with colors and textures.
- Tile: Provides a variety of design options, though it may require more maintenance.

Storage
Having adequate storage keeps your outdoor kitchen organized and functional. Cabinets and drawers store utensils, dishes, and cooking supplies, reducing trips back to the house.
Storage Options:
- Stainless Steel Cabinets: Durable and weather-resistant, ideal for outdoor use.
- Wood Cabinets: Offer a warm, rustic look but require regular maintenance to prevent weather damage.
- Built-In Shelves: Perfect for storing frequently used items within easy reach.
Sink
A sink is a valuable addition to any outdoor kitchen. It provides a convenient spot to wash hands, rinse vegetables, and clean up after meals.
Installation Tips:
- Plumbing: Ensure you have access to water lines and a drain pipe. It may require professional installation.
- Material: Stainless steel is a popular choice due to its durability and ease of cleaning.
- Location: Place the sink near the prep area for convenience.
These essential components—grill, countertops, storage, and sink—form the foundation of a functional outdoor kitchen. By selecting the right elements, you can create a space that meets your cooking needs and improves your outdoor living experience.
Next, we’ll explore the installation process and discuss the pros and cons of DIY versus professional help.
Installing an Outdoor Kitchen: Step-by-Step Guide
Building your dream outdoor kitchen is an exciting project. But should you install it yourself or hire a professional? Let’s explore your options.
DIY vs. Professional Installation
DIY Installation
Taking the DIY route can save you a significant amount of money—up to 40% on labor costs. This means a $20,000 project could drop to between $12,000 and $16,000 if you do it yourself. Plus, you’ll have full control over the timeline and design. You can even choose to build at your own pace.
However, DIY isn’t for everyone. It requires time, patience, and a certain level of skill. If you’re handy and enjoy a challenge, this might be the perfect project for you. But remember, tasks like running gas lines or complex plumbing should be left to professionals to ensure safety and compliance with local codes.
Professional Installation
Hiring a professional comes with its own set of benefits. You gain access to expertise and a guarantee of quality workmanship. Professionals can steer complex installations and ensure everything is done correctly. This can save you from costly mistakes and safety hazards.
However, finding the right contractor can be tricky. Specialists in outdoor kitchens are rare, so choosing a general contractor may not always guarantee the best results. If you decide to hire a professional, look for those who specialize in outdoor kitchens and have a proven track record.
Construction Costs
Whether you choose DIY or professional installation, it’s important to understand the costs involved. Besides labor, consider the materials and appliances you want to include. For DIY projects, you might save on labor but will still need to budget for materials and tools.
For professional installations, labor costs will be higher, but you’ll benefit from their experience and efficiency, potentially saving you time and stress.
Permits
Permits are crucial for any outdoor construction project. They ensure your kitchen meets local building codes and safety standards.
- Deck or Patio Permits: Typically cost between $220 and $500.
- Plumbing Permits: Range from $50 to $500.
In total, permits can add an average of $250–$2,000 to your project cost. It’s important to factor these into your budget from the start.
Once you’ve decided on DIY or professional installation, considered the costs, and secured the necessary permits, you’re ready to begin your project. Next, let’s dive into the different material options available for your outdoor kitchen.
Material Options for Outdoor Kitchens
Choosing the right materials for your outdoor kitchen is vital. It affects not just the look but also the durability and maintenance needs of your space. Let’s explore three popular options: stone, wood, and metal.
Stone
Stone is a top choice for outdoor kitchens due to its natural beauty and durability. It’s perfect for countertops, flooring, and even grill islands. Granite, marble, and quartzite are popular types. They withstand harsh weather and require minimal maintenance, making them ideal for the ever-changing New England climate.
Advantages of Stone:
– Durable and weather-resistant
– Low maintenance
– Adds a natural, neat look
Considerations:
– Can be expensive
– Heavy, requiring a strong foundation
Wood
Wood brings warmth and a rustic charm to your outdoor kitchen. It’s often used for cabinets, pergolas, and furniture. If you choose wood, go for varieties like cedar or teak, which are resistant to rot and insects.
Advantages of Wood:
– Warm and inviting appearance
– Can be more affordable than stone
Considerations:
– Requires regular sealing and maintenance
– Vulnerable to weather if not properly treated
Metal
Metal, especially stainless steel, is a favorite for outdoor kitchen appliances, cabinetry, and countertops. It’s known for its sleek, modern look and resistance to rust and corrosion, which is crucial for seaside towns like Gloucester and Rockport.
Advantages of Metal:
– Highly durable and easy to clean
– Rust and corrosion-resistant
Considerations:
– Can get hot in direct sunlight
– May be prone to scratches and dents
Making Your Choice
When deciding on the materials for your outdoor kitchen, consider your local climate, budget, and personal style. Each material has its own set of benefits and drawbacks, so weigh them carefully to ensure your kitchen is both beautiful and functional.
Now that you know more about material options, let’s tackle some common questions about installing an outdoor kitchen.
Frequently Asked Questions about Installing an Outdoor Kitchen
How much does it cost to install an outdoor kitchen?
The cost of installing an outdoor kitchen can vary significantly based on factors like size, materials, and appliances. On average, you might spend anywhere from $12,000 to $20,000 for a DIY project. If you choose professional installation, costs can rise to $20,000 or more. That doing it yourself can save you 20%–40% on labor fees, but hiring professionals ensures quality and adherence to local codes.
Does an outdoor kitchen need a foundation?
Yes, a solid foundation is crucial for stability. You have a few options:
- Concrete Slab: The most common choice, offering durability and stability. Ideal for heavy materials like stone.
- Paver Base: A more flexible option, good for areas with mild weather.
- Decking: If you’re building on an existing deck, ensure it can support the weight.
A strong foundation prevents shifting and ensures your kitchen withstands New England’s varied weather.
Do you need plumbing for an outdoor kitchen?
Plumbing is not a must, but it adds significant convenience. If you choose to install a sink, you’ll need:
- Water Line: Connects to your home’s water supply. It’s best installed by a professional to ensure proper depth and insulation.
- Drain Pipe: Must lead to your home’s main drain line to comply with plumbing codes. Gray water can’t be expelled on open ground.
Hiring a plumber is recommended for these tasks to ensure everything is up to code and functions smoothly.
Now that we’ve covered some common questions, you’re better equipped to make informed decisions about your outdoor kitchen project.
Conclusion
Building an outdoor kitchen is more than just adding a grill and a few countertops to your backyard. It’s about crafting an outdoor living space that improves your lifestyle and home value. At George Hardscaping, we understand the importance of blending beauty with functionality, and we’re here to help you achieve that perfect balance.
Our commitment to quality craftsmanship sets us apart. With years of experience in masonry and hardscaping, we know how to turn your vision into reality. Whether you’re dreaming of a cozy corner for family barbecues or a full-scale culinary oasis, our team is ready to deliver.
Located in the heart of Essex County, MA, we serve the North Shore with pride. Our expertise in patios, walkways, retaining walls, and custom firepits ensures that every project we undertake is executed with precision and care.
Ready to transform your backyard into a stunning outdoor kitchen? Contact us today to start planning your dream space. Let’s create a beautiful, functional haven where you can make lasting memories with family and friends.
