Retaining Walls Installation: 10 Powerful Tips for Success 2025
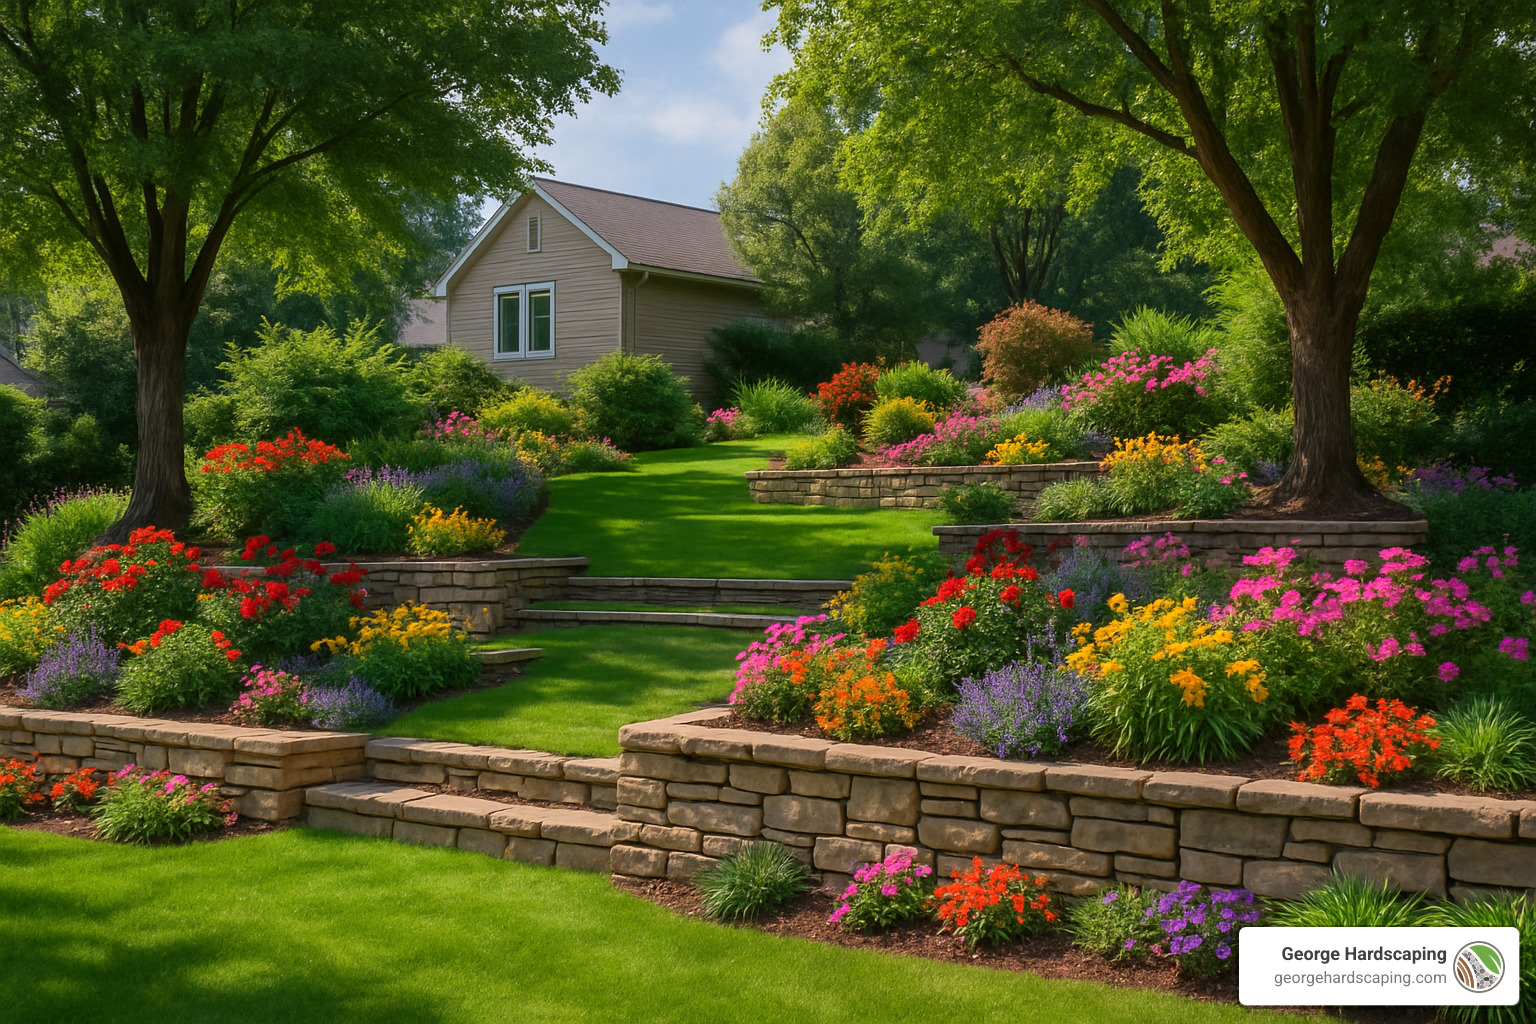
Transform Your Landscape with Retaining Walls
Retaining walls installation is one of the most impactful projects you can undertake to improve both the functionality and aesthetics of your property. If you’re looking for a quick guide to installing a retaining wall, here’s what you need to know:
Quick Guide to Retaining Wall Installation:
1. Plan & Prepare: Check local permits, mark utilities (call 811), determine wall location
2. Excavate: Dig trench 6″ deep plus 1″ per foot of wall height, width = twice the block width
3. Base Preparation: Add 4-6″ of compacted ¾” crushed gravel as leveling pad
4. First Course: Lay and level blocks with lip/flange facing forward, partially buried
5. Drainage Layer: Install filter fabric and perforated pipe behind first course
6. Build Wall: Stack additional courses in running bond pattern (staggered joints)
7. Backfill: Add drainage gravel behind wall in 8″ lifts, compact each layer
8. Cap & Finish: Secure capstones with adhesive, grade soil away from wall
A well-built retaining wall can transform a sloped, unusable yard into beautiful, functional outdoor living space. According to the National Association of Realtors, landscape projects like retaining walls deliver an impressive 105% value recovery when homes are sold, making them not just practical but financially smart investments.
Why Read This Guide?
If you’re a homeowner in Essex County, MA or surrounding areas dealing with sloped terrain, erosion issues, or simply looking to improve your outdoor living space, this guide is for you. We’ve designed it to be accessible for DIY enthusiasts with basic landscaping experience, though we’ll clearly indicate when professional help might be necessary.
You’ll need some basic tools to get started, including a shovel, level, tape measure, string line, rubber mallet, and safety gear. For larger projects, you may need to rent a plate compactor, cut-off saw, and possibly a mini excavator.
Understanding Retaining Walls 101
Retaining walls are structures that hold back soil and create level areas in otherwise sloped landscapes. They’re constantly battling gravity and lateral earth pressure—which is why getting the installation right matters so much.
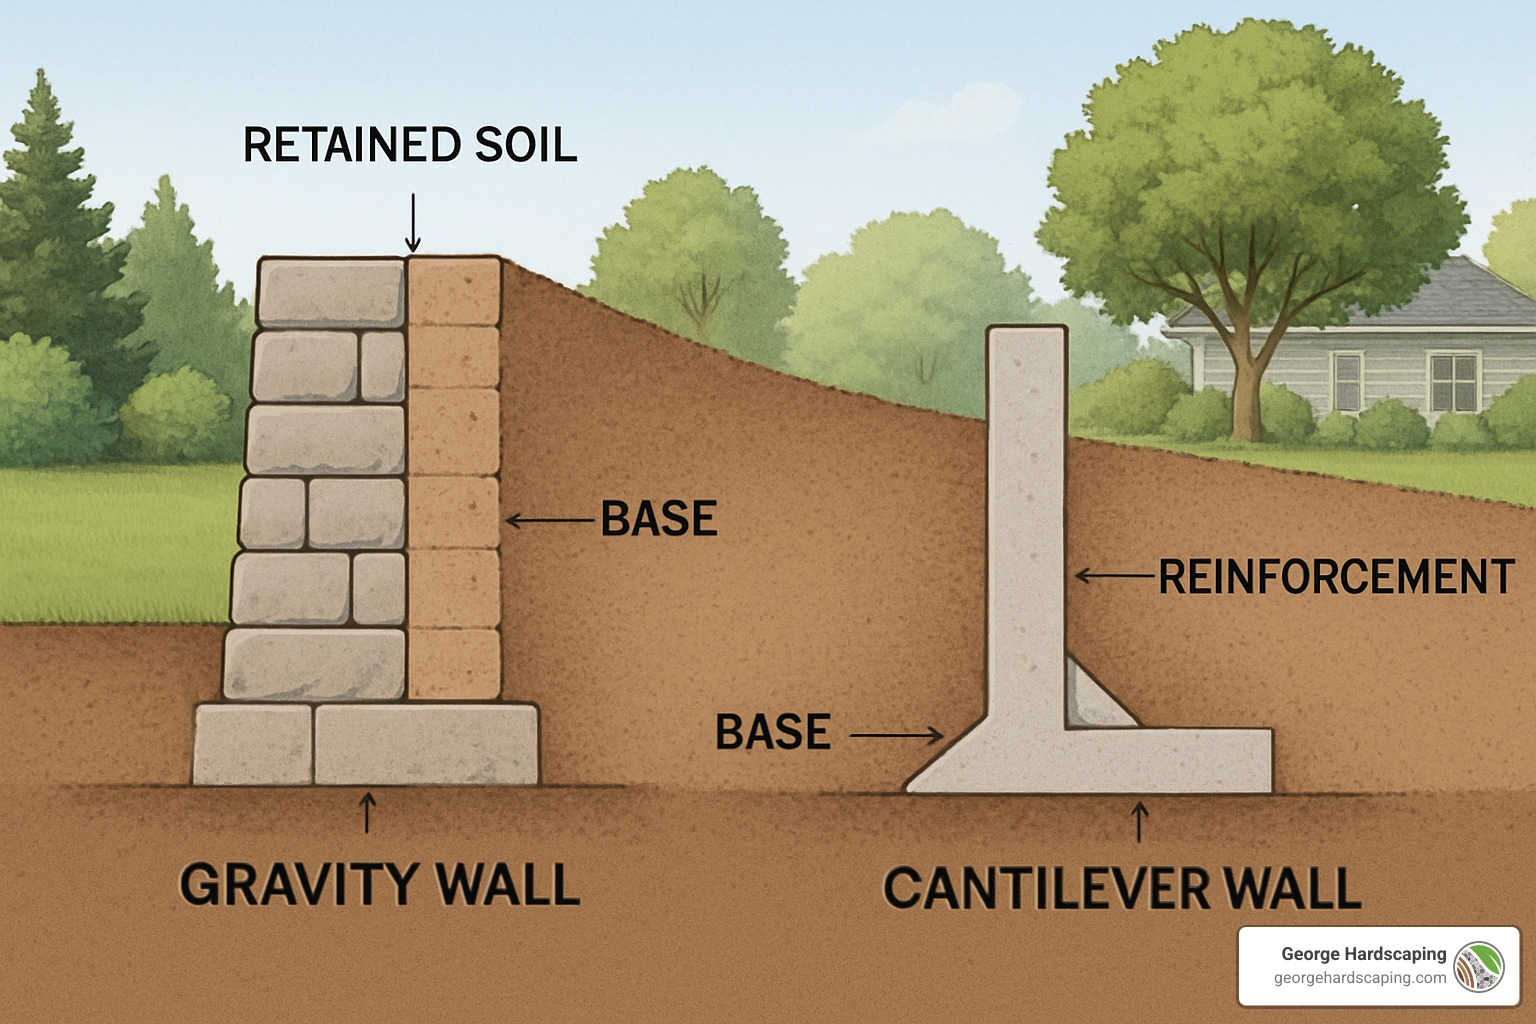
Here in Essex County, homeowners have several options when considering a Retaining Walls Installation. The most common types include segmental block walls (pre-made concrete units that stack together), gravity walls (which use their own weight to hold back soil), boulder walls (using natural stones), stacked stone walls (smaller flat stones in a rustic pattern), and timber walls (built with pressure-treated lumber).
For most homes in Massachusetts, segmental block walls offer the sweet spot of durability, good looks, and relatively straightforward installation.
Main Functions & Benefits
A Retaining Walls Installation does far more than just hold back dirt:
- They prevent erosion during New England downpours and spring thaws
- They direct runoff away from your foundation
- They create flat, usable spaces from slopes
- They boost property value and curb appeal
According to research from the National Association of Realtors, landscape improvements like retaining walls deliver impressive returns—with 75% of homeowners reporting they enjoy being home more after completing such projects.
Common Wall Types Compared
When planning your Retaining Walls Installation, understanding your material options helps you make the best choice:
| Material | Durability | DIY Difficulty | Lifespan | Aesthetics | Best For |
|---|---|---|---|---|---|
| Concrete Block | High | Moderate | 50+ years | Versatile | Walls up to 4 ft (DIY) |
| Natural Stone | Very High | High | 100+ years | Premium | Rustic, high-end landscapes |
| Timber | Moderate | Low-Moderate | 15-20 years | Rustic | Low walls, garden beds |
| Boulder | High | High | 50+ years | Natural | Informal landscapes |
Concrete segmental blocks have become our clients’ favorite choice because they’re pre-engineered for predictable performance, come in various colors and textures, have interlocking systems for easier installation, don’t require mortar, and can create both curves and corners.
The right choice ultimately depends on your property’s specific needs, your aesthetic preferences, and your budget. But whatever material you choose, proper installation techniques will determine whether your wall stands strong for decades.
Retaining Walls Installation: Planning & Design Essentials
The secret to a long-lasting retaining wall isn’t just in the building—it’s in the planning. Before you pick up that first shovel, let’s make sure you’ve got your ducks in a row.
Start by walking your property with a critical eye. How tall will your wall need to be? Walls over 4 feet tall typically require an engineer’s stamp of approval. The soil type matters tremendously too—sandy soil drains well but can be less stable, while clay soil exerts more pressure against your wall.
Local codes vary significantly between Beverly, Salem, Danvers and other North Shore communities, so check with your town’s building department about permits—most towns require them for walls over a certain height.
Don’t forget about surcharges—extra weight that might press on the soil behind your wall, like a driveway, shed, or foot traffic.
Always dial 811 before digging to have utilities marked. Nothing ruins a project faster than hitting a gas line or fiber optic cable!
Your drainage strategy is arguably the most important part of retaining walls installation. Water is the number one enemy of retaining walls in Massachusetts, where freeze-thaw cycles can wreak havoc on improperly drained structures.
For walls over 3 feet tall, you’ll likely need geogrid reinforcement—a synthetic mesh that strengthens the soil behind your wall.
Critical Pre-Build Checks
Before breaking ground, a few critical checks can make or break your retaining walls installation:
- Test your soil by grabbing a handful and squeezing it. Does it hold together like clay or crumble like sand?
- Check the bearing capacity of the soil beneath your wall
- In Essex County, the frost line typically extends 48 inches below grade
- Identify any water sources that could impact your wall—downspouts, natural slopes, or underground springs
Tools & Materials Checklist
For a successful retaining walls installation, you’ll need:
Essential Tools:
– Shovel and pick
– Tape measure and 4-foot level
– String line with stakes and line level
– Rubber mallet for adjusting blocks
– Hand tamper and/or plate compactor
– Chisel and hammer or cut-off saw for cutting blocks
– Wheelbarrow and garden rake
Your materials list should include retaining wall blocks, cap blocks, ¾” crushed stone (ASTM No. 57), perforated drainage pipe, filter fabric, and construction adhesive. For walls exceeding 3 feet, add geogrid reinforcement.
Never skimp on safety gear. Work gloves, safety glasses, steel-toe boots, and a dust mask when cutting blocks are absolute musts.
More info about Retaining Wall Design
Step-by-Step Retaining Wall Installation
Now let’s roll up our sleeves and dive into the actual building process for retaining walls installation.
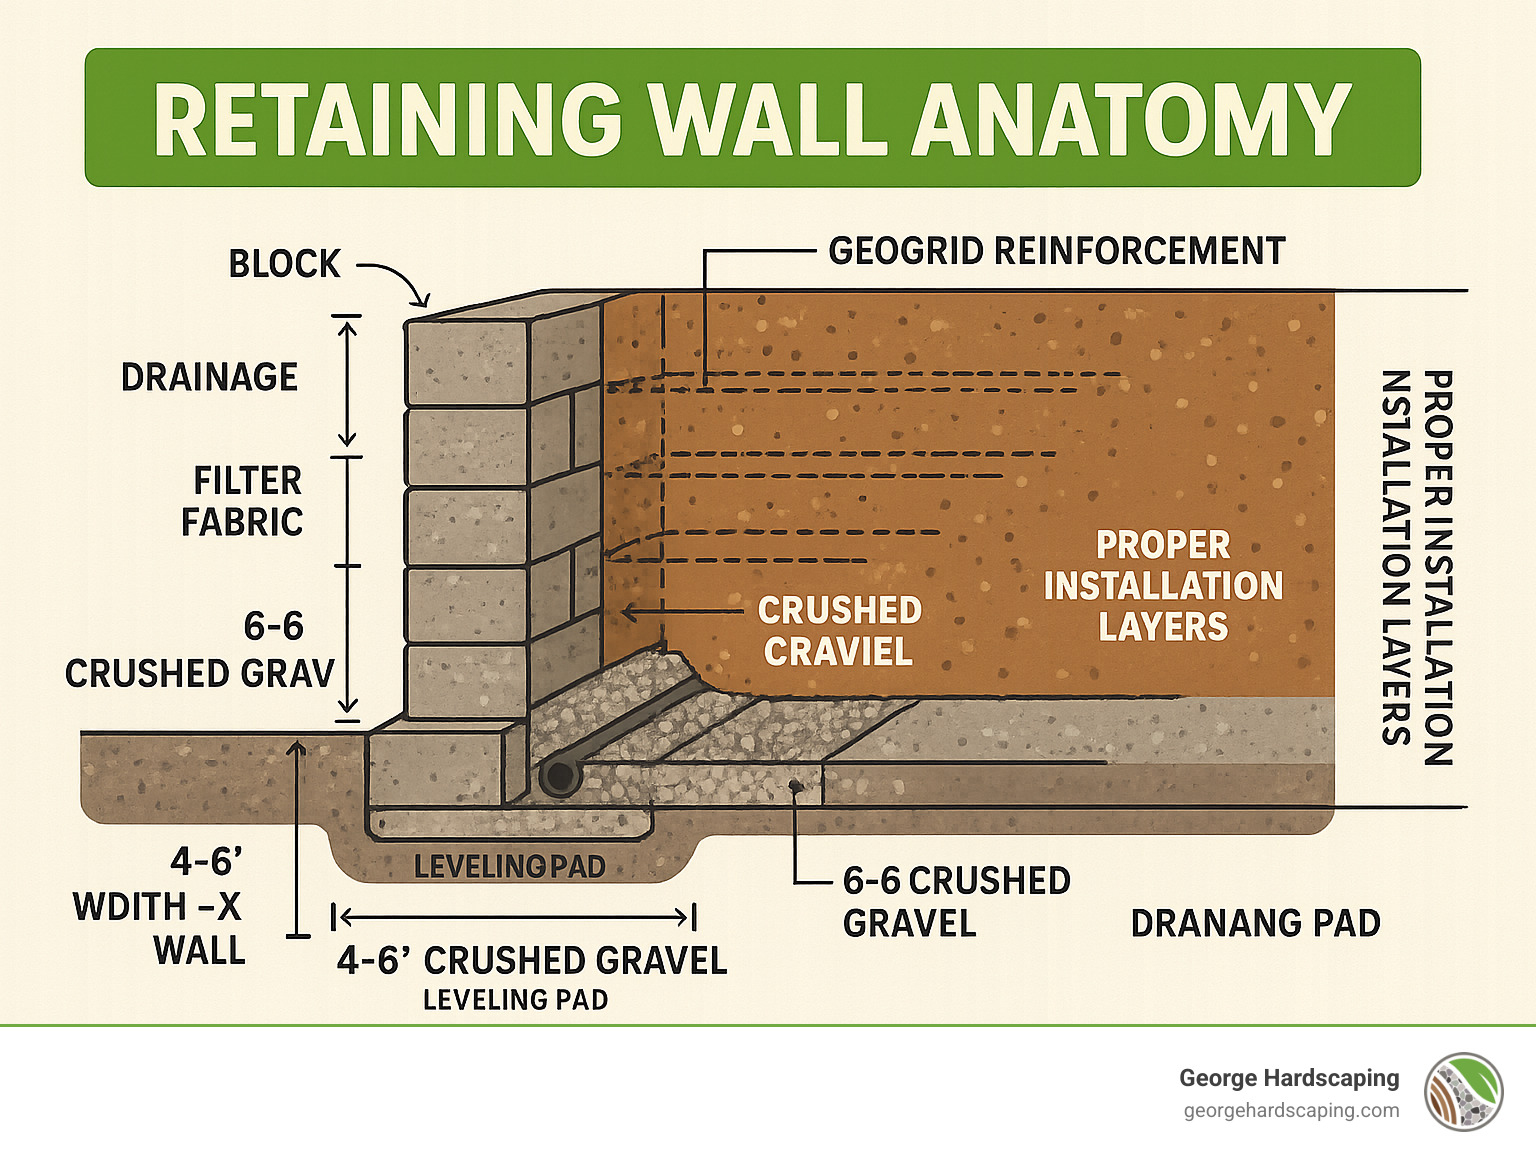
Base Preparation
Start by marking your wall’s footprint using stakes and string for straight sections or a garden hose for curves.
Dig your trench at least 24 inches wide (double the depth of a typical block) and at least 6 inches deep plus an additional inch for every foot of planned wall height. The trench should extend at least 14 inches behind where the wall face will sit.
Add a 6-inch layer of ¾” crushed stone (ASTM No. 57) and compact it thoroughly with at least two passes of a plate compactor.
Level your base carefully, creating a perfectly flat surface with a slight tilt (about 1 inch per 8 feet) away from the wall for drainage.
Drainage & Geogrid
Water is a retaining wall’s worst enemy. Line your excavated area with geotextile filter fabric, extending it up the back wall of your trench to prevent soil from clogging your drainage system.
After laying your first course of blocks, install a 4-inch perforated drainage pipe behind them with a gentle slope to guide water away.
Create a drainage zone at least 14 inches thick using ¾” crushed stone from the base all the way up to within 12 inches of your finished grade.
For walls exceeding 3-4 feet, install geogrid reinforcement perpendicular to the wall face, typically on every second or third course according to manufacturer specifications. Cut it to the proper length (usually 60% of your wall’s height) and pull it taut before securing it.
Laying Second & Higher Courses
Sweep off any debris from the blocks below before adding each new course.
Position each block so it spans the joint between two blocks below it (running bond pattern) to increase your wall’s strength.
Most modern retaining wall systems have a built-in setback or “batter” that automatically tilts your wall slightly into the slope as you build.
For inside curves, blocks will naturally touch at the front and fan slightly at the back. Outside curves do the opposite. For corners, either use dedicated corner blocks or cut standard blocks at 45-degree angles.
Check for level frequently—both front-to-back and side-to-side—and backfill in layers after completing each course, adding drainage stone behind the wall and compacting it thoroughly.
Never stack more than 18 inches of wall height before backfilling and compacting.
Capping & Finishing Touches
Clean the top course of blocks thoroughly, then apply a high-quality concrete adhesive designed for outdoor use.
Consider adding a slight overhang (1½ to 2 inches) with your cap blocks for visual appeal. Maintain consistent joints between caps for a clean look.
For the final grading, backfill the top 12 inches behind your wall with topsoil, creating a slope that directs surface water away from the wall at a 2-5% grade.
Consider these finishing elements to improve your project: integrated landscape lighting, planting pockets filled with cascading flowers, or built-in steps if your wall is part of a pathway system.
Costs, Maintenance & Aesthetic Integration
Understanding the financial investment for retaining walls installation helps set realistic expectations and prevents budget surprises.
Most homeowners across the country can expect to pay between $20 and $60 per square face foot for standard retaining walls. However, premium projects with high-end materials, intricate designs, or challenging site conditions can push that figure to $180+ per square foot. These estimates typically include both materials and professional installation costs.
Your final price tag will be influenced by several key factors: wall height and length, material choice, site access challenges, soil conditions, and drainage requirements.
Going the DIY route can save 50-60% on labor costs, but professional installation brings expertise, efficiency, and often includes workmanship warranties.
According to National Association of Realtors research, 79% of homeowners report a major sense of accomplishment after completing landscape projects like retaining walls, with many enjoying their outdoor spaces more than ever before.
Budget Breakdown & Material Price Ranges
Here’s what you might expect to pay for various materials (note that these are average costs based on internet data and not actual costs for George Hardscaping):
- Concrete block retaining walls: Basic blocks typically run $8-$25 per square foot, while premium blocks range from $20-$75 per square foot. Cap blocks generally cost $3-$12 per linear foot.
- Natural stone retaining walls: Fieldstone walls average $25-$80 per square foot, while precisely cut stone can range from $40-$120 per square foot.
- Timber retaining walls: Pressure-treated lumber might cost $15-$45 per square foot, with railroad tie walls running $20-$60 per square foot.
Additional materials include crushed stone ($45-$140 per ton), filter fabric ($0.50-$1.50 per square foot), drainage pipe ($0.75-$2.25 per linear foot), and geogrid reinforcement ($1-$3 per square foot).
Don’t forget to budget for permit fees ($50-$450 throughout Essex County) and equipment rentals if needed.
Long-Term Care & Upgrades
A properly installed retaining wall requires relatively little maintenance, but regular attention will keep it looking beautiful and functioning properly for decades.
Make annual inspections part of your spring routine, looking for signs of leaning, bulging, or cracking. Check that drainage systems are functioning properly and examine areas around the wall for erosion or settling.
Clear debris from drainage outlets before winter, address small issues promptly, and maintain the proper grade behind the wall.
For aesthetics, remove stains with appropriate cleaners, control weeds in wall joints, and consider applying a sealer to concrete blocks every 3-5 years.
Popular upgrades include landscape lighting, planter boxes for cascading flowers, built-in seating areas, and integrated water features or firepits.
Learn more about Retaining Wall Construction Cost on our dedicated page.
Common Mistakes, Pro Tips & When to Call a Professional
Even enthusiastic DIYers can run into trouble with retaining walls installation. Here are some common pitfalls to avoid:
- Poor drainage: Water behind your wall creates enormous pressure that can cause failure
- Rushing the foundation: Your base needs proper depth and thorough compaction
- Skipping proper compaction: Every layer needs to be firmly packed
- Underestimating when geogrid is needed: Walls over 3-4 feet typically need this additional support
- Ignoring building codes: Don’t skip the permit process
- Not accounting for freeze-thaw cycles: Proper drainage is doubly important in our Massachusetts climate
- Building the entire wall before backfilling: Never stack more than 18 inches before adding and compacting backfill
Signs You Need an Engineer
There are times when even capable DIYers should call in professional help:
- Walls over 4 feet tall almost always require an engineer’s design and proper permits
- Walls supporting significant weight (driveway, hot tub, structure)
- Challenging soil conditions (heavy clay or loose sandy soil)
- Complex wall designs with multiple curves, corners, or terraces
- Water management challenges (high water tables, underground springs, significant runoff)
- Walls retaining a pool deck
Pro Tips for Success
After installing countless retaining walls throughout Essex County, here are some insider tips:
- Bury that first course properly: At minimum, half of your first block row should be below grade
- Compact in thin layers: Never try to compact more than 8 inches of material at once
- Keep your joints staggered: Make sure blocks in adjacent courses overlap by at least ¼ of their length
- Keep heavy equipment at a distance: Stay at least 3 feet away from the back of your wall
- Always slope away from your wall: Create a 2-5% grade sloping away from the top
- Buy extra materials: Purchase about 10% more blocks than your calculations suggest
- Time your project well: Try to build after a dry spell when soil is manageable
- Use string lines: Maintain perfect alignment with string lines for straight sections
- Sweep between courses: Keep block surfaces clean to ensure proper seating
More info about How to Find a Contractor to Build a Retaining Wall
Frequently Asked Questions about Retaining Walls Installation
How deep should the trench be for my wall?
Dig 6 inches deep, then add 1 inch for each foot of planned wall height. For a 3-foot wall, you’ll need a 9-inch deep trench. This allows for your 6-inch gravel base while partially burying that critical first course of blocks. In Massachusetts, where freeze-thaw cycles can be harsh, we sometimes recommend going slightly deeper for extra stability.
Do I always need geogrid reinforcement?
Not every wall requires geogrid, but it’s like insurance for your investment. Geogrid reinforcement becomes essential for walls over 3-4 feet tall, walls supporting additional weight, walls built in challenging soil conditions, or walls with steep slopes above them.
Even for smaller projects, including geogrid can significantly extend your wall’s lifespan, making the difference between a wall that lasts a decade and one that serves your family for generations.
What permits are required in my area?
Permit requirements across Essex County vary significantly from town to town. As a general guideline:
- Walls under 3 feet tall typically don’t require permits in many towns, though there are exceptions
- Walls beyond 4 feet in height almost certainly need both permits and professionally engineered plans
- Walls near property boundaries often trigger additional approval requirements
- Walls near conservation areas or wetland buffer zones need Conservation Commission approval
Before starting your Retaining Walls Installation project, check with your local building department. While permits might seem like an unnecessary hurdle, they exist to ensure your wall is safe and won’t create problems for neighboring properties. A properly permitted wall also adds value to your home should you ever decide to sell.
Conclusion
A properly executed retaining walls installation transforms your property in ways that go far beyond simply holding back soil. These hardscape features create beautiful, usable outdoor spaces while significantly boosting your property’s value and curb appeal. The secret to a retaining wall that stands the test of time isn’t complicated—it’s about careful planning, quality materials, and paying close attention to each installation step.
Building a retaining wall isn’t a small undertaking. While DIY installation is certainly possible for walls under 3-4 feet, don’t underestimate the physical demands and technical knowledge required. Whether you decide to tackle this project yourself or bring in the experts, understanding the fundamental principles we’ve covered helps ensure you’ll get a structure that serves you well for decades.
New England’s unique climate presents special challenges for retaining walls. Our freeze-thaw cycles can be particularly brutal on improperly built structures. That’s why we emphasize drainage and base preparation so heavily—these hidden elements might not be visible in the finished project, but they’re absolutely crucial for long-term success.
If you’re looking at your sloped yard and imagining what it could become, or dealing with erosion issues that need addressing, a well-built retaining wall offers one of the best returns on investment in landscape improvement. According to industry research, these projects consistently rank among the most valuable outdoor improvements you can make to your property.
We hope this guide has equipped you with the knowledge to approach your retaining wall project with confidence. The most successful landscapes balance beauty with function—and a properly installed retaining wall delivers both in abundance.
For personalized advice or professional installation services throughout Beverly, Danvers, Salem, and the North Shore, we’re always here to help. At George Hardscaping, we’re passionate about creating outdoor spaces that improve both the beauty and functionality of your property, with quality craftsmanship that stands the test of time.
