Paver Pool Coping Installation: 6 Powerful Steps for Success 2025
The Edge that Makes or Breaks Your Pool
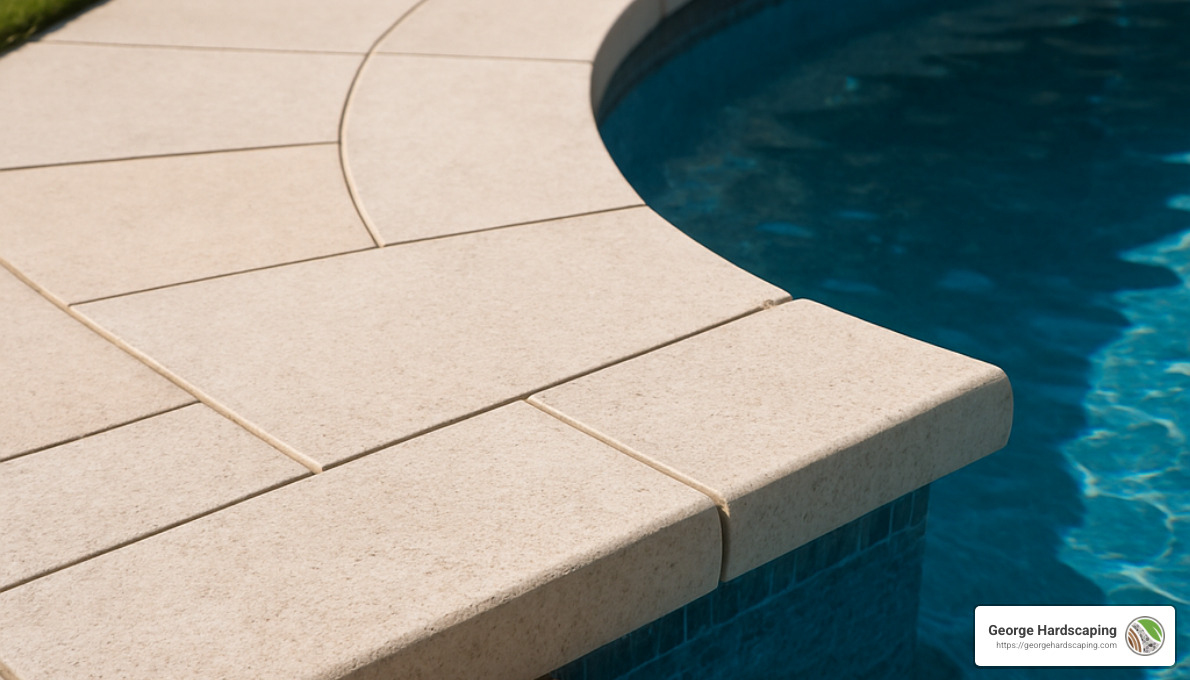
You know that satisfying feeling when you see a perfectly finished edge? That’s what paver pool coping installation brings to your swimming pool – that polished, professional look that ties everything together. But it’s not just about looks.
Paver pool coping installation is the process of creating that finished edge around your pool’s perimeter using specialized pavers. Think of it as the frame around a beautiful painting – it completes the picture while serving crucial functions.
| Quick Guide: Paver Pool Coping Installation |
|---|
| Materials Needed: Concrete/stone/porcelain pavers, modified mortar, concrete adhesive, foam expansion joint, polymeric sand |
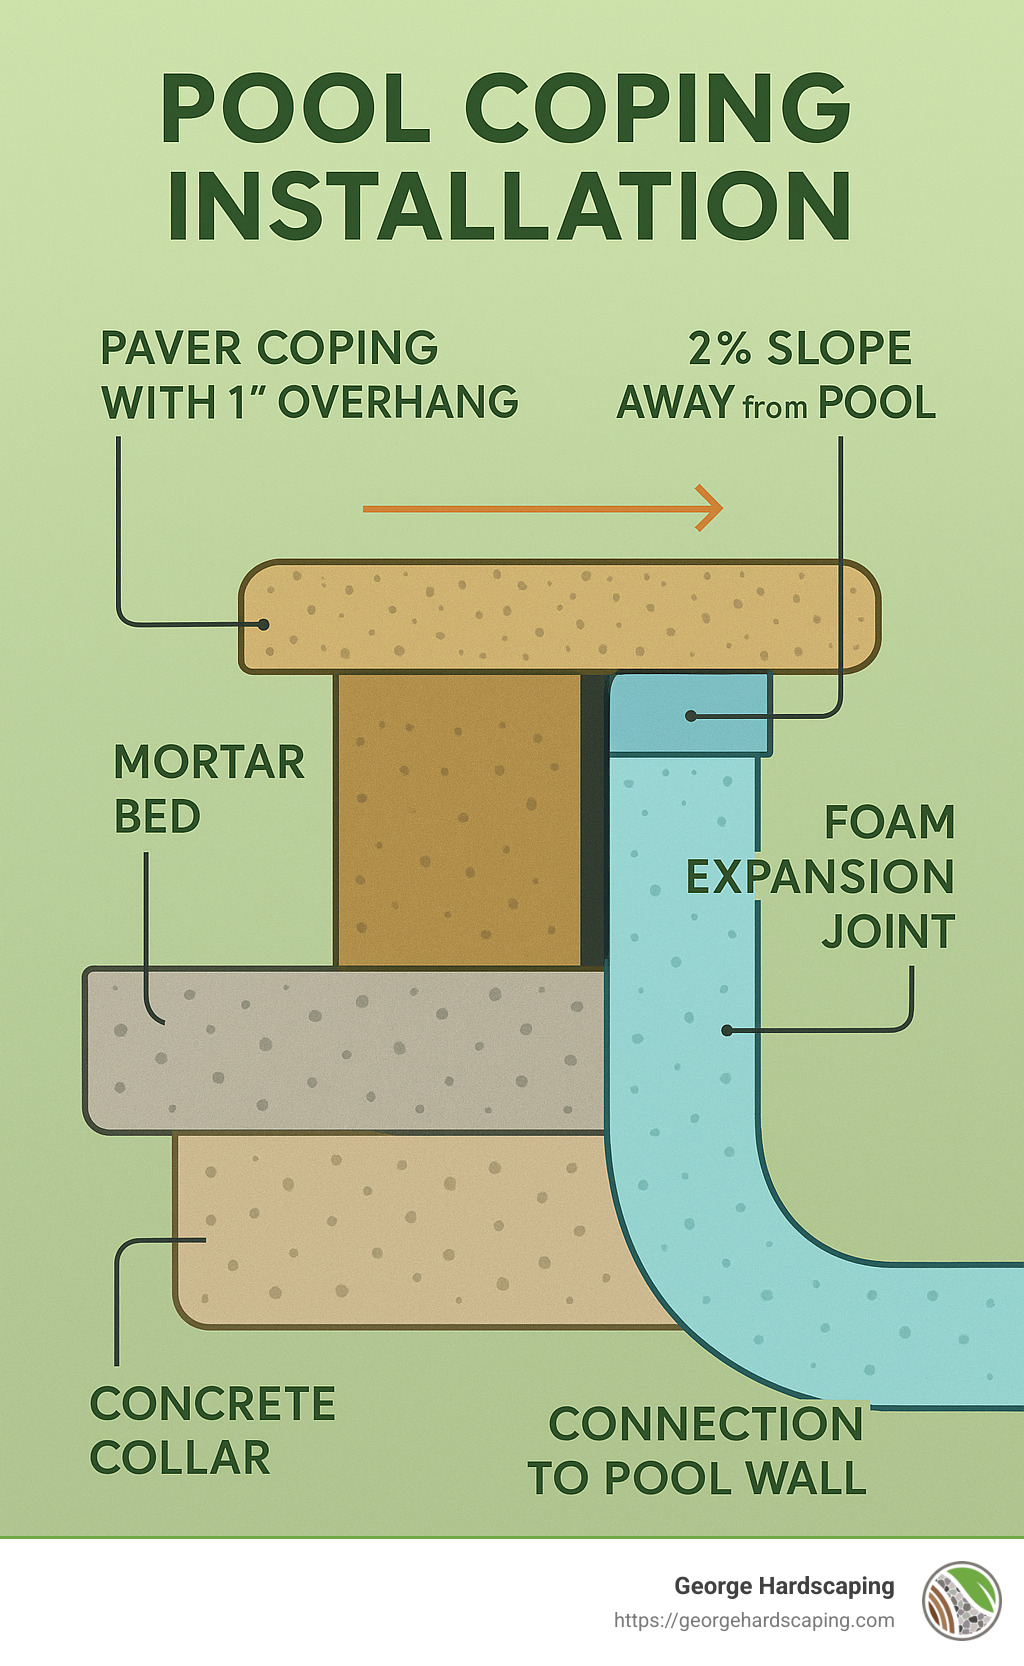
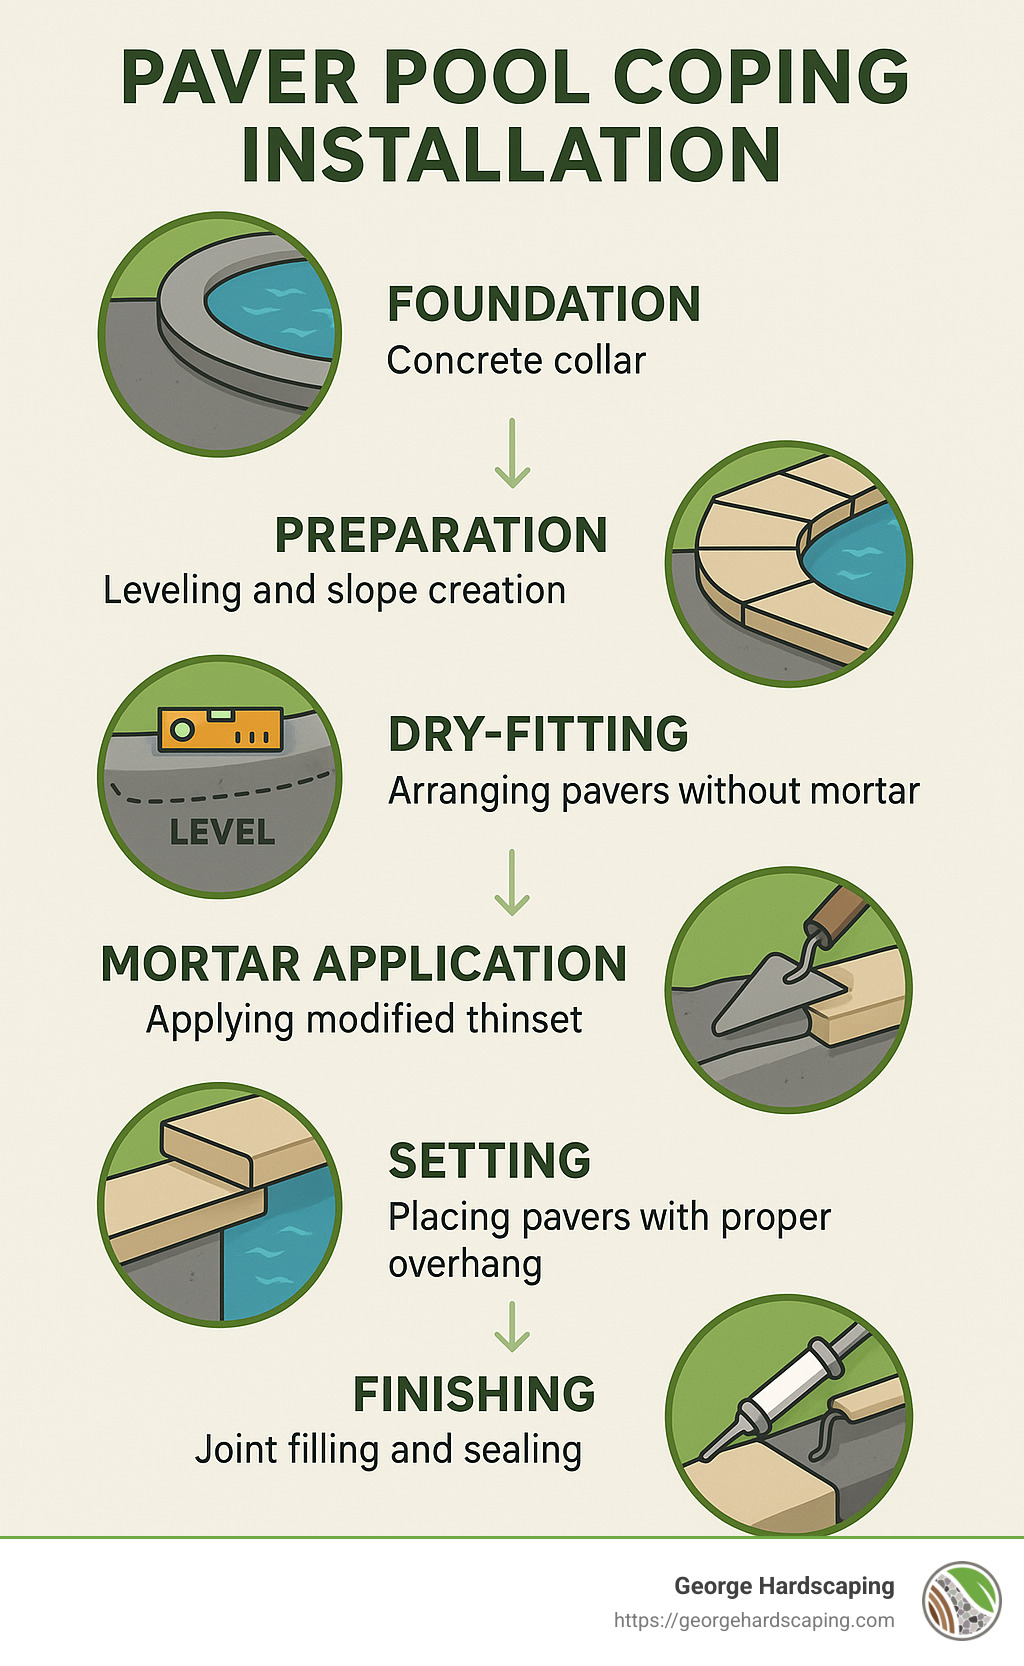
| Key Steps: 1) Pour concrete collar foundation 2) Prepare and level surface 3) Dry-fit pavers 4) Apply mortar/adhesive 5) Set pavers with 1″ overhang 6) Install expansion joints |
| Average Cost: $30-$100 per linear foot (based on internet data) |
| Time Required: 2-3 days (not including concrete curing time) |
| DIY Difficulty: Moderate to High |
The edge of your pool might seem like a small detail in the grand scheme of things, but it’s where so much of the pool experience happens. It’s where your kids will sit dangling their feet on scorching summer days. It’s your resting spot between swims. It’s the transition everyone touches, sees, and experiences.
Pool coping serves as the protective cap covering the top of your pool wall (technically called the bond beam). Beyond just looking pretty, this crucial element:
Protects your pool structure from water damage by directing splashed water away from behind the pool shell
Provides a non-slip surface for safer pool entry and exit – a must-have safety feature for families
Creates comfortable seating around the perimeter for those who prefer to dip just their toes
Shields the pool liner from exposure to the elements, extending its lifespan
Improves the overall aesthetic of your entire pool area, boosting your backyard’s appeal
As one veteran pool builder wisely observed, “The edge of a pool gets more action than the middle of it.” This insight perfectly captures why coping deserves careful consideration.
When it comes to materials, pavers offer distinct advantages for pool coping. Unlike poured concrete, paver coping gives you incredible design flexibility while maintaining functionality. They’re durable enough to withstand constant exposure to water, chemicals, and the elements. Best of all, if a single paver gets damaged, you can replace just that piece rather than redoing the entire edge.
Whether you’re building from scratch or renovating an aging pool, understanding proper paver pool coping installation ensures your pool edge will look beautiful and perform flawlessly for years to come. The right coping creates that seamless transition between your water oasis and the surrounding landscape.
Want to learn more about complementary pool hardscaping options? Check out our guides on Pool Paver Decks Installation and how to install travertine pavers around pool.
What Is Pool Coping & Why It Matters
Have you ever noticed how the edge of a swimming pool feels different from the rest of the pool? That’s the pool coping – and it’s much more than just a pretty border. Pool coping serves as the protective cap that covers the top of your pool wall (known as the bond beam). It’s like the frame around a beautiful painting, except this frame also works hard to protect your investment.
“When a person sits at the edge of a pool to dangle their feet, they’re literally sitting on the coping,” explains a seasoned pool installer. “It’s the transition point between your pool and the surrounding deck—a bridge between wet and dry zones.”
Think of pool coping as the handshake between your swimming pool and the rest of your backyard. This critical junction needs to be both functional and beautiful, protecting the pool structure while creating a comfortable place for swimmers to enter, exit, and relax.
Beyond just looking good, your pool coping handles several essential jobs. It shields the concrete bond beam from water damage, prevents splash-out from eroding the area behind your pool, provides a slip-resistant entry point, offers comfortable seating around the perimeter, and maintains your pool’s structural integrity for years to come.
For inground pools, especially those in regions with freeze-thaw cycles like Essex County, MA, quality coping installation isn’t just a nice-to-have—it’s absolutely essential for your pool’s long-term health and your family’s enjoyment.
Key Functions Every Homeowner Should Know
When we talk with North Shore homeowners about paver pool coping installation, we always highlight several key functions that make this pool element so crucial.
First, let’s talk about water diversion. Properly installed coping includes a slight outward slope (usually about 2%) that directs splashed water away from your pool wall and toward your deck drains. This seemingly small detail prevents water from seeping behind the pool shell where it could cause major structural problems over time.
In Massachusetts, where we experience everything from scorching summers to freezing winters, freeze-thaw defense becomes incredibly important. When water gets trapped between your pool and deck and then freezes, it expands and can crack concrete or shift pavers. Good coping installation with proper expansion joints helps protect against this seasonal threat.
“The coping is where clients envision themselves relaxing with friends and an umbrella drink,” one industry expert notes. “But it’s also their pool’s first line of defense against the elements.”
For vinyl liner pools, coping provides essential liner protection by securing the liner in place and preventing it from slipping or being damaged. The coping neatly covers the liner track, shielding it from harsh UV rays and daily wear and tear.

Well-designed coping creates clear edge definition between your pool and surrounding deck. This visual boundary improves safety by making the pool edge more visible while providing an attractive frame for your backyard oasis. You’ll appreciate this definition both for its beauty and the way it helps prevent accidental falls into the water.
Let’s not forget about seating comfort. A thoughtfully installed coping edge doubles as an informal seating area. Many of our clients tell us they use their pool coping as a comfortable perch more often than they actually swim! Rounded bullnose edges are particularly popular for this reason, offering a smooth, comfortable surface for sitting.
Finally, coping creates a controlled structural transition between your pool and surrounding deck. Since these elements may settle differently over time, proper coping with expansion joints prevents cracking and damage at this crucial juncture.
Understanding these functions helps explain why cutting corners on paver pool coping installation often leads to headaches down the road. Your beautiful pool deserves an edge that works as good as it looks—protecting your investment while enhancing your outdoor enjoyment for years to come.
Why Choose Paver Coping Over Other Materials
When planning your dream pool, the material you select for the edge makes all the difference in both looks and longevity. Paver pool coping has become increasingly popular among our Essex County clients, and for good reason.
Think about it – the edge of your pool gets touched by everyone who enters or exits the water. It’s where your kids will sit to dangle their feet, where you’ll perch with your morning coffee, and where water constantly splashes. This high-traffic area deserves special consideration.
Durability is perhaps the most compelling reason to choose pavers. Quality pool coping pavers stand up to freeze-thaw cycles remarkably well – a crucial factor in our Massachusetts climate where winter can be tough on outdoor surfaces.
What happens if a section gets damaged? With modular repair capabilities, you can replace just one or two damaged pavers without tearing out the entire pool edge. This targeted approach saves both time and money over your pool’s lifetime.
Safety matters too. Most pool coping pavers offer excellent slip resistance, especially those with textured finishes. When wet feet meet pool edges, this traction becomes a vital safety feature.
Ever burned your feet on hot concrete in summer? Many paver materials, especially natural stone options, maintain a cooler surface than poured concrete, making barefoot comfort possible even on scorching days.
Perhaps most exciting for homeowners is the incredible design flexibility pavers offer. From classic bullnose edges to sleek modern profiles, the range of shapes, colors, and textures allows your pool to perfectly complement your home’s architecture and your personal style.
| Material | Cost Range* | Durability | Heat Retention | Maintenance | Installation Complexity |
|---|---|---|---|---|---|
| Concrete Pavers | $30-$60/linear ft | High | Moderate | Low (reseal every 3-5 yrs) | Moderate |
| Natural Stone | $45-$150/linear ft | Very High | Low-Moderate | Moderate (regular sealing) | High |
| Porcelain Pavers | $50-$120/linear ft | High | Low | Very Low | Moderate |
| Poured Concrete | $25-$50/linear ft | Moderate | High | Moderate (crack repair) | Low |
| Brick | $30-$75/linear ft | Moderate-High | High | Moderate | Moderate |
*Pricing reflects internet data research and not actual costs for George Hardscaping services. Actual costs may vary significantly based on design complexity, site access, and regional factors.
For homeowners weighing options, consider that concrete coping might seem less expensive initially, but often lacks the character and durability of pavers. Natural stone offers timeless elegance but requires proper sealing. Porcelain provides remarkable durability with minimal maintenance but comes at a premium price point.
Want to explore more hardscape possibilities for your outdoor space? Visit our hardscaping services page for inspiration and information.
Popular Paver Materials, Styles & Finishes
The world of pool coping pavers has evolved tremendously in recent years, offering North Shore homeowners an impressive array of options to match any aesthetic vision or practical need.
Concrete Pavers remain the workhorse of the pool coping world, balancing affordability with impressive durability. Today’s manufacturing techniques have come so far that many concrete pavers convincingly mimic more expensive natural materials while maintaining consistent dimensions that make installation smoother.
Our Beverly and Marblehead clients particularly love bullnose coping with its comfortable rounded front edge that’s perfect for sitting. For more contemporary homes, drop-face coping creates a clean, vertical edge that beautifully conceals the pool wall. Minimalist designs often benefit from eased-edge coping with its subtly softened corners that maintain a refined appearance.
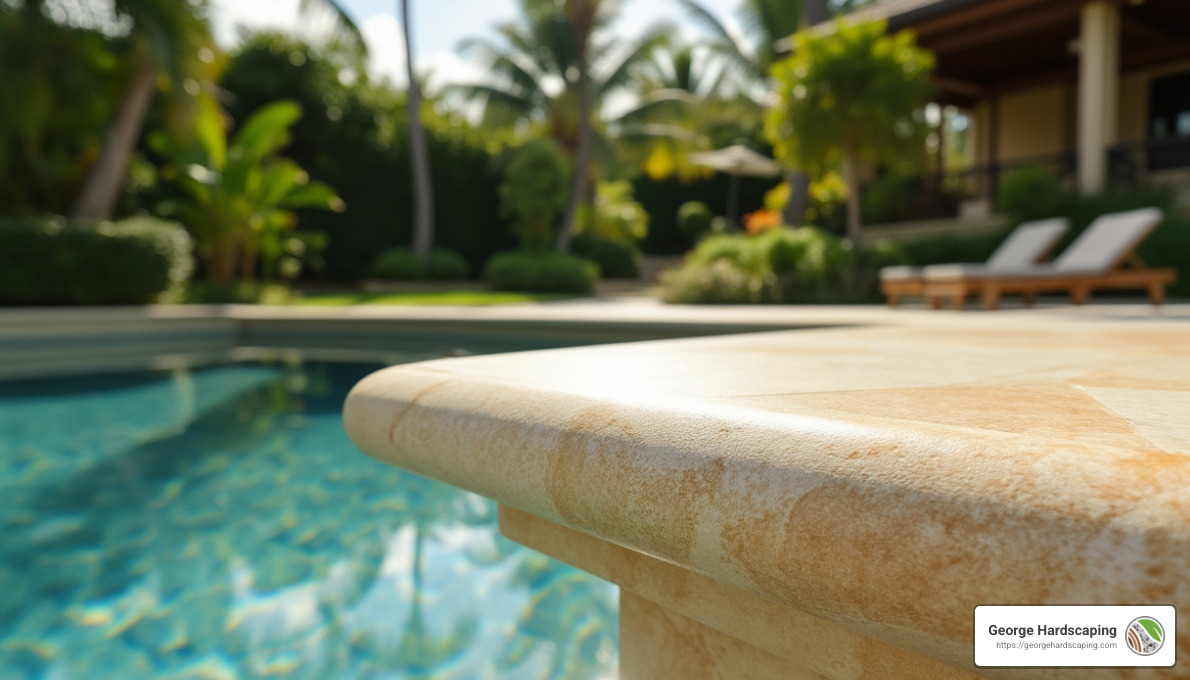
Natural Stone delivers best character and elegance for homeowners seeking authentic materials. Travertine has become especially popular along the North Shore for its cool-to-the-touch surface and excellent slip resistance when wet. The subtle pitting and natural variations create a timeless Mediterranean feel that works beautifully with our coastal environments.
Limestone offers a cleaner, more uniform appearance while still providing subtle natural variations. Bluestone creates a distinctive look with rich color that perfectly complements traditional New England architecture. For exceptional durability, especially in our harsh freeze-thaw environment, granite stands virtually best.
The newest star in the pool coping world is Porcelain Pavers. These remarkable materials resist staining (perfect for sunscreen and food spills), absorb virtually no water (crucial for winter durability), maintain their color beautifully over time, and create an ultra-contemporary appearance with clean lines.
The finish of your coping dramatically affects both its look and function. Smooth finishes create a sleek, modern appearance but require careful selection to ensure adequate slip resistance. Textured finishes improve safety with better traction when wet. For that perfectly weathered look, tumbled finishes offer an aged appearance ideal for rustic or Mediterranean styles. Brushed or antiqued finishes strike an excellent balance between slip resistance and barefoot comfort.
The edge profile you select impacts both the visual effect and practical use of your pool coping. Beyond the classic bullnose rounded edge, options include square edge for contemporary, clean-lined designs, chamfered edge with its 45-degree angle cut balancing modern aesthetics with comfort, and double bullnose rounded on both sides for island applications or raised pool edges.
“Rounded-edge design for improved user safety and comfort has become increasingly popular,” notes one industry expert. “Homeowners are seeking coping options that not only look beautiful but also feel good when you’re sitting poolside.”
Many of our clients throughout Salem, Beverly and surrounding North Shore communities are particularly drawn to the Bali Travertina Raw style. This innovative material perfectly mimics natural travertine while offering the durability and consistency of engineered pavers—ideal for our Massachusetts climate with its challenging seasonal swings.
Step-by-Step Paver Pool Coping Installation
When it comes to paver pool coping installation, getting the details right makes all the difference between a stunning pool edge that lasts decades and one that deteriorates after just a few seasons. At George Hardscaping, we’ve refined our installation process through hundreds of projects across Beverly, Salem, and throughout Essex County. Let me walk you through our approach to creating the perfect pool edge.
Tools & Materials for Paver Pool Coping Installation
Before tackling any pool coping project, proper preparation is essential. Having the right tools and materials ready saves time and prevents frustrating mid-project runs to the hardware store.
For tools, you’ll need a quality rubber mallet (for setting pavers without damaging them), a wet masonry saw with diamond blade (for those precise cuts around curves), and both a 4-foot level and torpedo level to ensure proper slope. A notched trowel is crucial for applying mortar evenly, while string lines and stakes help maintain perfect alignment around the entire perimeter.
“Take time and care when preparing your sub-base,” advises one of our senior installers. “It’s the foundation for the entire paver system, and shortcuts here will cause problems later.”
On the materials side, you’ll need your chosen coping stones (calculate linear footage plus about 10% extra for cuts and waste), modified thinset mortar or mastic adhesive, concrete mix for the collar foundation, and reinforcement materials like rebar. Don’t forget polymeric sand, backer rod, self-leveling caulk, and foam expansion joint material – these seemingly minor components play major roles in preventing future problems.
Safety should never be an afterthought. Always have safety glasses, a dust mask or respirator, knee pads, work gloves, ear protection, and steel-toed boots on hand. Cutting pavers generates significant dust and noise, so protecting yourself is non-negotiable.
Sub-Base & Bond Beam Preparation
The foundation for your pool coping is like the foundation for a house – invisible once completed, but absolutely critical to long-term success. Different pool types require slightly different approaches:
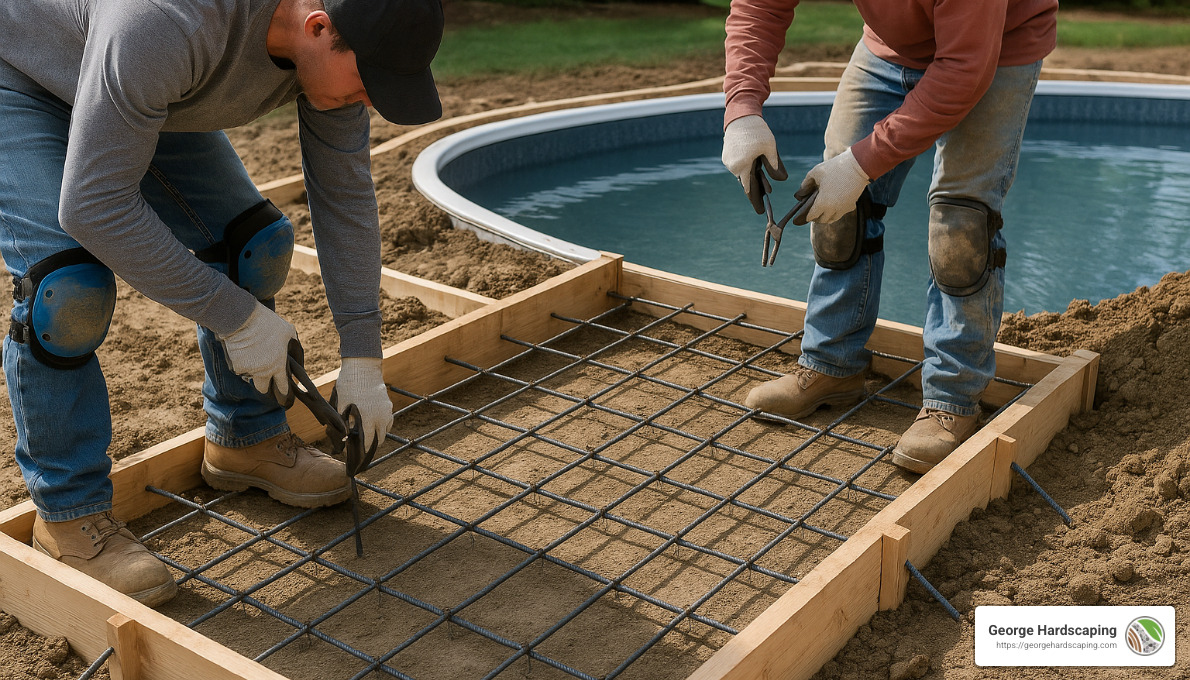
For vinyl liner or fiberglass pools, we create a reinforced concrete collar around the entire pool perimeter. This collar should be at least 6″×6″×6″ (width × depth × height) and include a ½” rebar grid for strength. We position the collar about ½” below the top of the pool wall, creating space for the mortar bed and coping thickness. After pouring, we leave the surface intentionally rough to promote better adhesion and allow at least 3 days of curing time before moving forward.
With concrete or gunite pools, we focus on properly preparing the existing bond beam by scarifying (roughening) the top surface. This creates more surface area for the mortar to grip. After thoroughly cleaning away debris and dust, we pre-wet the concrete before applying mortar to prevent moisture being pulled out of the mortar mix too quickly.
For properties with unstable soil conditions (which we occasionally encounter in certain parts of Essex County), additional measures may be necessary. This might include a recessed concrete overlay with proper reinforcement or a 4″ thick concrete underbase with ½” rebar supported on Sonotubes spaced at 4-foot intervals. In all cases, we ensure a 2% slope away from the pool edge for proper drainage.
“The concrete collar is the unsung hero of a successful paver pool coping installation,” explains one of our senior installers. “It provides a stable, level surface that prevents settlement and maintains the integrity of your pool edge for decades.”
For more detailed information on concrete collars, you can refer to this external guide on how to install coping.
Paver Pool Coping Installation: Laying, Cutting, Jointing
With your foundation properly prepared, you’re ready for the most visible aspect of the installation – setting the actual coping stones. We always begin with a dry fitting, laying out all coping units around the pool without mortar. This crucial planning step reveals any potential issues before mortar makes changes difficult.
We always tackle the corners first. For 90° corners, we typically use mitered cuts (two pieces cut at 45° angles) for the cleanest appearance, though butt joints (where one piece is cut square against the adjacent piece) are sometimes appropriate. For curved pools, we limit coping unit length to a maximum of 18″ to create smoother curves without awkward angles.
Cutting requires patience and precision. For curves, we dry-fit pavers along the curve, mark parallel cut lines on each piece, and make careful cuts with a wet saw. We often slightly undercut these pieces so the visible joint appears perfectly tight. Always test-fit all pieces before applying any mortar.
When it’s time for installation, we mix modified thinset mortar according to manufacturer specifications and apply it to the concrete collar using a notched trowel. We also “back-butter” each coping stone with a thin layer of mortar for improved adhesion. For concrete pools, we apply concrete adhesive directly to the pool wall in addition to the mortar base.
As we place each stone, we maintain a consistent 1-2″ overhang over the pool wall. This overhang is both functional (directing water back into the pool) and aesthetic (creating an appealing shadow line). We use a rubber mallet to tap stones into position, checking level constantly and maintaining that crucial 2% slope away from the pool for drainage.
For jointing between coping stones, we typically use one of three approaches: traditional mortar joints (usually with ¼” spacing), tight-fit butt joints for a seamless look, or flexible polymer-modified grout that better handles freeze-thaw cycles. In our New England climate, that flexibility is particularly valuable.
“Use contrasting mortar colors to highlight coping joints for visual interest,” suggests our design specialist. “This subtle detail can lift the entire appearance of your pool edge.”
After installation, immediate cleanup is essential. We remove any mortar residue from the coping surface with a soft brush, warm water, and a sponge before it has a chance to harden. Then we allow at least 24 hours of setting time before applying any weight or continuing with deck installation.
Transition to Deck Pavers & Expansion Strategy
The junction between your pool coping and surrounding deck is a critical area that requires special attention. This transition zone experiences significant stress from freeze-thaw cycles, ground movement, and differential settling – particularly relevant for our Massachusetts climate.
Creating an effective expansion joint is non-negotiable. We install a ½” thick foam expansion joint between the back edge of the coping and the beginning of the deck pavers, running continuously around the entire pool perimeter. After the foam is in place, we apply a self-leveling caulk to seal the top portion while still allowing for movement. We select caulk colors that complement the pavers and overall pool design.
“What we have been told to do, and it makes sense to me, is to put foam expansion between the pavers and the coping. Then fill the top with a self-leveling caulk,” explains one of our experienced team members.
When installing the deck pavers, we ensure a minimum 2% slope away from the pool for proper drainage. We never use a plate compactor directly on or adjacent to the coping stones, as this can cause damage or movement. Many clients choose to use the same paver style for both coping and deck to create visual harmony, though complementary materials can create striking contrasts when designed thoughtfully.
In our Essex County freeze-thaw climate, properly managing expansion and movement is essential. The combination of foam backer rod and flexible self-leveling caulk protects rigid coping by absorbing frost heave and seasonal ground movement. While some installers use polymeric sand alone for small gaps (around ⅜”), this provides significantly less movement accommodation than a proper expansion joint.
“If you don’t allow for movement between your coping and deck, something’s going to give—and it’s usually your beautiful coping that cracks first,” warns our installation manager. “That small expansion joint is insurance for your entire investment.”
For more information about our pool deck installation services, visit our Pool Deck Installation page.
Costs, Maintenance & DIY vs Pro
Let’s talk dollars and sense when it comes to paver pool coping installation. Whether you’re planning your budget or deciding if this is a DIY project, understanding the real costs and long-term maintenance will help you make smart choices for your pool edge.
When homeowners ask me about pricing, I always explain that several factors influence the final investment. Based on internet data (not George Hardscaping pricing), most pool owners can expect to spend between $30-$100 per linear foot for professional installation, including both materials and labor. For perspective, a typical 16′ x 32′ rectangular pool has about 96 linear feet of coping, putting the total project between $2,880 and $9,600.
What drives this wide price range? Material choice makes a significant difference. Concrete pavers typically run $5-$15 per linear foot, while natural stone jumps to $15-$40, and premium porcelain options land around $20-$45 per linear foot. Then there’s the labor component, which internet research suggests ranges from $20-$60 per linear foot depending on your location and project complexity.
Curved pools, special features, and difficult access can all push costs toward the higher end of these ranges. As one of my colleagues likes to say, “The pool’s shape might be simple, but the coping never is.”
One of the beauties of paver coping is its relatively manageable maintenance routine. Unlike some pool features that demand constant attention, quality paver coping typically needs just a seasonal cleaning with mild soap and water. Every 3-5 years, you’ll want to apply a fresh coat of sealer to maintain that crisp appearance and protect against staining from sunscreen, food spills, and pool chemicals.
“Concrete pavers are chlorine- and salt-resistant and naturally slip-resistant,” notes one industry expert. “With minimal maintenance, they’ll maintain their beauty and functionality for decades.”
The real maintenance advantage comes when something goes wrong. If a single paver cracks or stains beyond repair, you can replace just that piece instead of redoing the entire coping—something impossible with poured concrete options.
DIY vs. Professional Installation
The eternal question: tackle it yourself or call in the pros? Paver pool coping installation sits firmly in the “challenging DIY” category, requiring specific skills and tools that most homeowners don’t have in their garage.
If you’re considering the DIY route, be honest about your:
Skill level – This project demands precise measuring, cutting, and leveling skills along with a solid understanding of mortar mixing and application.
Tools – You’ll need specialized equipment including a quality wet saw with diamond blade, which alone can cost $500-$1,000 to purchase or $75-$150 daily to rent.
Time – Most DIYers need 3-7 full days to complete an average pool coping installation, not including concrete curing time.
Physical ability – Hauling heavy pavers, mixing mortar, and kneeling for hours takes a serious physical toll.
The professional advantage goes beyond just speed. Experienced installers bring valuable knowledge about local climate considerations—particularly important in Essex County, where freeze-thaw cycles demand specific installation techniques to prevent winter damage.
“I would be extremely leery of having someone lay a paver coping on a vinyl pool that has never done so before,” one experienced contractor warns. “The skills needed for a beautiful, lasting installation come from doing dozens of these projects.”
When professionals install your coping, they also typically provide workmanship guarantees that protect your investment. Many homeowners find that peace of mind alone justifies the additional cost.
For scientific research on slip resistance and safety considerations for pool coping, the Belgard research on concrete pavers for pool coping provides excellent technical insights.
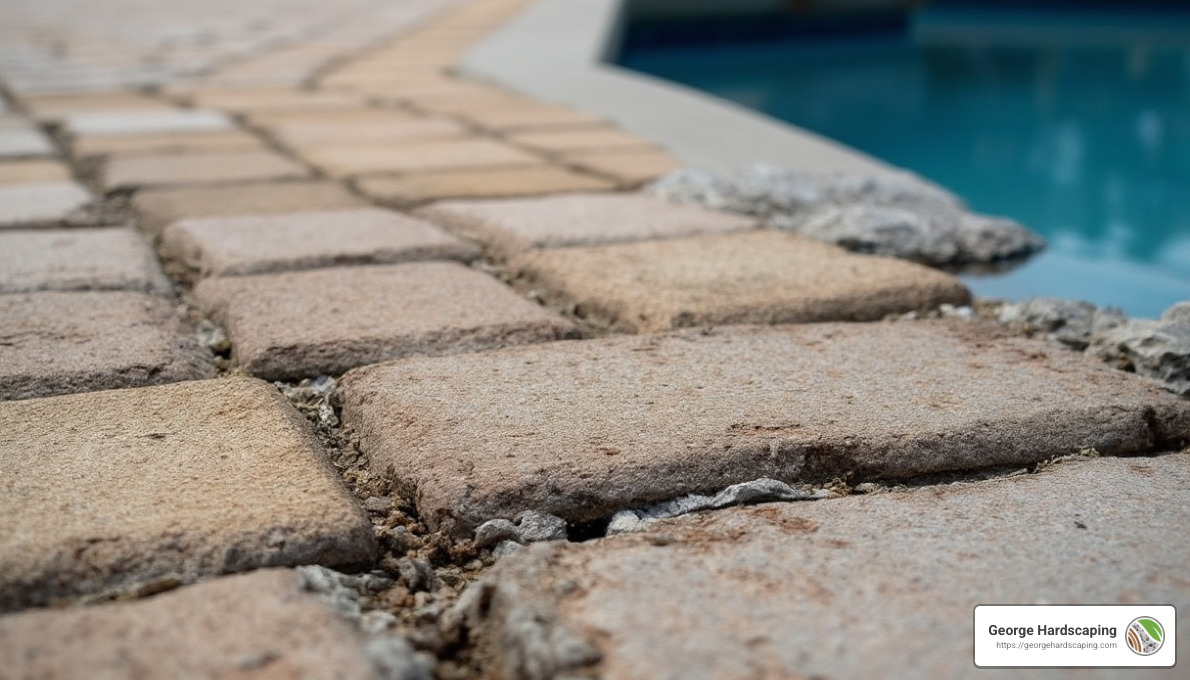
Common Mistakes to Avoid
Over years of installing pool coping throughout Essex County, we’ve seen the same mistakes pop up repeatedly. Learning from others’ missteps can save you significant heartache with your own project.
Skipping the expansion joint is perhaps the costliest error. That small foam strip between your coping and deck pavers might seem insignificant, but without it, Massachusetts’ freeze-thaw cycles will almost certainly crack your beautiful new coping within a season or two.
Failing to create a proper slope on your coping (ideally about 2% away from the pool) leads to standing water after rain or splashing. This not only creates slipping hazards but can eventually damage your pool structure as water seeps into places it shouldn’t.
Uneven overhang is immediately noticeable once your pool is filled. Beyond looking unprofessional, inconsistent overhangs can interfere with automatic pool covers and create unexpected toe-stubbing hazards for swimmers.
I’ve seen well-meaning DIYers use indoor thinset mortar for outdoor pool coping, only to have it completely fail after the first winter. Always use modified mortars specifically designed for exterior applications in freeze-thaw environments.
Many homeowners eager to finish their project rush through the foundation work, creating an inadequate concrete collar. This seemingly invisible component is actually the backbone of your entire coping system. Skimping here guarantees problems later.
Another common pitfall is neglecting proper sealing. That final coat of sealer isn’t just for looks—it’s essential protection against UV damage, staining, and water infiltration that can significantly extend the life of your coping.
“We do countless pool decks, and the ones that fail almost always ignored the expansion joint between rigid coping and flexible deck pavers,” shares a veteran installer. “That simple detail makes the difference between a coping that lasts 20+ years and one that cracks within the first winter.”
The good news? With proper installation techniques and quality materials, your pool coping can deliver decades of beauty and functionality with minimal maintenance—whether you DIY with careful research or trust professionals with your project.
FAQs & Quick-Fire Answers About Paver Pool Coping Installation
After years of installing pool coping across Beverly, Salem, Gloucester, and other North Shore communities, we’ve heard just about every question imaginable. Here are the most common questions homeowners ask us, along with straightforward answers that might help with your project planning.
How wide should the coping overhang be?
For most pool installations, we recommend a consistent 1-inch overhang over the pool wall. This “Goldilocks zone” provides just enough projection to properly direct water runoff while maintaining a clean, professional appearance.
“Too little overhang and water runs down the pool wall, potentially causing damage over time. Too much creates awkward shadows and makes cleaning your waterline a real chore,” explains one of our senior installers.
For vinyl liner pools, precision becomes even more critical since the overhang must clear the liner track without excessive projection. Most automatic pool covers also function best with this standard 1-inch measurement.
Can I install paver pool coping installation as a weekend DIY?
While technically possible, paver pool coping installation as a DIY project comes with significant challenges. Think of it as the swimming pool equivalent of hanging kitchen cabinets – it looks straightforward until you’re in the middle of it.
The reality is that professional installers bring years of experience cutting precise miters, creating smooth curves, and ensuring proper drainage slopes. They also have specialized wet saws, notched trowels, and levels that most homeowners don’t keep in their garage.
What our crew completes in 1-2 days typically stretches into a week-long project for even experienced DIYers. And unlike many home projects where mistakes can be easily fixed, errors in pool coping often require complete removal and reinstallation once the mortar sets.
If you’re particularly handy with masonry work and have access to proper tools, you might succeed. But most homeowners find that professional installation delivers better results and actually saves money when you factor in potential mistakes and tool purchases.
What’s the best way to cut curves during paver pool coping installation?
Creating smooth curves around your pool requires patience and precision. The secret is working with smaller sections – we typically limit curved coping pieces to 18 inches or less. This prevents the “connect-the-dots” effect where your round pool looks like a series of straight lines.
When cutting curves, we always:
1. Dry-fit everything first to visualize the final appearance
2. Create templates for complex curves to ensure perfect fits
3. Mark precise cutting lines on each piece
4. Slightly undercut the back edge of each piece, allowing tight front-facing joints
5. Test-fit again after cutting before applying any mortar
“The quality of your wet saw makes all the difference when cutting curves,” notes our lead installer. “A wobbly blade or underpowered saw will turn beautiful stone into expensive rubble pretty quickly.”
How do I ensure my paver coping can withstand freeze-thaw cycles?
New England winters can be brutal on pool coping. In Essex County, where freeze-thaw cycles are a fact of life, proper installation techniques become even more critical.
Material selection forms your first line of defense – choose pavers specifically rated for freeze-thaw conditions. Natural stone like granite and quality porcelain pavers typically perform exceptionally well in our climate.
The foundation matters enormously. We install reinforced concrete collars (minimum 6″×6″×6″) that provide stable support while allowing for inevitable ground movement. This might seem overbuilt, but it’s what prevents your beautiful coping from cracking during the first winter.
Perhaps most crucial is the expansion joint between your coping and deck pavers. This foam buffer allows for movement without transferring stress to your coping stones. We’ve seen countless DIY projects fail precisely because this critical detail was overlooked.
Other freeze-thaw considerations include proper drainage slope (approximately 2%), complete mortar coverage under pavers, and quality sealers that reduce water absorption.
What maintenance does paver pool coping require?
One of the beauties of paver pool coping installation is its relatively low maintenance requirements. With proper installation, your coping should serve you beautifully for decades with minimal care.
Most coping materials benefit from resealing every 3-5 years with a quality penetrating sealer. This simple step prevents staining from sunscreen, food spills, and pool chemicals while enhancing freeze-thaw resistance.
Regular cleaning with mild soap and water is typically all that’s needed for routine maintenance. For tougher stains, material-specific cleaners can tackle everything from rust to sunscreen marks without damaging your coping surface.
We recommend annual inspection of joints between coping stones, especially after severe winters. Catching and repairing minor joint issues early prevents water infiltration that could lead to more significant problems down the road.
How do I transition between different paver materials from coping to deck?
Creating a seamless transition between your pool coping and surrounding deck improves both safety and aesthetics. The key is thoughtful design that acknowledges these are separate systems that move differently over time.
Most professional installations include a border or soldier course in a complementary color or material. This visual break creates an intentional transition rather than an awkward meeting point.
The critical technical element is the expansion joint – typically ½-inch foam with self-leveling caulk on top. This allows your deck to move independently from your coping without creating stress cracks.
“The transition should be visually pleasing but technically separated,” explains our design consultant. “Think of it like expansion joints in sidewalks – they’re there for a reason, but we can make them look intentional rather than awkward.”
Is porcelain coping worth the higher cost?
Porcelain pool coping has gained tremendous popularity in recent years, and for good reason. Despite typically costing 20-40% more than concrete alternatives, many homeowners find the benefits compelling:
Exceptional stain resistance makes porcelain particularly well-suited for pools where sunscreen, food, and beverages are common. While natural stone might develop character patinas over time, porcelain maintains its original appearance with minimal effort.
Near-zero water absorption translates directly to superior freeze-thaw durability – a significant advantage in our Massachusetts climate. Water that can’t penetrate can’t freeze and expand inside the material.
Color stability means your pool coping will look virtually the same a decade from now as it did on installation day. Unlike some concrete products that can fade or change tone over time, porcelain maintains its appearance exceptionally well.
For high-end pool installations where appearance and longevity are priorities, porcelain often represents a worthwhile investment. However, quality concrete pavers remain an excellent choice with their own advantages in terms of design variety and value.
What type of mortar should I use for paver pool coping?
The mortar selection for paver pool coping installation is not a place to cut corners. Standard thinset intended for interior tile work will inevitably fail in the challenging pool environment.
Always use a polymer-modified thinset mortar specifically formulated for exterior and wet applications. Look for products that meet ANSI A118.4 or A118.15 ratings and explicitly state they’re suitable for freeze-thaw conditions.
Popular professional-grade options include Ardex X32/X37, Mapei Ultraflex LFT, or Laticrete 254 Platinum. While these specialty mortars cost more than standard thinset, they provide the flexibility and bonding strength necessary for long-term success in our New England climate.
“The mortar is literally what holds your entire project together,” reminds our materials specialist. “It’s hidden once installed, but it’s where quality installation truly begins.”
Conclusion
The perfect pool isn’t complete without properly installed coping—it’s truly the finishing touch that defines your pool’s appearance, safety, and longevity. Paver pool coping installation may seem complex, but the results are worth every minute spent getting the details right.
Whether you’re drawn to the classic look of concrete pavers, the natural elegance of stone, or the modern appeal of porcelain, following the proper installation techniques we’ve outlined ensures your pool edge will stand the test of time. From that crucial concrete collar foundation to the final sealer application, each step builds upon the last to create a beautiful, functional transition between your water oasis and surrounding landscape.
Having installed countless pool copings throughout Beverly, Marblehead, Salem, and communities across Essex County, we’ve seen how quality materials and proper installation make all the difference. The pools that continue to look stunning decade after decade aren’t necessarily the most expensive—they’re the ones where attention was paid to those critical details that many overlook.
Think of your pool coping as the handshake between your pool and the rest of your backyard. It needs to be firm, reliable, and make a good impression. When installed correctly, your coping doesn’t just frame your pool beautifully—it protects your investment from water damage, provides safe entry and exit points, and creates those perfect perching spots where friends and family gather on warm summer evenings.
Remember these essential elements of success: always start with a proper concrete collar foundation, maintain that consistent 1-inch overhang with a gentle 2% slope away from the pool, never skip the expansion joints between your coping and deck pavers, and select materials suited to our sometimes harsh New England climate. Perhaps most importantly—don’t rush. Allowing proper curing time between steps might test your patience, but it’s what separates lasting installations from disappointing ones.
Pool coping isn’t just functional—it’s where bare feet dangle, drinks rest, and conversations flow. It’s where kids sit splashing while parents watch from just an arm’s length away. When done right, your pool edge becomes an invisible hero, performing its duties without drawing attention to itself, letting the beauty of your entire backyard shine.
For more information about our pool deck installation services and how we can help transform your backyard, visit our Pool Deck Installation page.
