Transform Your Outdoor Kitchen: The Sink Addition Guide
Adding a sink to outdoor kitchen spaces might just be the most practical upgrade you’ve never seriously considered. Think about it – how many times have you been flipping burgers or prepping veggies outside and wished you didn’t have to trek back inside just to wash your hands?
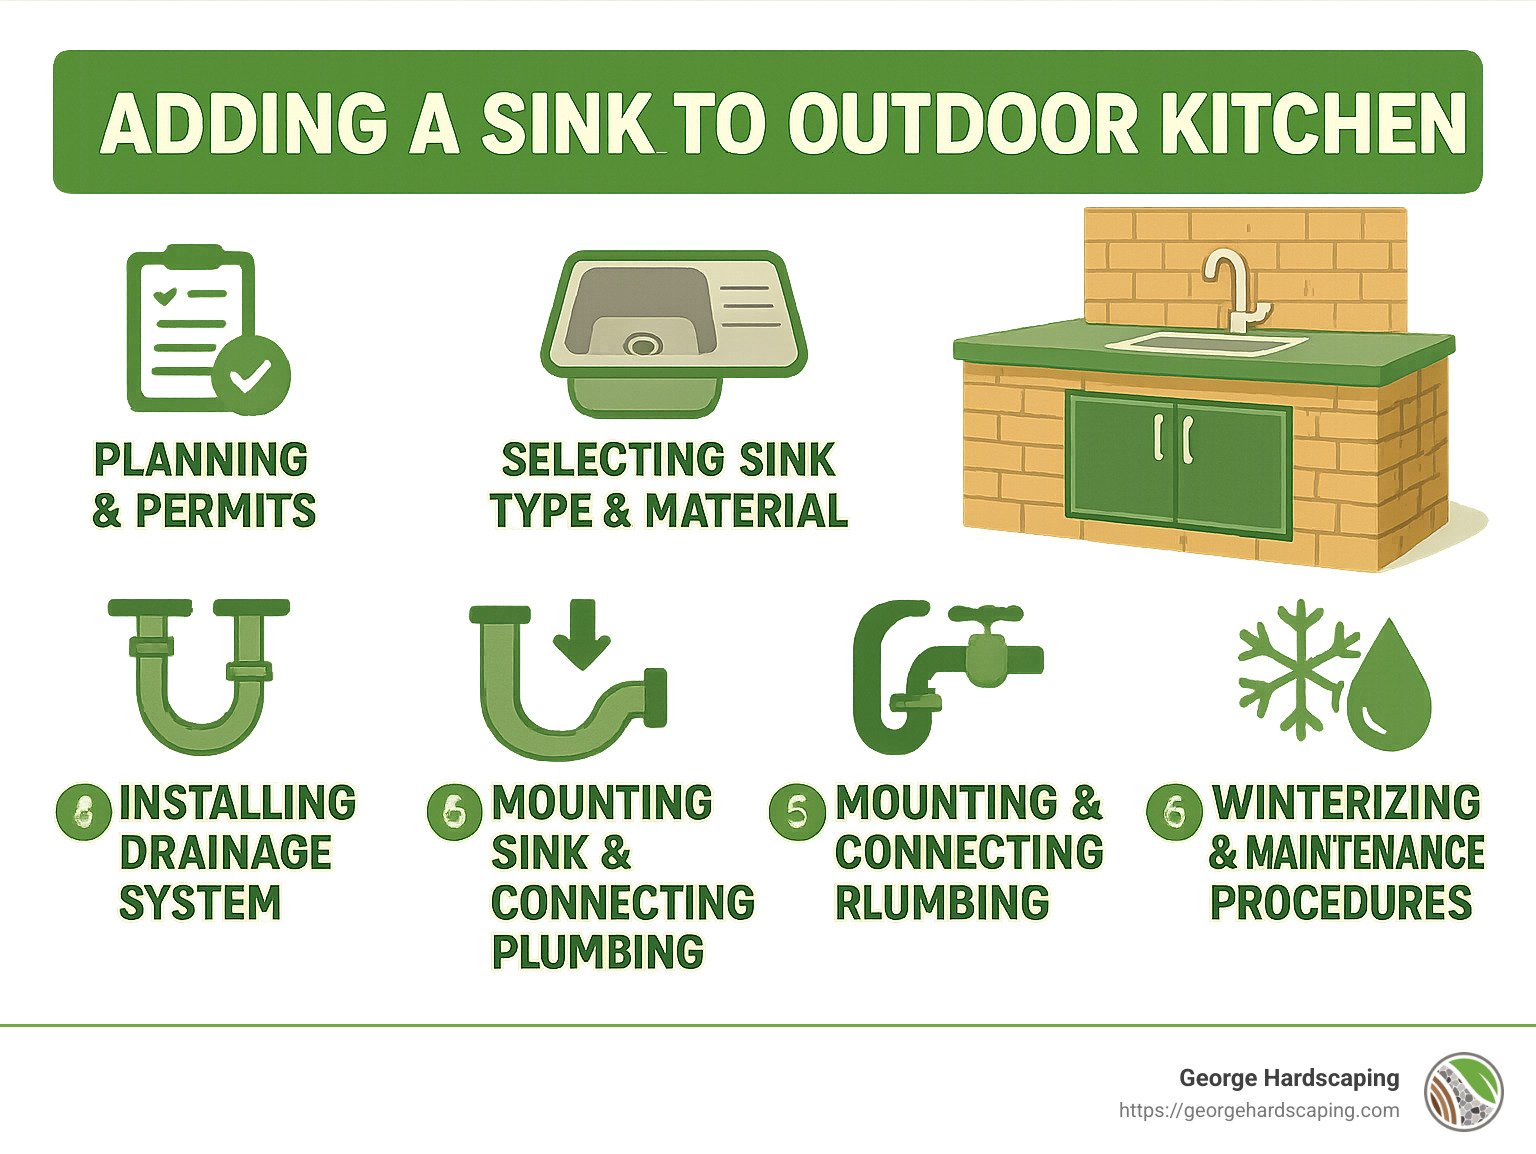
If you’re wondering what this project entails, here’s your quick snapshot:
| Quick Guide: Adding an Outdoor Sink |
|---|
| Average Cost: $150 for basic drop-in to $1,500+ for premium models |
| Installation Time: Typically one weekend (about 5 hours of active work) |
| Water Supply Options: House plumbing connection or garden hose with vacuum breaker |
| Drainage Options: Connect to home plumbing, dry well, French drain, or bucket collection |
| Best Materials: 304-grade stainless steel (most durable), copper (attractive but higher maintenance) |
| Must-Have Features: Weatherproof design, proper drainage slope, winterization capability |
I can’t count how many outdoor gatherings I’ve hosted where having a sink nearby would have saved countless trips indoors. Licensed plumber Brant Stacey puts it perfectly: “One of the biggest issues of an outdoor sink is the logistics of getting the water there,” but trust me, solving this challenge delivers convenience that’s genuinely worth it.
Just imagine washing those garden-fresh tomatoes right where you pick them, rinsing dishes after serving those perfectly grilled steaks, or simply washing sticky barbecue sauce off your hands without abandoning your grill. An outdoor sink creates a complete cooking station that keeps the party flowing.
Here’s a little experiment – next time you’re cooking, mentally tally how many times you wash your hands during meal prep. Then picture doing all that running back and forth to your indoor kitchen. Exhausting, right?
The good news is that adding a sink to outdoor kitchen setups is something most homeowners with basic DIY skills can accomplish over a weekend. You’ll need to think through water supply options, drainage solutions, check local building codes, and plan for seasonal maintenance – but the value-to-effort ratio makes this project a winner.
Placement is everything when planning your sink installation. You’ll want it positioned where it’s most functional – typically within arm’s reach of your grill or prep area – and where running plumbing lines makes the most logical sense. The perfect spot balances convenience with practical installation considerations.
Ready to explore more outdoor kitchen projects? Check out these related guides:
– install outdoor grill
– installing stone veneer on outdoor kitchen
– outdoor kitchen installation cost
Why an Outdoor Sink? Benefits & Drawbacks
Think about your indoor kitchen for a moment – could you imagine it without a sink? Probably not! The same thinking applies to your outdoor cooking space. Here in Essex County, MA, where we treasure our summer months outdoors, adding a sink to outdoor kitchen areas has become one of our most requested upgrades among George Hardscaping clients.
Benefits of adding a sink to outdoor kitchen
The convenience of an outdoor sink truly transforms how you use your space. Improved hygiene becomes effortless when you can wash your hands before handling food and after touching raw meat – no more running back and forth to your indoor kitchen!
Food preparation becomes more enjoyable too. Imagine rinsing fresh garden vegetables or cleaning fish right where you’ll be cooking them. One of our clients in Danvers told us, “Having water right where I’m working has cut my meal prep time in half.”
The cleanup convenience alone makes an outdoor sink worthwhile. Washing serving platters, utensils, and cutting boards outdoors keeps indoor messes to a minimum. As a North Shore client in Marblehead shared, “I used to make dozens of trips inside while cooking. Now everything stays outside where it belongs.”
Beyond cooking, outdoor sinks serve multiple purposes – from gardening tasks like filling watering cans to pet washing after a beach day. Many homeowners even use them for craft projects that are too messy for indoors. And don’t overlook the added property value – well-designed outdoor kitchens with functional sinks consistently appeal to potential buyers.
Potential drawbacks & how to solve them
While the benefits are substantial, it’s important to consider the challenges before diving in:
Installation complexity is probably the biggest hurdle. As licensed plumber Brant Stacey notes, “One of the biggest issues of an outdoor sink is the logistics of getting the water there.” Running plumbing outdoors requires careful planning and sometimes professional expertise. For a simpler approach, consider hose-fed systems that provide cold water only – perfect for basic hand washing and quick rinses.
Our Massachusetts weather concerns can’t be ignored. Freezing temperatures can damage outdoor plumbing if not properly prepared. Proper winterization is essential, including drain systems and shut-off valves to prevent costly spring repairs. One homeowner in Beverly told us: “I was worried about the freezing winters, but with proper winterization, our outdoor sink has survived three years without issues.”
The added cost might give some homeowners pause. Average outdoor sink additions range from $500-$1,500 when factoring in plumbing work (based on internet data, not actual George Hardscaping pricing). To manage costs, consider phasing your project or exploring budget-friendly options like repurposed utility sinks.
Be aware of permit requirements – many Essex County towns require permits for outdoor plumbing work. It’s always best to check with your local building department early in your planning process to avoid delays or complications.
Finally, remember the counter space trade-off. Sinks require valuable countertop real estate that could otherwise be used for food prep or serving. The solution is choosing appropriately sized sinks that balance function with available space – a compact bar sink might be perfect for smaller outdoor kitchens.
For more expert insights on outdoor kitchen features, check out HGTV’s guide on outdoor kitchen sinks or explore more about Hardscaping Services for your complete outdoor living space.
Planning & Selecting the Right Sink
Finding the perfect sink is crucial when adding a sink to outdoor kitchen spaces. This isn’t just about buying any sink—it’s about choosing one that fits your lifestyle, stands up to the elements, and makes your outdoor cooking more enjoyable.
Sink types & install styles
When I meet with homeowners in Essex County, they’re often surprised by how many sink options are available for outdoor kitchens.
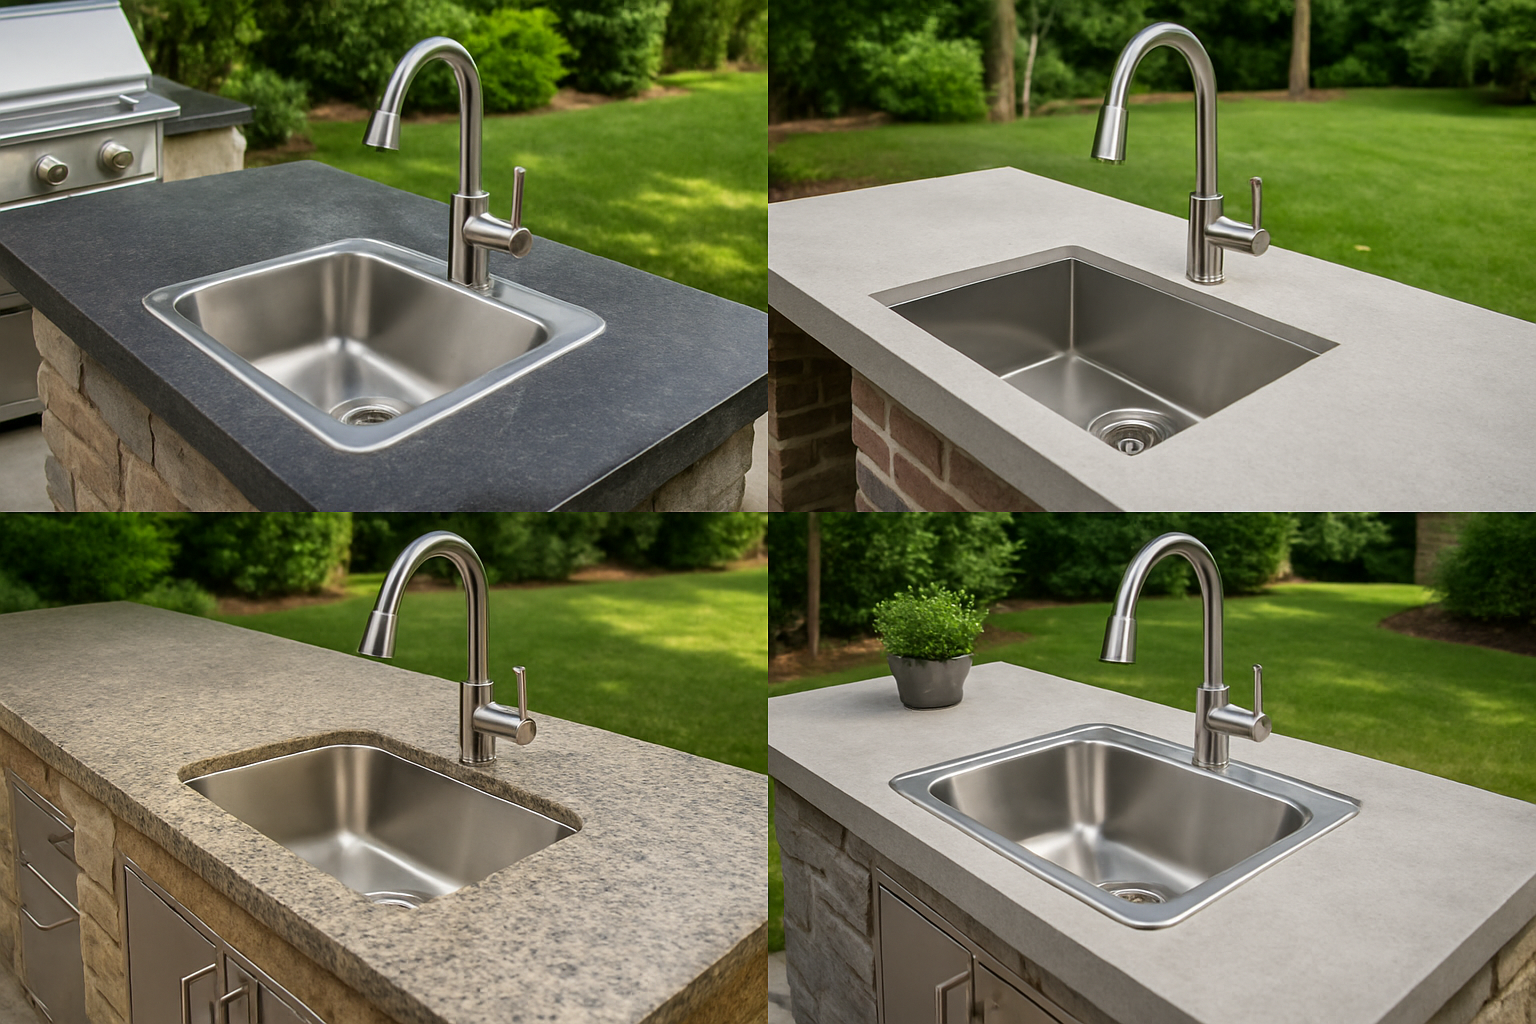
Drop-in sinks remain the most popular choice since they’re straightforward to install—the rim sits neatly on your counter surface and secures with clips underneath. If you’re tackling this as a weekend DIY project, drop-ins are your friend. They install from above and create a finished look with minimal fuss.
Undermount sinks offer that sleek, high-end appearance many homeowners desire. Installed from beneath your countertop, they create a seamless transition from counter to sink that not only looks fantastic but makes wiping crumbs directly into the sink a breeze. The trade-off? They usually require professional installation and cost a bit more.
For smaller spaces or dedicated drink stations, bar sinks (typically around 15″ in diameter) provide just enough utility without hogging precious counter space. Meanwhile, prep sinks strike a nice middle ground—deep enough for serious food preparation but not as dominating as a full-sized kitchen sink.
Choosing the best material
The New England climate can be tough on outdoor fixtures, making material selection particularly important.
304-grade stainless steel is the workhorse of outdoor sinks. It shrugs off rust, handles temperature swings, and cleans up beautifully. One of our Ipswich clients told me, “After three harsh winters, my stainless sink still looks almost new.” The only downsides? Water spots can show up (especially with our hard water), and heavy impacts might leave a dent.
Copper sinks bring undeniable character to outdoor kitchens. They naturally fight bacteria and develop a unique patina over time. However, they’re not ideal for coastal areas where salt air can accelerate changes in appearance, and they do require more attentive care.
Granite composite offers exceptional durability—it won’t scratch easily and can handle hot pots directly from the grill. These sinks tend to be heavier, so your counter structure needs to be robust. They pair beautifully with stone countertops, which many of our Beverly and Manchester-by-the-Sea clients prefer.
Concrete sinks allow for complete customization in shape and color. For truly unique outdoor kitchens, nothing beats a custom-poured concrete sink that integrates perfectly with your countertop. The downside is maintenance—regular sealing is essential to prevent cracking and staining.
Sizing & layout strategy
Size matters when adding a sink to outdoor kitchen designs. Too small, and you’ll struggle to wash larger items; too large, and you sacrifice valuable prep space.
Most outdoor kitchen sinks work best between 25-39 inches wide, with a depth of 8-12 inches. Single basins maximize space for washing larger items like cutting boards and baking sheets, while double basins let you separate tasks—keeping clean and dirty items separate during a busy cookout.
Remember to consider the space around your sink too. You’ll want at least a 4-foot clearance in front for comfortable use. One Marblehead client learned this the hard way: “We originally placed our sink too close to the corner, and now two people can’t work comfortably in the kitchen at once.”
Faucet & accessory must-haves
A great sink deserves a great faucet. For outdoor installations, solid brass faucets with PVD finishes outperform all others. They resist corrosion and maintain their appearance despite exposure to the elements.
Features that truly improve outdoor cooking include pulldown sprayers (perfect for rinsing vegetables or cleaning the sink itself), single-handle operation (so you can adjust with messy hands), and ceramic disk valves that resist mineral buildup from hard water.
Don’t overlook accessories that multiply the functionality of your sink. Soap dispensers keep counters uncluttered, sink covers provide extra prep space when you’re not using the sink, and cutting boards that fit over the basin create additional workspace exactly where you need it.
Location planning for workflow
The placement of your sink can make or break your outdoor cooking experience. I always advise homeowners to think through their cooking process before finalizing location.
Position your sink near your grill for easy food prep and quick cleanup. One North Andover client shared, “Having the sink right next to my grill means I can rinse my hands immediately after handling raw meat—it’s made outdoor cooking so much more sanitary.”
Consider prevailing winds when choosing your sink location. You don’t want smoke constantly blowing across your workspace. If possible, place your sink under cover to extend its usability during light rain and provide shade during summer.
Proximity to existing plumbing can significantly reduce installation costs, but don’t let this be the only factor. Sometimes running additional plumbing a few extra feet creates a much more functional layout. The sink should integrate with your prep areas to create an efficient workflow—think about the classic kitchen triangle concept, adapted for outdoor cooking.
For homeowners looking to create the perfect foundation for their outdoor kitchen, our Patio Design and Installation services can help develop a space that’s both beautiful and functional—with all the right infrastructure for your dream outdoor sink.
Water Supply & Drainage Options
The most challenging aspect of adding a sink to outdoor kitchen projects is often the plumbing. As licensed plumber Brant Stacey points out, “Getting the cold water line? Not an issue. Getting it to drain appropriately according to code? That is a possible issue.”
Supplying water: house line vs hose hookup
When it comes to getting water to your outdoor sink, you’ve got two main options, each with their own set of pros and cons.
Connecting to your home’s existing plumbing creates a permanent, reliable solution that can provide both hot and cold water with consistent pressure. This is ideal if you’re building a serious outdoor kitchen that you’ll use frequently. The downside? It’s more expensive and complex, requiring trenching and proper installation to prevent freezing in our Massachusetts winters.
If you go this route, we recommend using PEX or poly pipes for better freeze resistance rather than rigid copper. Be sure to install accessible shut-off valves inside your house for easy winterization, and slope your pipes slightly toward drain points to prevent water from sitting in the lines. In our Essex County climate, pipe insulation isn’t optional—it’s essential.
The simpler alternative is a garden hose connection. It’s budget-friendly and much easier to install, making it perfect for occasional use or when you’re not ready to commit to permanent plumbing. The trade-offs are that you’ll only have cold water, the setup looks less finished, and you might experience lower water pressure.
“There’s an air gap at the vacuum breaker that doesn’t allow the water from the water hose to back up in, possibly cross-contaminating the system,” explains Brant Stacey. This vacuum breaker is non-negotiable for hose-fed sinks to prevent contamination of your drinking water.
Many of our North Shore clients choose cold-water-only setups to keep things simple. But if hot water is a must-have for your outdoor cooking station, you have options: running hot water lines from the house (most expensive), installing a compact on-demand water heater in your outdoor kitchen cabinet, or using a plug-in hot water dispenser (which requires a weatherproof GFCI outlet).
Drainage solutions & local code checks
While getting water to your sink is important, figuring out where that water goes afterward is often the more complicated part—especially when it comes to local regulations.
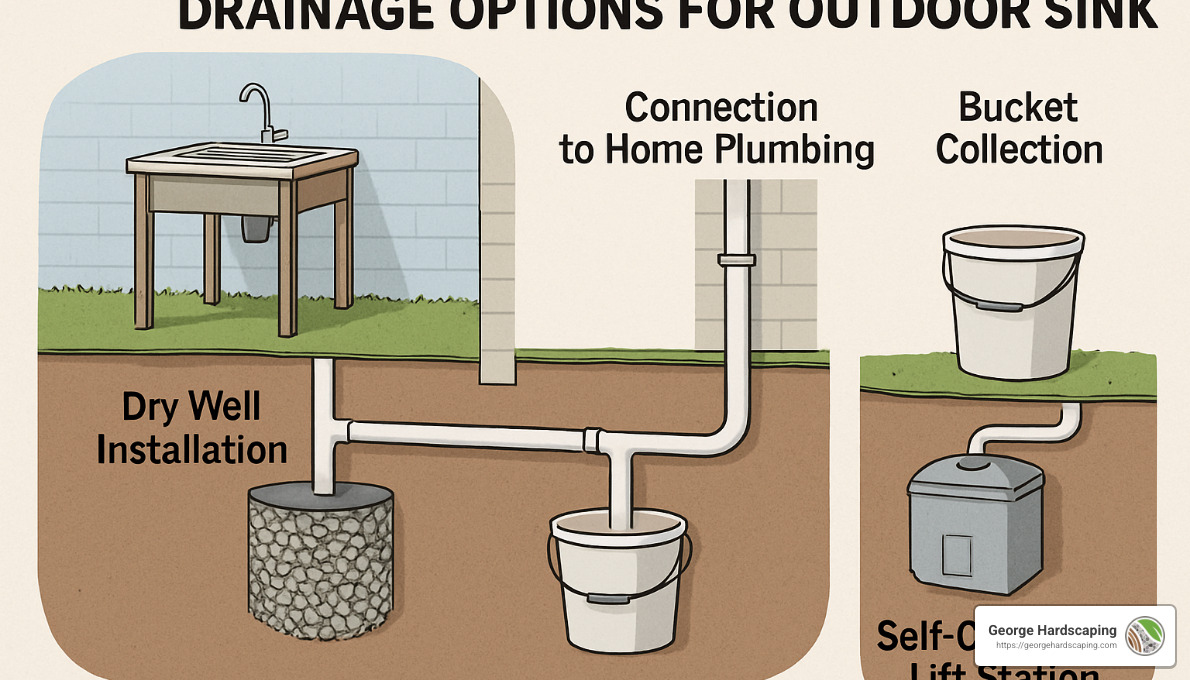
Connecting to your home’s plumbing system is the most code-compliant approach. It handles all types of waste and functions just like your indoor sink. The downside is that it’s the most expensive option and requires proper venting to prevent sewer gases from escaping. This option makes the most sense for comprehensive outdoor kitchens, especially if you’re including appliances like dishwashers or garbage disposals.
A dry well or French drain offers a middle-ground solution that many homeowners find appealing. To create one, you’ll dig a hole at least 10 feet from any structures and about 4 feet deep, line it with a perforated container (even a garbage can with holes works), fill it with gravel, and connect your drain pipe with the proper slope of ¼” per foot. While simpler than connecting to house plumbing, these systems are often restricted by local codes for kitchen waste.
“You can’t put grease, bio waste, food materials, or anything like that in a dry well or french drain,” warns Brant Stacey. These systems are designed for relatively clean water, not food waste.
The simplest solution is bucket collection under your sink drain. There’s no permanent plumbing required, making it perfect for occasional use or temporary setups. Many environmentally-conscious homeowners collect this gray water for garden irrigation. Just remember you’ll need to empty it regularly, and its capacity is limited.
For situations where gravity drainage isn’t possible, a self-contained lift station can pump wastewater to an appropriate disposal point. While effective, these systems require power and regular maintenance.
Before deciding on any drainage solution, check with your local building department. Essex County towns have varying regulations about outdoor kitchen drainage, and what works in Marblehead might not be permitted in Beverly or Gloucester.
Winterizing prep points
In our New England climate, proper winterization isn’t optional—prevent costly repairs and extend the life of your outdoor kitchen.
Start by installing shut-off valves inside your house where they won’t freeze. Include drain ports at the lowest points of your supply lines so you can completely empty the system before winter hits. Plan for pipe blowing with compressed air connections to ensure every drop of water is out of your lines.
When installing new plumbing, consider your local frost line—typically about 4 feet deep in Massachusetts. Pipes above this depth need proper insulation or drainage capabilities. Whenever possible, install frost-proof fixtures designed to withstand cold temperatures.
“Cold weather surprises every state at some point,” notes plumbing expert Mike Baker. Even in milder winters, a single deep freeze can burst pipes and create expensive damage if your system isn’t properly winterized.
For comprehensive outdoor space planning that integrates these plumbing considerations, explore our Hardscaping Services that create beautiful, functional outdoor living areas designed to withstand our New England seasons.
For more specific information on creating the perfect outdoor cooking area with proper drainage and water supply, check out this helpful dry well how-to guide that walks you through the process step by step.
Step-by-Step Guide: Adding a Sink to Outdoor Kitchen
Ready to roll up your sleeves and transform your outdoor cooking space? Let’s walk through the actual installation process for adding a sink to outdoor kitchen projects. With some careful planning and basic DIY skills, this weekend project can dramatically improve your outdoor entertaining experience.
Pre-install checklist
Before you grab your tools, take time to prepare properly. Think of this as the foundation of your project—rushing through planning is like trying to grill before the charcoal’s hot!
First, gather all your necessary tools: groove-joint pliers, PEX cutter, drill with hole saw attachments, level, silicone caulk and gun, shovel, tape measure, two-hole pipe clamps, and plumber’s putty. Having everything ready prevents those frustrating mid-project trips to the hardware store.
Safety comes next—always mark underground utilities before digging. Call Dig Safe at 811 at least 72 hours before your project starts. One of our North Andover clients learned this lesson the hard way when they accidentally hit a sprinkler line!
Don’t skip the permits. Most Essex County towns require plumbing permits for outdoor kitchen additions, with costs typically ranging from $50-$250. As one local building inspector told us, “It’s always cheaper to get a permit than to redo non-compliant work.”
Finally, create a detailed plan showing supply line routes, drainage paths, shut-off valve locations, and measurements. As the saying goes: measure twice, cut once!
Running supply lines
Identifying the right connection point inside your home is your first step. Basement or crawl space access makes this much easier, as you’ll want to minimize wall and floor penetrations.
When drilling through your exterior wall, use an appropriately sized hole saw and immediately seal penetrations with waterproof caulk. Consider installing pipe sleeves for extra protection—especially important in our New England climate.
For the actual pipes, PEX or poly pipe works best for outdoor installations. These materials have some flex to handle temperature changes better than rigid copper. Remember to:
- Create a slight slope (¼” per foot) to aid drainage when winterizing
- Secure pipes with two-hole clamps every 4 feet for proper support
- Install shut-off valves with drain plugs at the lowest points
Don’t forget to insulate any exposed pipes with foam pipe insulation. For extra protection in our Essex County winters, consider heat tape for extreme climate protection.
“Your back will thank you for drawing the layout on paper before you dig,” shared one of our seasoned installers. “Planning your pipe routes saves time and prevents mistakes that could turn your weekend project into a week-long headache.”
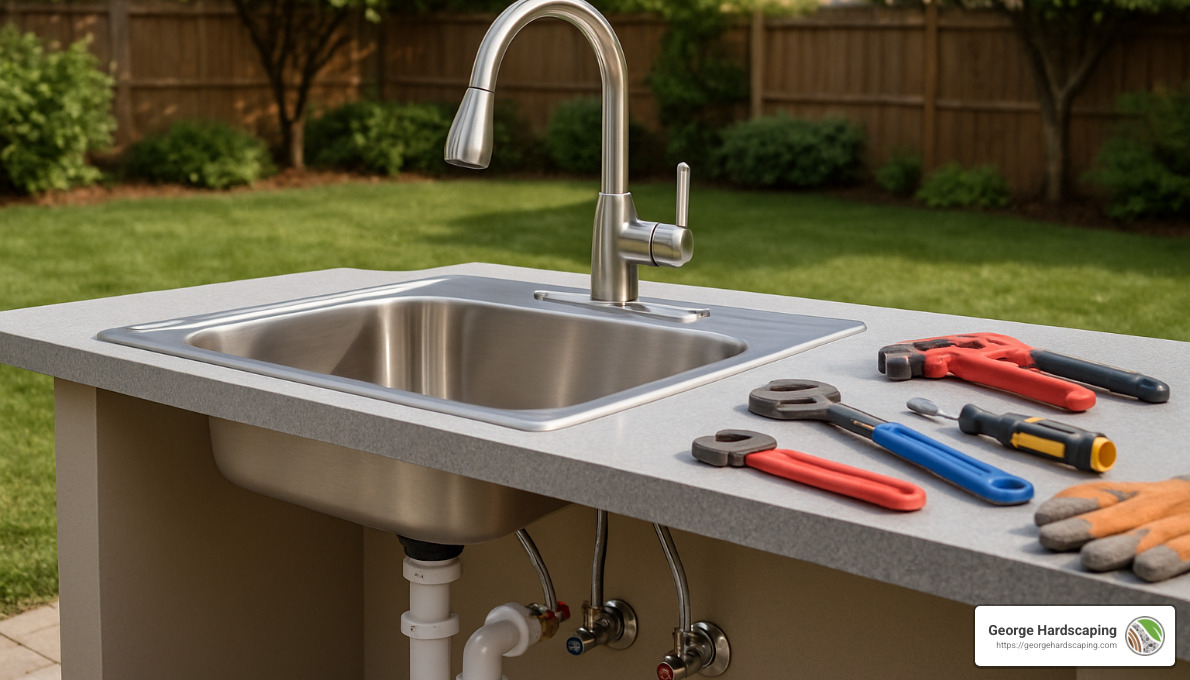
Installing sink & faucet
Now for the exciting part—actually setting your sink in place! For drop-in sinks, carefully cut the opening according to the template, leaving the support lip. If you chose an undermount sink, you’ll cut the full opening and prepare the mounting hardware.
Apply a generous bead of silicone caulk around the rim for drop-in sinks. For undermount models, apply epoxy or silicone to the mounting brackets according to the manufacturer’s instructions. When setting the sink, press firmly to create a watertight seal.
Installing the faucet is easier if you attach it to the sink before final placement. Use plumber’s putty around the base for extra sealing and connect supply lines using flexible braided connectors. Hand-tighten connections first, then give them a ¼ turn with pliers—overtightening can damage fittings.
For the drain assembly, install the basket strainer with plumber’s putty and attach the P-trap to create a water seal. The P-trap isn’t just plumbing jargon—it’s that curved pipe that prevents sewer gases from coming up through your drain!
Building drainage system
Your drainage method will depend on local codes, so verify requirements before proceeding. For many outdoor kitchens, a dry well provides an effective solution.
To install a dry well, dig a trench from the sink to your chosen location (at least 10 feet from structures) with a consistent slope of ¼” per foot. Dig the dry well hole approximately 4 feet deep and place a perforated container like a modified garbage can with ½” holes drilled throughout. Connect your drain pipe to this container, fill with gravel leaving 2″ below grade, then cover with landscape fabric and soil.
If you’re connecting to your home’s plumbing, locate an appropriate drain access point and install proper venting according to code. Maintain that critical slope of ¼” per foot toward the house and use appropriate fittings for clean connections.
For simpler setups, bucket collection can work well. Install a P-trap to prevent odors, position the bucket for easy access and removal, and consider overflow protection for those times when you might forget to empty it.
Testing & finishing touches
Before celebrating, check thoroughly for leaks by turning on the water supply slowly and inspecting all connections. Run water through the drain and verify proper flow—watching water disappear down your new outdoor sink is surprisingly satisfying!
Apply final sealant by caulking edges where the sink meets the countertop and sealing any wall penetrations. Don’t forget to waterproof the cabinet interior where pipes enter—this prevents moisture damage to your cabinetry.
Finalize your countertop by sealing stone or concrete surfaces or applying protective treatment to wood. Ensure water runoff direction prevents pooling, which can lead to premature deterioration of your beautiful new outdoor kitchen.
Common mistakes when adding a sink to outdoor kitchen
Even experienced DIYers can make these common errors, so keep them in mind:
Improper slope in drain lines leads to standing water and potential freezing. Always maintain that ¼” per foot slope.
Ignoring frost depth is a recipe for burst pipes. In Essex County, water lines should be below the frost line (typically 4 feet) or properly insulated and equipped with shut-off valves.
Inadequate support for heavy sinks can lead to sagging or even collapse. Ensure your cabinet structure can handle the weight of a water-filled sink.
Missing shut-off valves make winterization nearly impossible. Always install them at key points for seasonal maintenance.
Using incorrect materials meant for indoor use will lead to premature failure. Outdoor components need to withstand UV exposure and temperature fluctuations.
Forgetting proper venting results in slow drainage and unpleasant odors. Follow plumbing code requirements for venting, even in outdoor installations.
Insufficient sealing allows water intrusion that can damage cabinets and structures. Be generous with appropriate sealants at all connection points.
“Time spent on proper installation saves countless hours of future repairs,” notes one of our experienced installers. “Especially in New England, where freeze-thaw cycles put extra stress on outdoor plumbing.”
With careful planning and attention to detail, adding a sink to outdoor kitchen spaces can be a satisfying DIY project that improves your outdoor living experience for years to come.
Costs, Codes, Maintenance & Winterizing
Let’s talk about the practical side of adding a sink to outdoor kitchen projects – the dollars and cents, the rules to follow, and keeping everything running smoothly through our New England seasons.
Budget breakdown & cost drivers
When clients ask me about costs, I always remind them that outdoor plumbing involves more than just the sink itself. Based on internet data (not actual costs for George Hardscaping), here’s what you might expect:
A basic stainless steel drop-in sink might run $150-$450, while premium models or specialty materials can jump to $500-$1,500. Quality faucets range from $75 for simple models to $600 for feature-rich options with pull-down sprayers and special finishes. The plumbing materials themselves – pipes, connectors, valves – typically cost between $0.50-$8 per linear foot depending on material quality.
If you’re hiring a professional plumber, expect rates between $45-$200 per hour, with most installations taking 4-8 hours of labor. Local permits can add another $50-$250 to your project.
What really drives these costs? Distance is a big one – the farther your sink sits from existing plumbing, the more materials and labor you’ll need. Material choices make a huge difference too; that gorgeous hammered copper sink will cost significantly more than standard stainless steel. The complexity of your drainage solution can also significantly impact your budget.
As one of our suppliers often tells clients, “The investment in quality materials pays dividends in longevity, especially outdoors where replacement isn’t as simple as swapping out your kitchen faucet.”
Permit & inspection checklist
Here in Essex County, navigating permits is part of the process. Most towns require plumbing permits for any new water supply or drainage work. If you’re adding electrical outlets for small appliances, you’ll need an electrical permit too. Substantial outdoor kitchen structures might trigger building permits, and some drainage solutions require health department approval.
If your property sits near wetlands (common in our coastal communities), you might need conservation commission review as well.
When the inspector comes, they’ll typically check:
– Water supply connections (especially backflow prevention)
– Drainage installations and proper slopes
– Pipe depth relative to our local frost line
– Proper venting for drainage systems
As licensed plumber Brant Stacey wisely notes, “Getting the cold water line? Not an issue. Getting it to drain appropriately according to code? That is a possible issue.” This is why working with professionals who understand local requirements can save significant headaches.
Care & cleaning routine
The longevity of your outdoor sink depends largely on how you maintain it. For stainless steel sinks (the most popular choice among our clients), regular cleaning with mild soap and water works best. Avoid abrasive cleaners that can scratch the surface, and take an extra minute to dry and polish the sink to prevent water spots. A monthly application of stainless steel cleaner helps maintain that like-new look.
If you’ve opted for a copper sink, you’ll need to clean it approximately every six weeks with appropriate copper cleaner. Copper develops a natural patina over time – decide early whether you want to maintain its original shine or accept the evolving character that develops.
For granite composite options, stick with mild cleaners without bleach or ammonia, rinse thoroughly after use, and avoid leaving standing water for extended periods.
Beyond the sink itself, make a habit of checking connections monthly for leaks, clearing drains of debris regularly, and inspecting caulk and sealant annually. A protective cover during harsh weather can extend the life of your fixtures considerably.
Winterizing steps
Anyone who’s survived a Massachusetts winter knows that proper winterization isn’t optional – it’s essential. When temperatures start dropping in late fall, follow these steps:
First, shut off the water supply using your indoor valves. Next, open the outdoor faucets to drain any remaining water from the lines. For thorough protection, consider blowing out lines with compressed air to remove every last drop.
Disconnect and store any removable parts indoors, and pour RV antifreeze (not automotive antifreeze) down drains to protect P-traps from freezing. Finally, cover your sink and faucet to shield them from debris and UV damage during the off-season.
“Winterize all exterior plumbing before temperatures drop below freezing,” one local plumbing expert always reminds our clients. “A single freeze can burst pipes and cause thousands in damage.” Those few minutes of preventative care can save substantial repair costs come spring.
DIY vs hiring a pro
The DIY route might work well if you have basic plumbing experience, feel comfortable navigating the permit process, own the necessary tools, and can dedicate a full weekend to the project. Simple systems, particularly those using hose connections rather than permanent plumbing, are more DIY-friendly.
Consider hiring a professional if you’re connecting to house plumbing, working in an area with complex local codes, lack specialized tools, or if the installation involves significant digging. The peace of mind that comes with warranty protection is another benefit of professional installation.
As one contractor we partner with likes to say, “If you’re not comfortable giving up your Saturday afternoon or risking water damage from mistakes, hiring a pro might be worth it.” Sometimes the value of your time and the assurance of proper installation outweighs the cost savings of DIY.
Frequently Asked Questions
When discussing outdoor sinks with clients, certain questions come up consistently:
Q: What’s the easiest water source for an outdoor sink?
A garden hose connection with a vacuum breaker is definitely the simplest approach, though it provides cold water only and may have limited pressure compared to direct plumbing.
Q: Do I need hot water in my outdoor kitchen sink?
While convenient, hot water adds complexity and cost. Many outdoor kitchens function perfectly well with cold water only, especially if primarily used for hand washing and quick rinses during summer cookouts.
Q: How deep should water lines be buried in Essex County?
Water lines should be buried below the frost line, typically 42-48 inches in our region. If running above ground, they must be properly insulated and equipped with drain valves for winterization.
Q: Can I use a bucket under the sink for drainage?
This simple solution works well for light use, but check local codes first – some areas restrict gray water disposal methods, particularly for kitchen waste.
Q: What’s the best sink material for our coastal climate?
For coastal areas like Gloucester, Marblehead, and Salem, 304-grade stainless steel offers excellent corrosion resistance against salt air.
Q: How much does professional installation typically cost?
Based on internet data (not actual costs for George Hardscaping), professional installation typically ranges from $500-$1,500 depending on complexity, not including the sink and fixtures themselves.
For homeowners looking to create a complete outdoor entertainment space, our Outdoor Kitchen and Fireplace services can help design an integrated solution that includes proper sink installation.
Conclusion
Adding a sink to outdoor kitchen spaces truly changes the way you experience your backyard. It’s not just about convenience (though that’s a big part of it) – it’s about creating a complete outdoor living space where you can cook, entertain, and relax without constantly running back inside.
Throughout this guide, we’ve explored the ins and outs of outdoor sink installation – from selecting the right materials to navigating drainage options and winterization requirements. While the project does involve some technical considerations, the benefits far outweigh the challenges when done correctly.
For homeowners across Essex County’s beautiful communities – whether you’re in Salem’s historic neighborhoods, Marblehead’s coastal areas, or Beverly’s family-friendly suburbs – an outdoor sink brings functionality that you’ll appreciate season after season. There’s something deeply satisfying about washing fresh garden vegetables right where you’ll cook them, or being able to clean up after a family barbecue without trekking through the house.
“I can’t imagine our outdoor space without the sink now,” one of our Ipswich clients told us recently. “It’s become the central hub of our summer gatherings – just like the kitchen sink is indoors.”
The key to long-term satisfaction lies in thoughtful planning and quality materials. While stainless steel remains the most practical choice for our New England climate, the right sink for your space depends on your specific needs, aesthetic preferences, and budget. Investing in freeze-resistant features and proper drainage will save you headaches down the road.
At George Hardscaping, we understand the unique challenges of creating functional outdoor living spaces in Essex County’s variable climate. Our team specializes in integrating beautiful hardscaping with practical elements like outdoor kitchens and sinks. We consider everything from proper drainage slopes to seasonal protection when designing your space.
If you’re ready to transform your outdoor cooking area with a well-designed sink installation, our Outdoor Kitchen and Fireplace services offer comprehensive solutions custom to your property’s specific needs. We handle everything from initial design to final installation, ensuring your outdoor kitchen not only looks beautiful but functions perfectly through all four seasons.
Whether you tackle this as a DIY weekend project or enlist professional help, adding that sink will fundamentally change how you use your outdoor space. You’ll find yourself spending more time outside, entertaining more frequently, and enjoying the seamless indoor-outdoor lifestyle that makes New England summers so special.
The next time you’re hosting friends for a cookout and can wash, prep, cook, and clean all in your beautiful outdoor space – without a single trip inside – you’ll wonder how you ever managed without it. Adding a sink to outdoor kitchen areas might seem like a small upgrade, but it’s often the practical touches that make the biggest difference in daily life.
