Outdoor kitchen grill station: 9 Jaw-Dropping Ideas 2025
Why Every Essex County Homeowner is Talking About Outdoor Kitchen Grill Stations
An outdoor kitchen grill station is a dedicated outdoor cooking area that combines a built-in grill with prep space, storage, and appliances like refrigerators or sinks. These stations serve as the social hub of your backyard – changing ordinary grilling into a complete outdoor entertaining experience.
Quick Overview of Outdoor Kitchen Grill Station Options:
- Modular Kits: $3,000-$7,000 – Ready-to-assemble units that install in 2-4 hours
- Custom Masonry: $8,000-$25,000+ – Permanent stone or concrete block construction
- Prefab Islands: $2,000-$12,000 – Pre-built units with integrated appliances
- RTA Concrete Panels: $4,000-$15,000 – DIY-friendly panels rated for 100 years outdoors
Think of it as creating a “stopping place” in your yard – just like a gas station serves travelers, your grill station becomes the natural gathering spot where friends and family congregate.
Small setups feature about 10 feet of components, while large installations span over 20 feet. You can start simple with just a grill and counter, then expand with side burners, mini-fridges, or even pizza ovens.
For North Shore homeowners dealing with salt air and harsh winters, material choice matters. 304 stainless steel resists corrosion, while concrete panels and natural stone handle freeze-thaw cycles better than wood frames.
What Exactly Is an Outdoor Kitchen Grill Station?
Picture this: you’re hosting a summer barbecue, and instead of disappearing into the house every five minutes for utensils, drinks, or prep space, everything you need is right at your fingertips outdoors. That’s exactly what an outdoor kitchen grill station delivers.
According to Merriam-Webster, a “station” is defined as a stopping place or depot. This definition perfectly captures what happens when you install one of these setups in your backyard – it becomes the natural gathering spot where everyone congregates.
The “Station” Concept Explained
Think about how a train station brings people together from different directions. Your outdoor kitchen grill station does the same thing for backyard entertaining – it becomes the natural meeting point where conversations flow and memories get made.
The genius lies in the convenience factor. No more juggling plates while fumbling with screen doors. Everything stays outside where the action is. You can flip burgers, mix drinks, prep sides, and chat with guests without missing a beat.
Key Components You’ll Find
A well-planned station brings together several key elements. The built-in grill serves as the centerpiece, typically featuring 4-6 burners that pump out 60,000 to 90,000 BTUs of cooking power.
Side burners handle the supporting cast of outdoor cooking. Perfect for heating up baked beans, melting butter for corn, or keeping sauces warm. Most units include at least one 15,000 BTU side burner.
Storage solutions keep your essentials organized and protected from New England weather. Access doors hide propane tanks, while drawers hold grilling tools and seasonings.
A mini-fridge (usually around 4.4 cubic feet) keeps beverages cold and provides space for marinated meats. Some homeowners add a prep sink for food washing and quick cleanup.
Counter space ties everything together – aim for at least 30 inches on each side of your grill for prep work and serving. Popular materials include granite, concrete, and stainless steel tops.
9 Outdoor Kitchen Grill Station Ideas to Copy Right Now
After designing outdoor kitchens across Essex County for years, we’ve seen which styles make homeowners (and their neighbors!) stop and stare. Whether you’re drawn to sleek modern lines or rustic charm, there’s an outdoor kitchen grill station style that’ll perfectly match your home.
Sleek Stainless Outdoor Kitchen Grill Station
Nothing says “serious chef” quite like a gleaming outdoor kitchen grill station finished entirely in stainless steel. We use 304 stainless steel throughout these builds because it laughs at salt air from the Atlantic and keeps looking sharp year after year.
Picture restaurant-quality cabinet frames paired with integrated 4-burner grills pumping out 75,000 BTUs. Add matching stainless appliances and quartz counters. The uniform finish creates light reflection that makes smaller spaces feel larger.
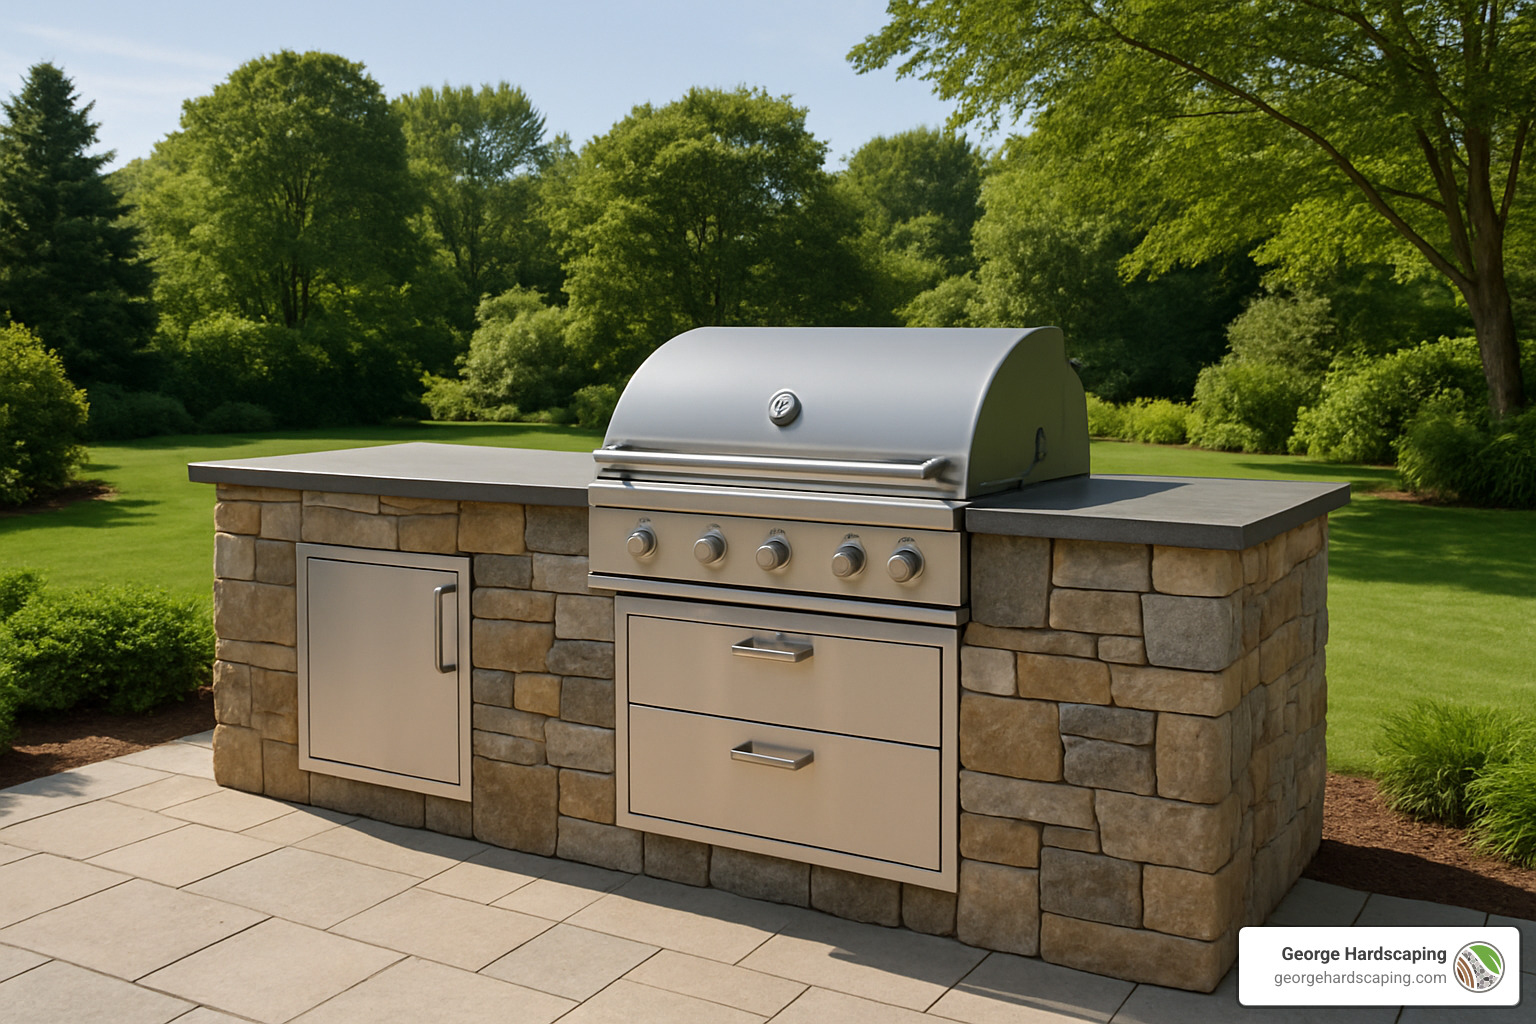
Rustic Stone Island With Wood Beam Accents
Natural stone veneer with reclaimed wood beams creates that cozy gathering spot everyone gravitates toward. We love using local New England fieldstone because it feels like it belongs here.
Pair stack stone patterns with reclaimed wood beam accents for warmth. Top it with granite counters, add built-in seating, and you’ve got a backyard that feels like a mountain retreat.
Compact Balcony Station
Small space? No problem. Modular systems feature fold-down prep tables that store flat against the wall, compact 2-3 burner grills, and rolling cart storage that tucks away when not in use.
Ready-to-assemble options go from delivery truck to fully functional in just 2 hours. Perfect for condo owners or anyone who might want to rearrange things later.
L-Shaped Social Hub Around the Pool
The L-configuration maximizes counter space while creating natural conversation zones. We position these to give the chef clear sightlines to the pool – especially important when kids are swimming.
Think extended counter for multiple prep zones, bar seating along the long side, and integrated lighting that keeps the party going after sunset.
Covered All-Weather Outdoor Kitchen Grill Station
A covered outdoor kitchen grill station extends your cooking season significantly. We design these with pergola or gazebo roof structures using noncombustible materials like fiber cement.
Integrated patio heaters make shoulder seasons comfortable, while weather-resistant storage keeps equipment dry. Extend roof eaves 24-36 inches beyond countertops to keep surfaces dry during angled rain storms.
Pizza-Oven & Smoker Combo Nook
For the weekend warrior who gets excited about different cooking methods, this setup combines multiple fuel types in one amazing station. Picture a wood-fired pizza oven next to a separate smoker section plus a gas grill for quick weeknight meals.
Fair warning: your neighbors might start dropping by around dinner time more often.
Built-In Grill Station With Firepit Lounge
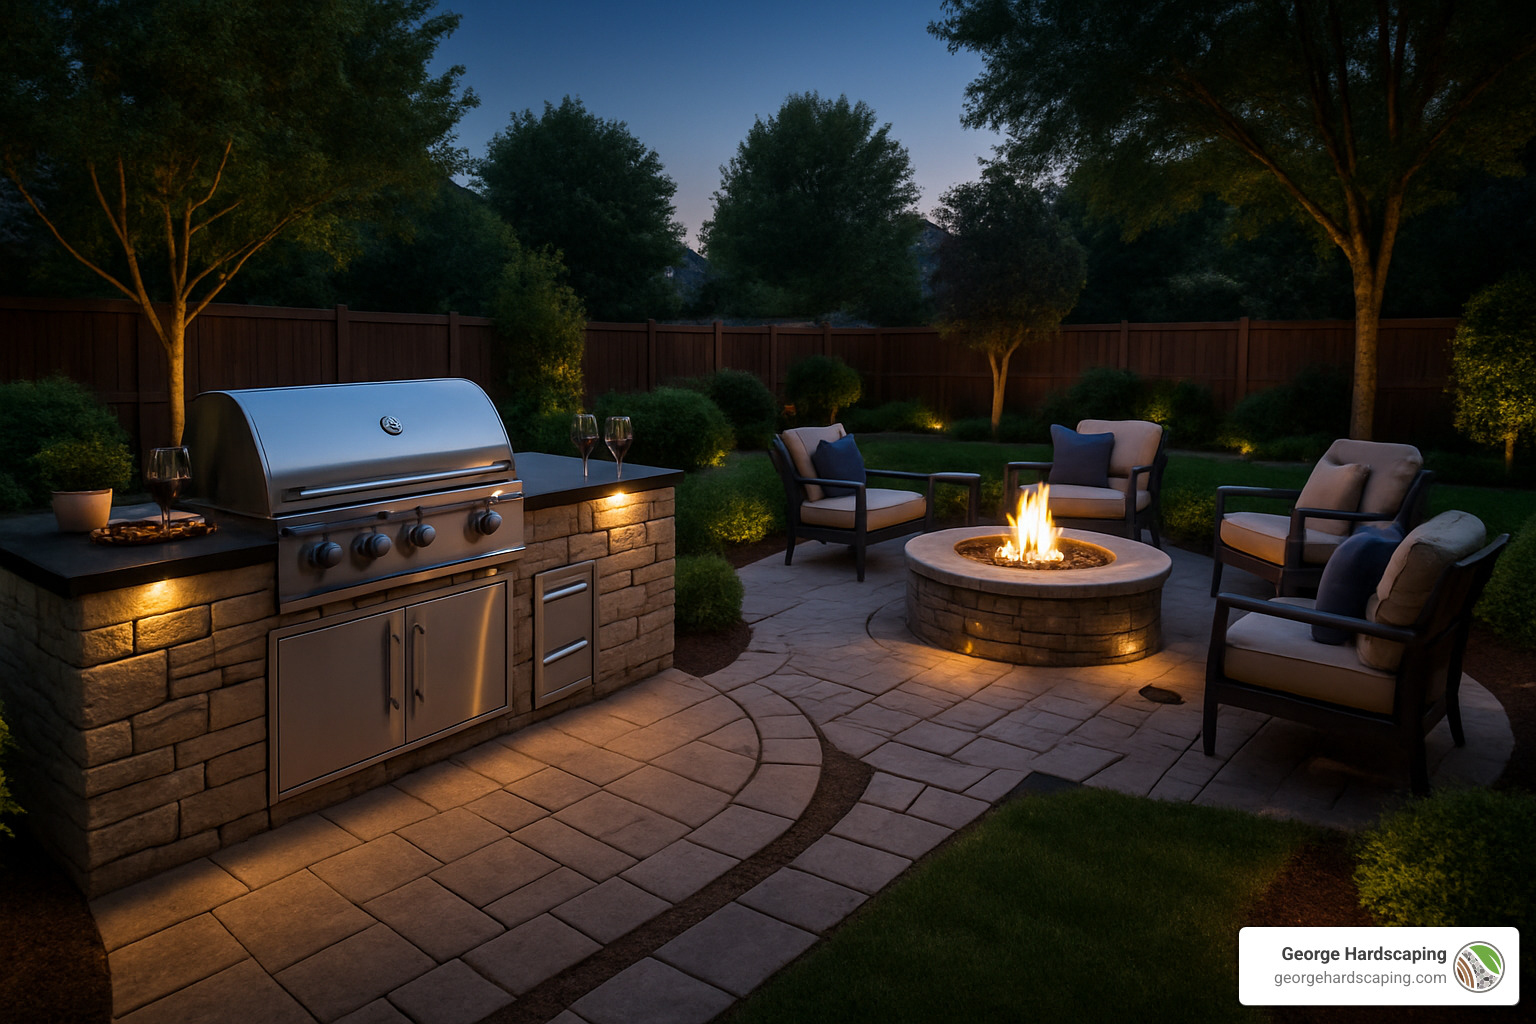
Creating dual zones in your yard maximizes both functionality and ambiance. We position the cooking station upwind from the firepit to prevent smoke conflicts.
The design includes a primary grill station for cooking, a separate firepit lounge area for post-dinner relaxation, and connecting walkways in matching materials.
More info about Custom Outdoor Firepits
Entertainment Wall With TV & Sound
Game day entertaining requires special planning. Picture weather-resistant TV mounting systems with hidden wiring, integrated sound system speakers, and extended counter space for epic game day spreads.
Additional refrigeration keeps beverages cold throughout the longest playoff games. Plan wire runs during construction to avoid exposed cables.
RTA Concrete Panel Speed-Build
Ready-to-assemble concrete panels offer the best of both worlds – professional appearance with DIY installation. These systems assemble in as little as 2 hours, use concrete panels rated for 100 years outdoors, and allow for custom sizing.
This approach works perfectly for homeowners comfortable with basic assembly but wanting professional-grade materials.
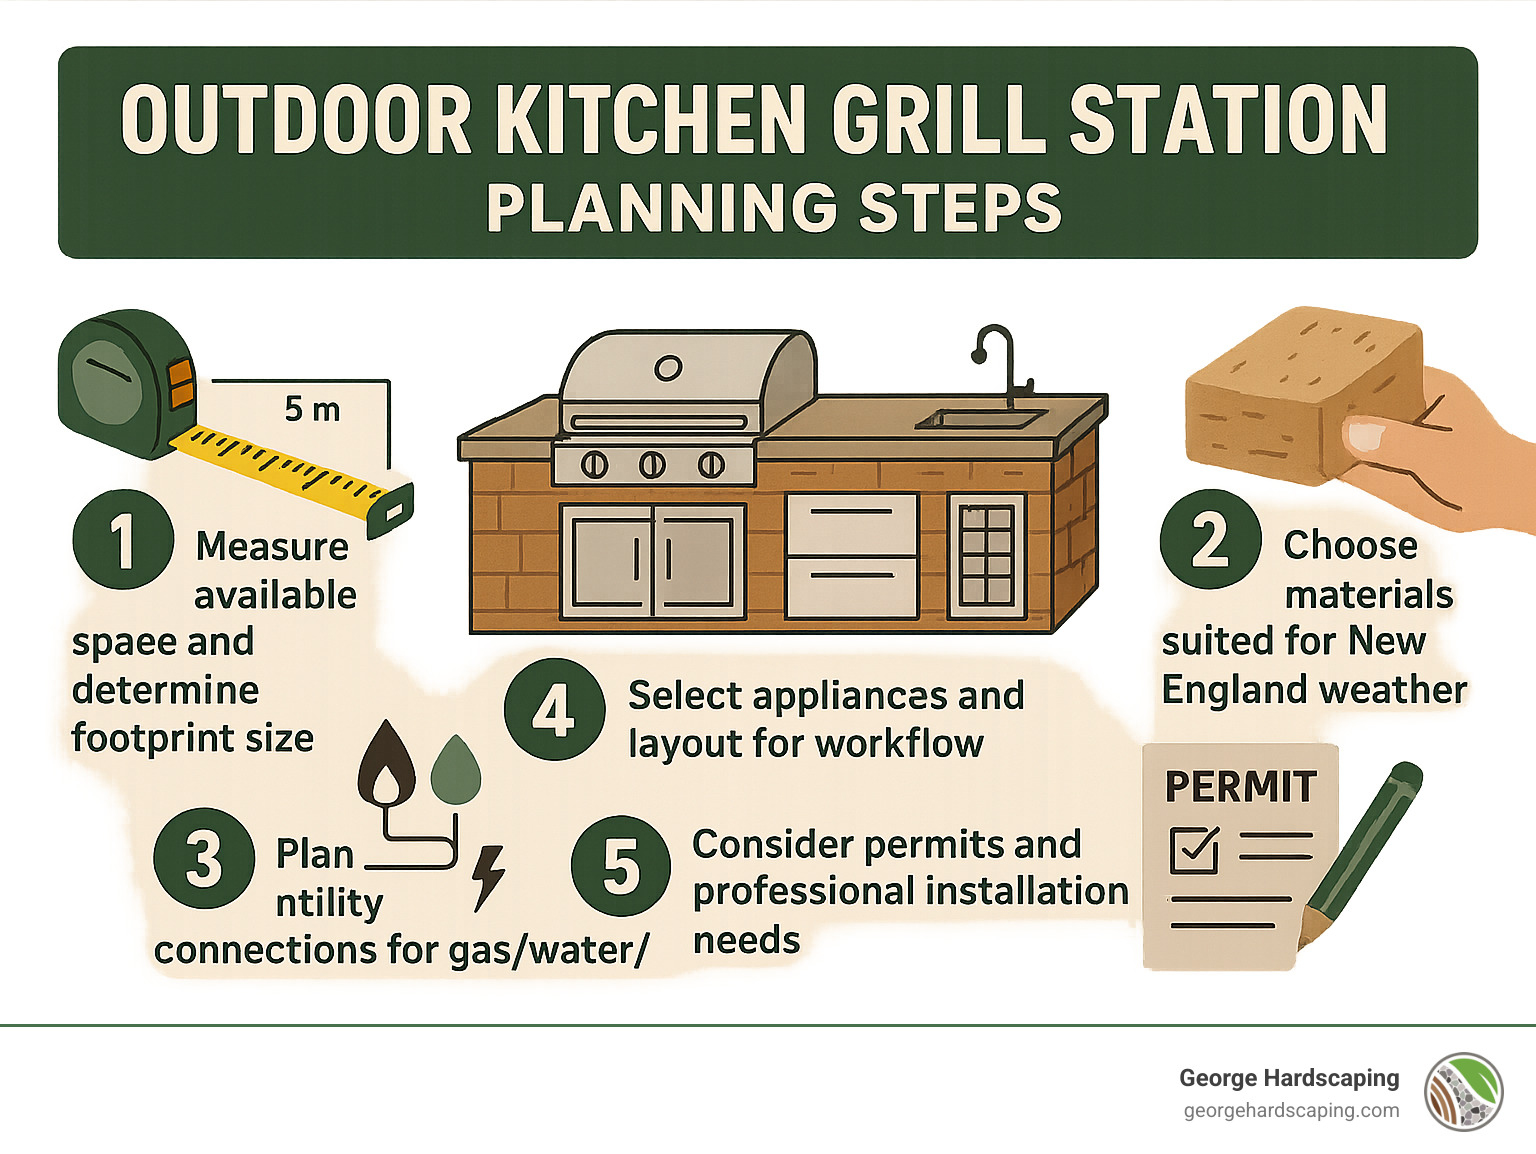
Planning, Design & Costs
Getting your outdoor kitchen grill station right starts with solid planning. We’ve seen too many homeowners jump straight to picking appliances without thinking through the basics first. A little extra planning time upfront saves headaches (and money) later.
The smartest approach starts with your space and how you actually use your backyard. Do you host big barbecues or prefer intimate family dinners? These answers shape everything from size to material choices.
| Option Type | Cost Range | Installation Time | Best For |
|---|---|---|---|
| Prefab Units | $2,000-$8,000 | 1-2 days | Quick setup, renters |
| Custom Masonry | $8,000-$75,000+ | 2-4 weeks | Permanent, high-end |
| RTA Systems | $3,000-$15,000 | 2-4 hours | DIY-friendly, quality materials |
| Modular Kits | $2,500-$12,000 | 4-8 hours | Flexibility, expandable |
Layout & Workflow Tips
Think like a chef when planning your layout. Professional kitchens organize around hot zones (your grill and side burners), cold zones (refrigerator and ice), and wet zones (sink and prep areas).
Give yourself breathing room around the grill. We recommend at least 30 cm of counter space on each side. Position your grill so prevailing winds carry smoke away from seating areas.
For entertaining, consider how guests will flow around the space – nobody wants to crowd the cook or get caught in smoke clouds.
Materials That Outlast New England Weather
Our coastal location brings unique challenges. Salt air, freeze-thaw cycles, and nor’easters test every material choice.
Concrete masonry units form the backbone of lasting outdoor kitchens. They handle weather extremes beautifully and can be finished with attractive stone veneer. Steel frame construction with cement board offers another durable approach.
Skip wood framing entirely – it’s a maintenance headache and potential fire hazard near grills.
For countertops, granite offers natural beauty and heat resistance but needs periodic sealing. Quartz costs more upfront but requires virtually no maintenance. Concrete counters can be custom-tinted but need proper sealing.
All appliances should feature 304 stainless steel construction for salt air resistance. Marine-grade wiring and GFCI protection aren’t optional – they’re necessities.
What Will It Cost?
Outdoor kitchen grill station costs vary dramatically based on size, materials, and complexity. These average costs come from industry research and don’t reflect actual George Hardscaping pricing.
Simple modular setups start around $2,000-$8,000 for basic islands with grills and minimal storage.
Mid-range custom installations typically run $8,000-$25,000 including professional installation and utility connections.
High-end custom projects can reach $25,000-$75,000 or more for premium materials, complex utility work, and extensive features.
More info about Patio Design & Installation
DIY vs Professional Installation
The big question every homeowner faces: tackle this yourself or bring in the pros? After watching countless installations over the years, we’ve learned that success depends on three things – the complexity of your project, your comfort level with tools, and what your local building codes require.
When DIY Makes Sense
If you’re handy with tools and love a good weekend project, DIY installation can be incredibly rewarding. The sweet spot for DIY projects involves simple modular systems that don’t require running new utilities to your yard.
Ready-to-assemble concrete panel systems are perfect for confident DIYers. These clever designs snap together like oversized building blocks, and you can have a fully functional outdoor kitchen grill station up and running in just a couple of hours. No mixing concrete, no waiting for mortar to cure – just solid assembly work.
The tool list is refreshingly simple. You’ll need a good 4-foot level, a drill with masonry bits, a socket wrench set, and a rubber mallet. Don’t forget safety glasses and work gloves – concrete panels aren’t forgiving if you slip.
Modular kits work well when your site is reasonably level and you can easily get materials to the installation area. If you’re just plugging appliances into existing outlets and connecting to portable propane tanks, you’re in DIY territory.
When to Call a Pro
Some projects demand professional expertise, and there’s no shame in recognizing when you’ve reached that point. Gas line installation tops the list of jobs that require licensed professionals. Natural gas connections involve safety codes, pressure testing, and permits – not the place for weekend experimentation.
Complex masonry work on sloped sites or challenging terrain needs professional skills. We’ve seen too many DIY retaining walls fail because the builder didn’t account for proper drainage or frost protection. When your outdoor kitchen includes stone or concrete block construction, professional installation protects your investment.
Electrical work beyond simple plug-in appliances requires licensed electricians in most areas. GFCI outlets, dedicated circuits, and weatherproof connections all need to meet local codes. The permit and inspection process alone makes professional installation worthwhile.
Professional installation typically includes warranties on both labor and materials. For permanent installations that represent a significant investment in your home, this protection provides valuable peace of mind.
Maintenance, Safety & Year-Round Enjoyment

Your outdoor kitchen grill station represents a significant investment – one that can provide decades of enjoyment with proper care. Living on the North Shore, we know how salt air and harsh winters can challenge outdoor equipment. Regular attention prevents major problems down the road.
Seasonal Checklist
Spring startup begins with inspecting gas connections for winter damage. Clean and season grill grates to remove rust or debris. Test all appliances before your first cookout. Check and reseal countertops if needed – granite and concrete surfaces benefit from annual sealing.
Summer maintenance keeps everything running smoothly. Clean grease traps monthly – built-up grease attracts insects and creates fire hazards. Wipe down stainless surfaces weekly to prevent salt air corrosion. Monitor refrigerator coils regularly and inspect covers for wear.
Fall preparation sets you up for winter success. Deep clean all appliances while weather’s pleasant. Drain water lines to prevent freezing. Apply protective treatments to natural stone surfaces.
Winter storage protects your investment. Disconnect and store propane tanks safely. Cover all appliances with quality winter covers. Remove standing water from sinks or ice makers.
Safety Must-Haves
Safety isn’t exciting, but it’s absolutely essential.
Electrical safety starts with GFCI outlets on all circuits. Weather-resistant outlet covers protect connections. For permanent installations, professional wiring ensures everything meets code.
Fire safety requires constant attention. Maintain manufacturer-recommended clearances – typically 24-36 inches from anything that can burn. Install noncombustible backsplashes behind grills using tile, stone, or stainless steel.
Keep a fire extinguisher nearby – choose a Class K extinguisher designed for cooking fires.
Gas safety demands respect. Annual professional inspection of gas connections catches problems early. Leak detection solution helps you test connections regularly. Proper ventilation prevents gas accumulation in covered areas.
Never use combustible roof materials over grills. Stick with metal, tile, or other noncombustible materials for overhead protection.
Frequently Asked Questions about Outdoor Kitchen Grill Stations
We get these three questions almost every time we meet with homeowners planning their dream outdoor kitchen grill station. Let’s tackle the big ones that keep coming up.
How far should a grill station sit from the house?
The short answer? It depends on your specific grill and what your house is made of. Most grill manufacturers require 24-36 inches of clearance from any combustible surface – that means wood siding, deck railings, or overhangs.
Here’s the thing though – built-in grills often have different requirements than portable ones. Always check your specific model’s installation manual because some high-end units need less space while others need more.
From a practical standpoint, we usually recommend positioning your station close enough that you’re not hiking across the yard with platters of food, but far enough that smoke doesn’t drift into open windows. In Essex County, our southwest winds are pretty predictable, so we factor that into every design.
One trick we’ve learned? Stand where you’re thinking of putting the grill on a breezy day and see which way the air moves. Your neighbors will thank you for thinking this through!
Do I need permits for gas and water lines?
Yes, and this is where things get serious. Most towns around here require permits for any gas line work – and honestly, that’s a good thing. Gas isn’t something to mess around with.
In Massachusetts, licensed professionals must handle all gas work. Period. We’ve seen too many DIY disasters to recommend any shortcuts here. Water line extensions usually need permits too, especially if you’re tapping into municipal water systems.
Electrical work gets tricky as well. Anything over 120 volts almost always requires permits, and many Essex County towns require professional installation for all outdoor electrical work. The salt air makes proper connections even more critical.
Our advice? Contact your local building department early in the planning process. They’re usually pretty helpful, and getting permits upfront beats dealing with problems when you try to sell your house later.
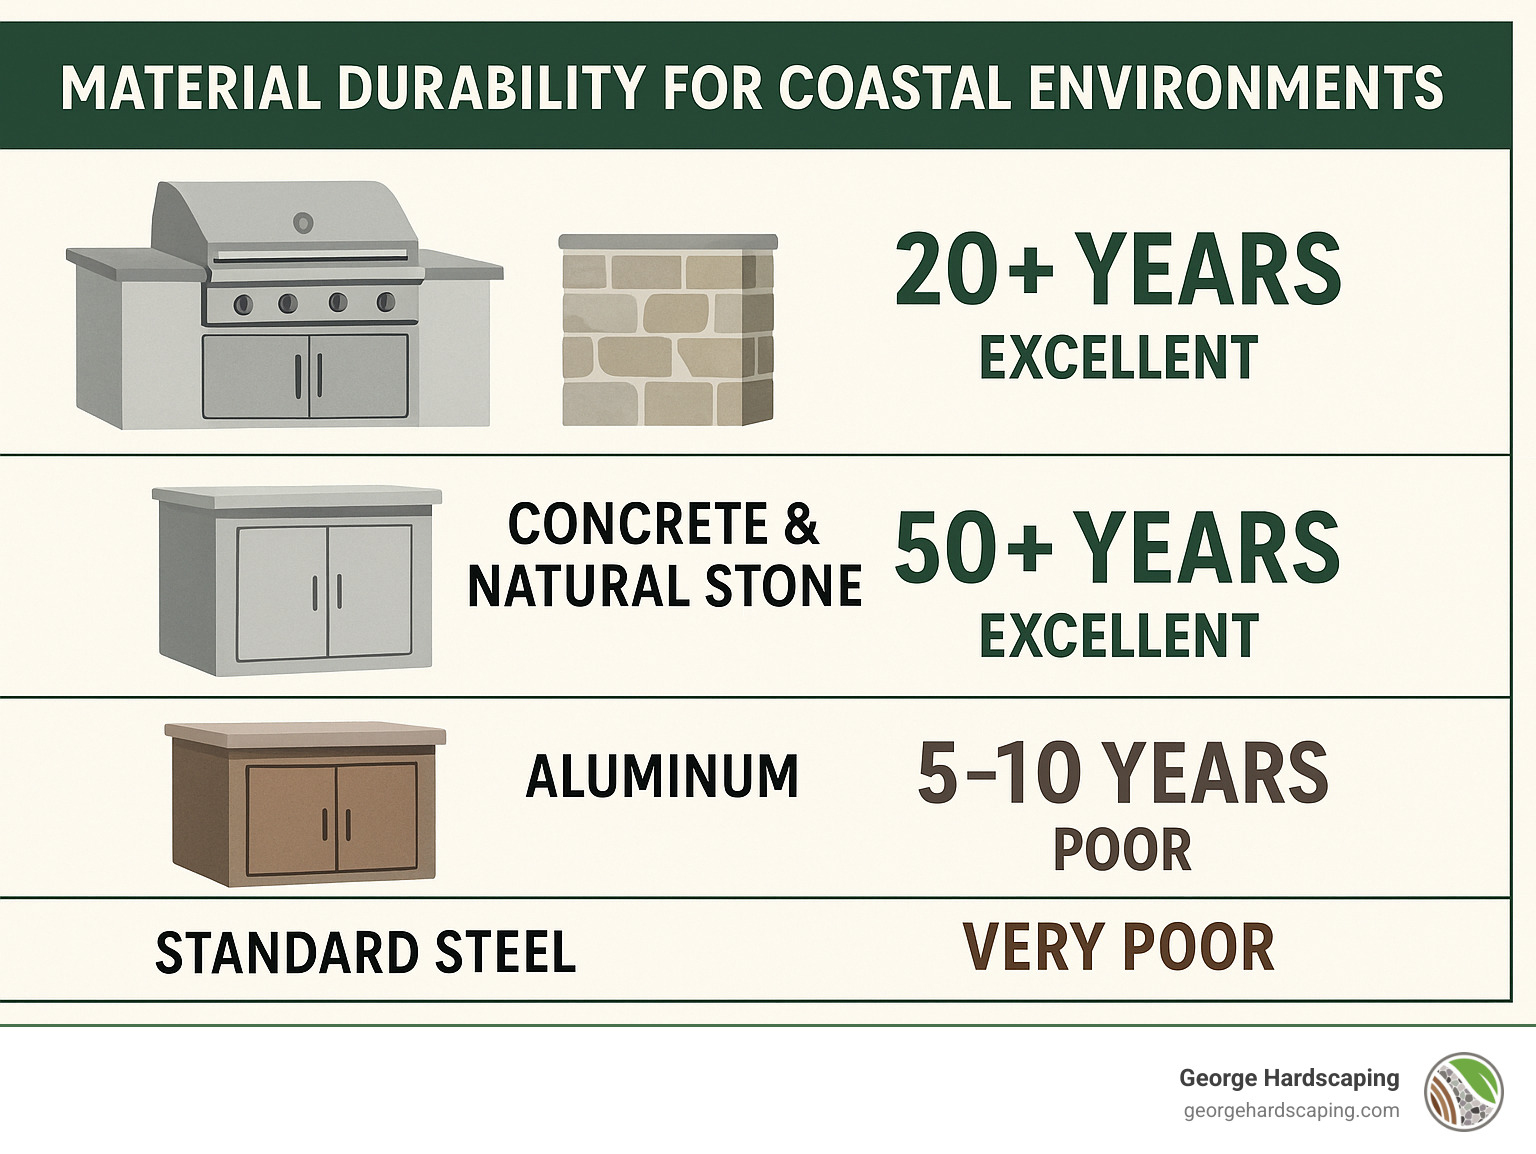
What materials resist salt-air corrosion best?
Living this close to the Atlantic Ocean means choosing materials that can handle salt spray and humidity. We’ve learned this lesson the hard way over the years!
304 stainless steel is absolutely the gold standard for appliances and hardware. It contains enough chromium and nickel to shrug off salt air for decades. Yes, it costs more upfront, but replacing corroded equipment every few years gets expensive fast.
For the structure itself, concrete and natural stone are your best friends. They actually get stronger over time and don’t care about salt air. We avoid aluminum and standard steel hardware entirely – they just don’t last in our climate.
One thing many people overlook is the electrical components. Marine-grade wiring and connections are essential. Regular house wiring corrodes quickly near the coast, leading to dangerous situations and expensive repairs.
Here’s a maintenance tip that saves money: rinse everything down with fresh water regularly. Salt buildup accelerates corrosion, but a simple rinse removes most of it before damage occurs.
Conclusion
Creating an outdoor kitchen grill station that transforms your backyard into the neighborhood’s favorite gathering spot isn’t about breaking the bank – it’s about smart design that works with your lifestyle and Essex County’s unique coastal challenges.
We’ve walked through nine different approaches, from sleek stainless steel setups to rustic stone islands with wood beam accents. The compact balcony station proves you don’t need acres of space, while the L-shaped social hub around the pool shows how thoughtful layout creates natural conversation zones. Whether you choose a covered all-weather design for year-round grilling or go bold with a pizza-oven and smoker combo, the secret lies in proper planning and materials that can handle everything from summer heat waves to February nor’easters.
At George Hardscaping, we’ve spent years helping families across Essex County create outdoor spaces that actually get used. We know why 304 stainless steel matters in Marblehead’s salt air, how Georgetown’s soil affects foundation work, and which permits you’ll need in Salem. Our masonry expertise means your investment will look as good in ten years as it does on installation day.
The truth is, the best outdoor kitchen grill station isn’t necessarily the most expensive one – it’s the one that brings your people together. It should make flipping burgers feel less like a chore and more like the highlight of your weekend. From Beverly to Newburyport, we’ve watched families completely change how they entertain once they have a proper outdoor cooking setup.
Your dream outdoor kitchen is closer than you think. With Essex County’s growing season and our expertise in creating spaces that last, there’s never been a better time to make it happen.
More info about Outdoor Kitchen and Fireplace
