How to Install Stone Slab Steps: 7 Powerful Tips for Success 2025
Why Stone Slab Steps Transform Your Landscape Into a Stunning Statement
Learning how to install stone slab steps properly creates safe, beautiful transitions in your landscape that can last for decades. Here’s the essential process:
Quick Installation Overview:
1. Plan & measure – Calculate rise (5-7″ per step) and run (12-18″ tread depth)
2. Excavate & prep base – Dig 6″ deep, add 4″ compacted gravel + 2″ stone dust
3. Set steps bottom-up – Place heaviest slab first, overlap 1-2″ between steps
4. Level & slope – Use 1/8″ forward pitch for drainage, check with level
5. Secure & finish – Pin with rebar, backfill edges, add safety features
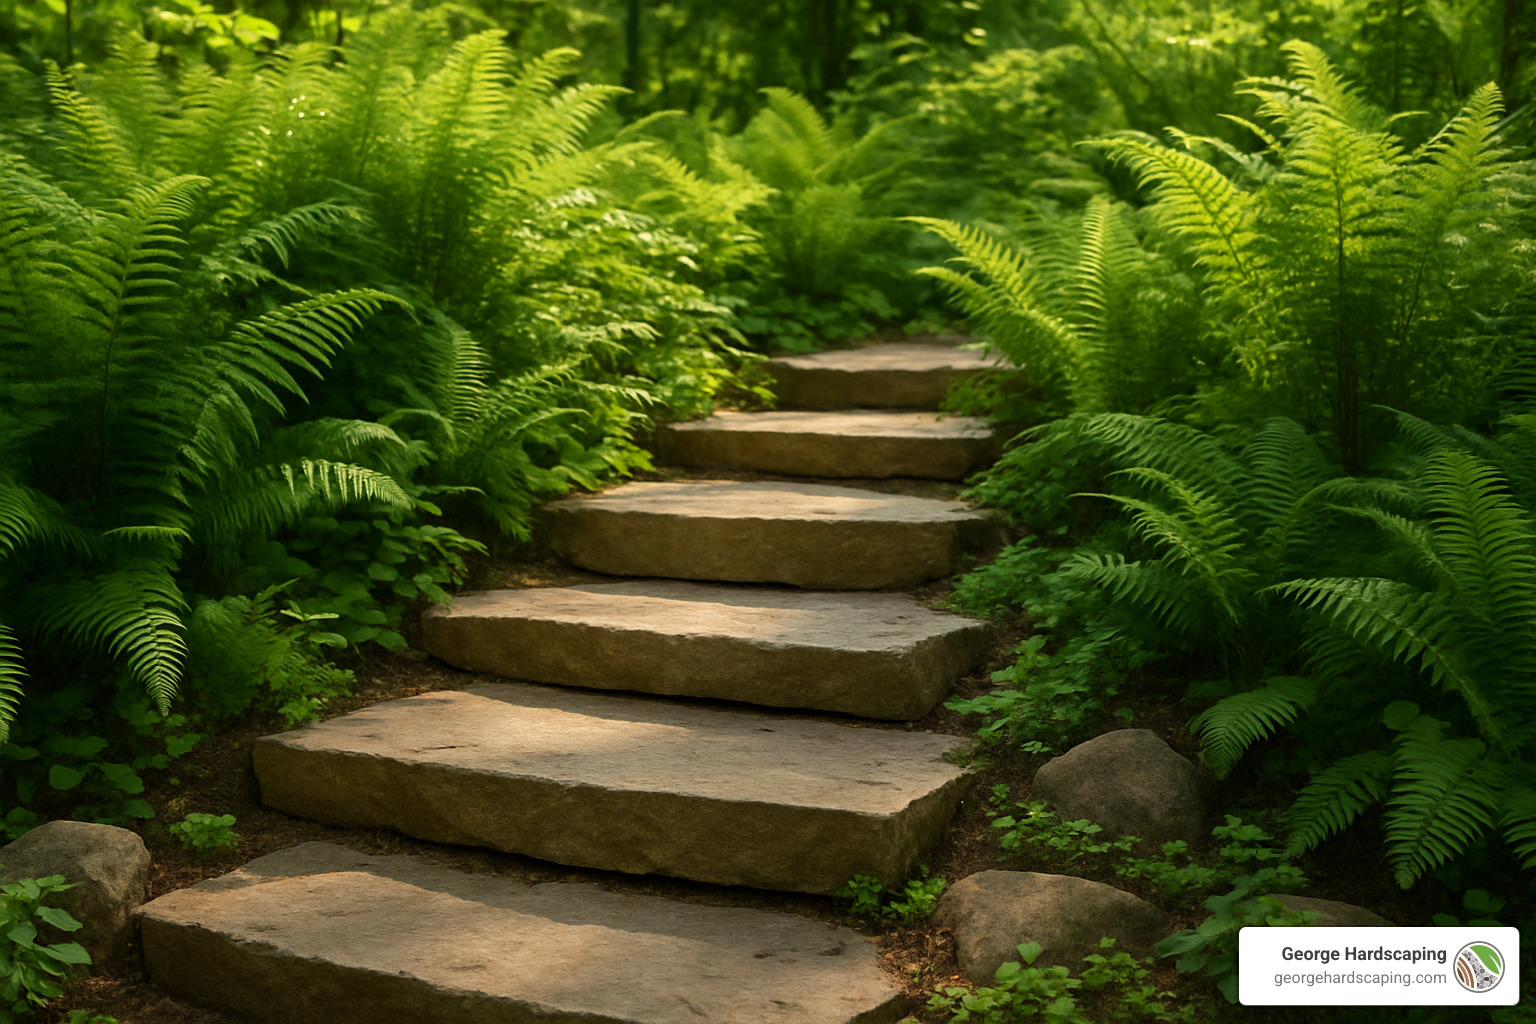
Picture stepping through your back door onto classy stone steps that wind through your garden. That’s the wow factor natural stone brings to any property.
Each stone slab can weigh 200-800 pounds, making this one of the more challenging DIY projects. But the payoff is huge – properly installed stone steps boost curb appeal, improve safety, and create that premium look that sets your home apart.
The key is getting the foundation right. A solid 4-6 inch compacted gravel base prevents settling and frost damage. Then it’s all about precise measurements and patient, methodical installation from bottom to top.
Whether you’re connecting a patio to your yard or creating garden pathways, stone slab steps deliver both function and serious visual impact.

How to install stone slab steps terminology:
– how to build outdoor stone stairs
– how to install stone stair treads
– how to install stone steps on a slope
Plan Your Project & Pick the Perfect Stone
Getting your how to install stone slab steps project right starts with solid planning and choosing materials that’ll work with your specific site. After years of installing stone steps across Essex County, we’ve learned that the time you spend upfront planning saves you headaches (and backaches) later.
The first thing we do is grab a string line and level to map out the slope. This isn’t just about measuring – you’re figuring out how many steps you need and where they’ll sit. The math matters here because uncomfortable steps make everyone grumpy, and unsafe steps are just plain dangerous.
You’ll also want to check local codes before you start digging. Some municipalities have specific requirements for outdoor stairs, especially if they’re near property lines or connect to structures.
What Are Stone Slab Steps?
Stone slab steps are exactly what they sound like – thick, flat pieces of natural stone cut specifically for outdoor stairs. Think of them as nature’s building blocks, quarried straight from the earth and shaped into functional beauty.
The durability factor is huge. We’ve seen properly installed stone steps that look almost new after 30+ years of harsh New England weather. Natural stone handles our freeze-thaw cycles way better than concrete alternatives, which is why so many historic New England homes still have their original stone steps.
Most stone slabs come with a natural look – rock-faced on three sides with one smooth tread surface. This gives you that classic, timeless appearance that works with everything from colonial homes to modern designs.
Choosing Stone Type & Dimensions
Your stone choice affects everything from how the steps look to how they perform in our climate. Here’s what works best around here:
Granite steps typically come 7 inches thick with 14-inch treads and are basically indestructible. They cost more upfront but you’ll never replace them. A typical 4-foot granite step weighs around 450 pounds – plan accordingly.
Bluestone is our go-to recommendation, usually available in 6 inches thick with 16-inch treads. The natural texture provides excellent slip resistance, especially important during our wet springs and icy winters. Thermal bluestone has an even rougher surface that grips like crazy.
Limestone offers beautiful creamy colors that complement many architectural styles. It performs well in our climate but benefits from sealing every few years to maintain its appearance.
Sandstone tends to be the most budget-friendly option, ranging from buff to rich brown tones. Just make sure you’re getting quality sandstone that can handle our weather – some varieties are too soft for New England.
Weight per slab ranges from 200 to 800 pounds depending on size and material. This isn’t a one-person job, and you’ll definitely want proper equipment or several strong helpers.
Calculating Rise, Run & Step Count
Getting your measurements right makes the difference between steps that feel natural and ones that trip people up. Here’s the math that actually matters:
Start by measuring your total vertical rise from bottom to top. Comfortable rise per step is 5-7 inches – anything higher feels like you’re climbing a mountain, anything lower feels awkward.
For the run, each step needs a tread depth between 12-18 inches. Shorter treads make people feel rushed, longer ones throw off their natural stride.
The basic formula: Total rise ÷ slab thickness = number of steps needed. Then double-check by dividing total run ÷ number of steps to get your actual tread depth.
Use a string and level to get accurate measurements, especially on slopes. If you’re working with a long run, measure in sections and add them up – trying to stretch one string line across a huge distance just leads to errors.
For more detailed guidance on planning your landscape steps project, check out our landscape steps services. And if you want to see how professionals approach similar projects, This Old House has a great guide on setting stone slabs.
Tools, Materials & Site Preparation
Getting your tools and materials sorted before you start how to install stone slab steps makes all the difference between a smooth project and a frustrating weekend. Trust me – there’s nothing worse than realizing halfway through that you’re missing a crucial piece of equipment while you’ve got a 500-pound granite slab hanging in the air.
Essential Tools Checklist
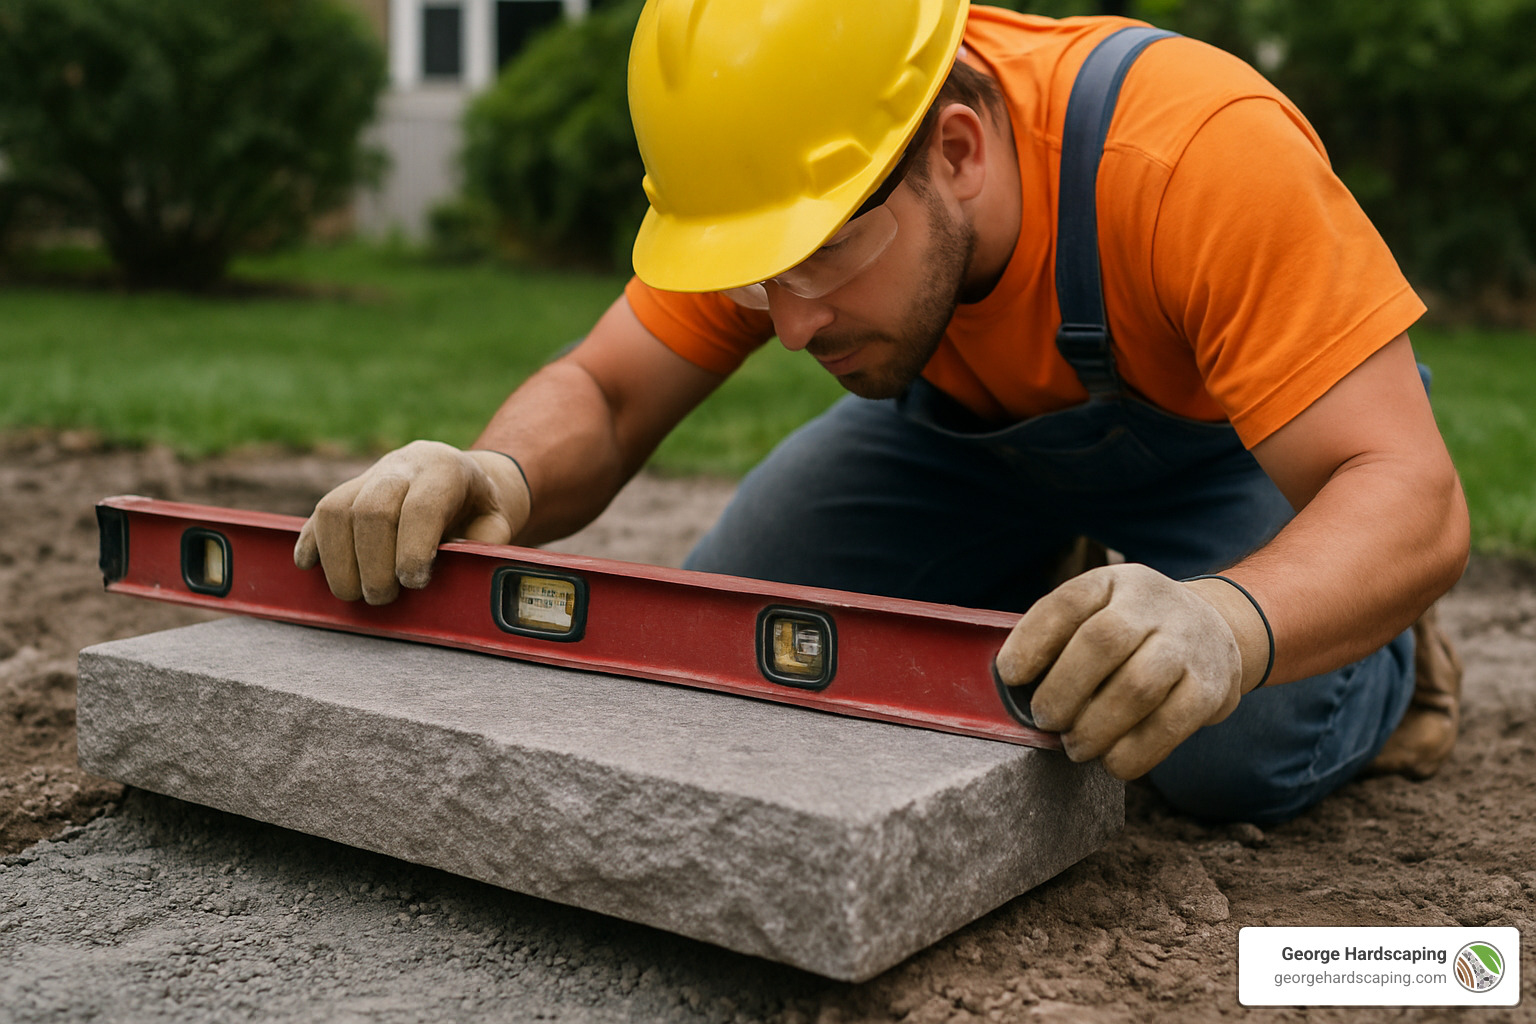
The right tools turn this challenging project into a manageable one. Your pointed shovel becomes your best friend for precise excavation work, while a rubber mallet gives you the gentle touch needed for final positioning without chipping your expensive stone. A 4-foot level is absolutely critical – don’t try to get by with a shorter one when you’re dealing with wide stone slabs.
For moving these heavy pieces around, you’ll need pry bars to nudge slabs into perfect position. A hand tamper helps you compact those tight spots where your plate compactor can’t reach. Basic measuring tools like a tape measure and marking spray keep everything organized and precise.
Power equipment makes the heavy work possible. Rent a plate compactor – this isn’t optional if you want professional results. Your base needs proper compaction, and jumping up and down on it won’t cut it. A sturdy wheelbarrow handles all your material moving, and if you need to trim any stones, a masonry saw gets the job done cleanly.
Here’s where things get interesting with the heavy lifting. For slabs over 400 pounds, seriously consider forklift rental. Yes, it adds to your budget, but it also keeps your back intact and prevents cracked stones from awkward lifting. For smaller jobs, a tree dolly with pneumatic wheels can be a lifesaver. Don’t forget chains or straps rated for the weight you’re moving.
Material-wise, you’ll need ¾-inch crushed stone for your base layer and stone dust or quarry run for the bedding layer. Geotextile filter fabric prevents your carefully prepared base from shifting over time. If drainage is a concern, grab some perforated drain pipe. ½-inch rebar pins, 18 inches long keep everything locked in place, and landscape adhesive seals any joints that need extra attention.
Safety gear isn’t negotiable when you’re learning how to install stone slab steps. Safety glasses and work gloves protect against flying chips and rough edges. Steel-toed boots save your toes if something heavy decides to drop, and a back support belt helps during all that heavy lifting.
Building a Solid Base
Your base determines everything. Get this wrong, and you’ll be redoing the whole project in a few years when things start settling and shifting. Here’s how we build bases that last decades.
Excavation depth needs to account for everything that’s going below your stone. For 7-inch thick slabs, dig down 13 inches total. That gives you 4 inches for your gravel base, 2 inches for stone dust bedding, plus the full 7-inch slab thickness. It seems like a lot of digging, but this foundation work is what separates amateur jobs from professional ones.
Your base layer starts with 4-6 inches of ¾-inch crushed stone, but here’s the key – install it in 2-inch lifts and compact each one thoroughly with that plate compactor. Dumping all 4-6 inches at once and trying to compact it just creates a hard crust over loose material underneath. Compact in lifts and you’ll have a rock-solid foundation.
Filter fabric goes over your compacted stone base with seams overlapping at least 6 inches. This woven geotextile fabric prevents your stone dust from migrating down into the gravel over time. Skip this step and your carefully leveled bedding layer gradually disappears, leaving your steps wobbly and uneven.
The bedding layer uses 2 inches of stone dust spread over the fabric. This fine material lets you make precise adjustments for perfect leveling while still maintaining good drainage. Remember to slope everything away from buildings – about 1/8 inch per foot minimum keeps water flowing where it should.
For professional installation and expertise, check out our stone masonry services.
How to Install Stone Slab Steps
Now comes the exciting part – actually setting those beautiful stone slabs. The key to professional results is working methodically from bottom to top, taking time to get each step perfect before moving to the next.
How to install stone slab steps successfully requires patience and precision. Think of it like building with giant Lego blocks – each piece needs to fit perfectly with the one below it, creating a stable, attractive staircase that’ll handle decades of foot traffic.
The bottom-up sequence is absolutely critical here. We’ve seen too many weekend warriors try to work from the top down, only to find they can’t get proper support for their upper steps. Trust the process – start at the bottom and work your way up.
Bottom-Up Method: how to install stone slab steps like a pro
Starting with the bottom step gives you the solid foundation everything else depends on. This first step carries the weight of all the others, so getting it right matters more than you might think.
Excavating that first hole needs to be precise. Mark your bottom step location with spray paint, then dig to the full depth you calculated earlier. Make the excavation about 6 inches wider than your slab on all sides – you’ll need room to work and make adjustments.
Here’s where many DIYers stumble: they leave roots or organic debris in the hole. Every piece of vegetation will eventually decompose, creating voids that lead to settling. Take the extra time to remove everything down to solid soil.
Base preparation is where your earlier planning pays off. Install that crushed stone base in 2-inch lifts, running your plate compactor over each layer until it feels rock-solid underfoot. The base should be level from side to side, but slight forward slope for drainage.
Check your work with a 4-foot level frequently. Any wobbles or soft spots in the base will telegraph through to your finished step, creating an unstable surface that’s both dangerous and unprofessional looking.
Setting the First Slab: how to install stone slab steps safely
This is the moment of truth – placing that first heavy slab. At 450+ pounds, there’s no room for “oops, let me try that again.”
Spread your fine stone bedding evenly over the compacted base. This 2-inch layer of stone dust gives you the ability to make precise adjustments while maintaining drainage. Keep that forward pitch of about 1/8 inch per foot – water needs somewhere to go.
Getting the slab into position safely requires either equipment or extra hands. We always recommend having at least three people for slabs over 300 pounds. Use proper lifting technique – bend those knees, keep your back straight, and don’t try to be a hero.
Once the slab is roughly in position, use your rubber mallet for fine adjustments. Tap gently – these slabs can crack if you get too aggressive. Check level in both directions, but maintain that drainage slope. The slab should feel absolutely solid when you step on it. Any rocking or movement means your base needs more work.
Installing Subsequent Steps & Alignment
Each additional step builds on the success of the previous one. The beauty of stone slab steps comes from that consistent, flowing appearance where each step seems to naturally emerge from the landscape.
Overlapping treads by 1-2 inches creates the proper rise while using standard slab thicknesses. A 7-inch thick slab with a 1-inch overlap gives you a comfortable 6-inch rise. This overlap also provides visual continuity – the steps look like they belong together rather than just being stacked.
Maintaining consistent riser height is crucial for safety. People develop a rhythm when climbing stairs, and even a half-inch variation can cause stumbles. Measure the rise between each step carefully, adjusting with the bedding layer if needed.
Pinning with rebars prevents long-term shifting that can create dangerous gaps. Drive those ½-inch by 18-inch rebar pins alongside each slab, leaving about 2 inches protruding. Position them where they won’t interfere with foot traffic – usually toward the back corners of each step.
Keep checking alignment with a string line as you go. Steps that wander left or right not only look unprofessional but can be genuinely dangerous in low light conditions. Take your time with each step – rushing this phase undoes all your careful preparation work.
Drainage, Finishing Touches & Safety Must-Dos
The difference between stone steps that last five years versus fifty years comes down to these final details. We’ve seen too many beautiful installations fail because someone rushed through the drainage and finishing work.
Water is your stone steps’ biggest enemy. Without proper drainage, even the most carefully installed steps will shift, settle, and potentially crack during New England’s brutal freeze-thaw cycles. That’s why every step needs that 1/8 inch forward pitch we mentioned earlier – it’s not optional.
But drainage is just the beginning. Retaining cheeks (those side pieces flanking your steps) aren’t just decorative – they prevent soil erosion and lateral movement. Set them in concrete for permanent installations, and they’ll keep your steps looking crisp for decades.
Edge restraints work similarly, containing the crushed stone base and preventing it from migrating over time. Think of them as invisible guardians protecting your investment.
Don’t forget about safety features either. Handrails aren’t legally required for most residential installations, but they’re smart additions for steps with more than three risers. Path lighting makes your beautiful steps safe to steer after dark – and honestly, well-lit stone steps look pretty spectacular at night.
Preventing Shift & Settlement
Even with perfect installation, Mother Nature has her own plans. Here’s how to stay ahead of her.
Geogrid reinforcement acts like rebar for your base layers. This mesh material distributes weight and prevents differential settling – especially crucial on slopes or in areas with questionable soil conditions. It’s extra insurance that pays off when your neighbor’s steps start sagging after a few years.
Proper backfill means using the same crushed stone from your base, not soil. Soil settles, creates voids, and invites water problems. Backfill in thin lifts and compact each one to match your original base density. Yes, it’s more work, but it’s what separates professional results from DIY disasters.
The key is thinking long-term. Every shortcut you take now becomes a repair job later – usually at the worst possible time, like right before your daughter’s graduation party.
Common Mistakes to Avoid
After twenty years in Essex County, we’ve seen every mistake in the book. Here are the big ones that’ll save you headaches down the road.
Uneven rise heights are the number one safety hazard we encounter. Your foot expects each step to be the same height, and even a half-inch difference can cause serious falls. Always measure rise between steps and adjust your bedding layers to maintain perfect uniformity.
Inadequate base thickness is the classic penny-wise, pound-foolish mistake. That 4-6 inch compacted gravel base isn’t a suggestion – it’s the foundation of everything. Skimp here and you’ll be rebuilding in three years instead of enjoying your steps for thirty.
Poor drainage kills more stone installations than everything else combined. Without that forward pitch, water pools, freezes, expands, and destroys your beautiful work. In our climate, proper drainage isn’t just important – it’s survival.
Here’s one that makes us cringe every time: installing steps on finished pavers. Never, ever set stone steps directly on top of existing pavers. It looks terrible, damages the pavers, and creates an unstable mess. Always install steps first, then bring your patio or walkway up to meet them properly.
Learning how to install stone slab steps correctly means avoiding these pitfalls from the start. Take your time with these finishing details – they’re what transform a DIY project into something you’ll be proud to show off for years to come.
For professional installation that gets all these details right the first time, check out our stairs and walkways services.
Costs, Maintenance, FAQs & Next Steps
Understanding the investment and ongoing care requirements helps you make informed decisions about your stone step project.
Average Cost Breakdown (Internet Data)
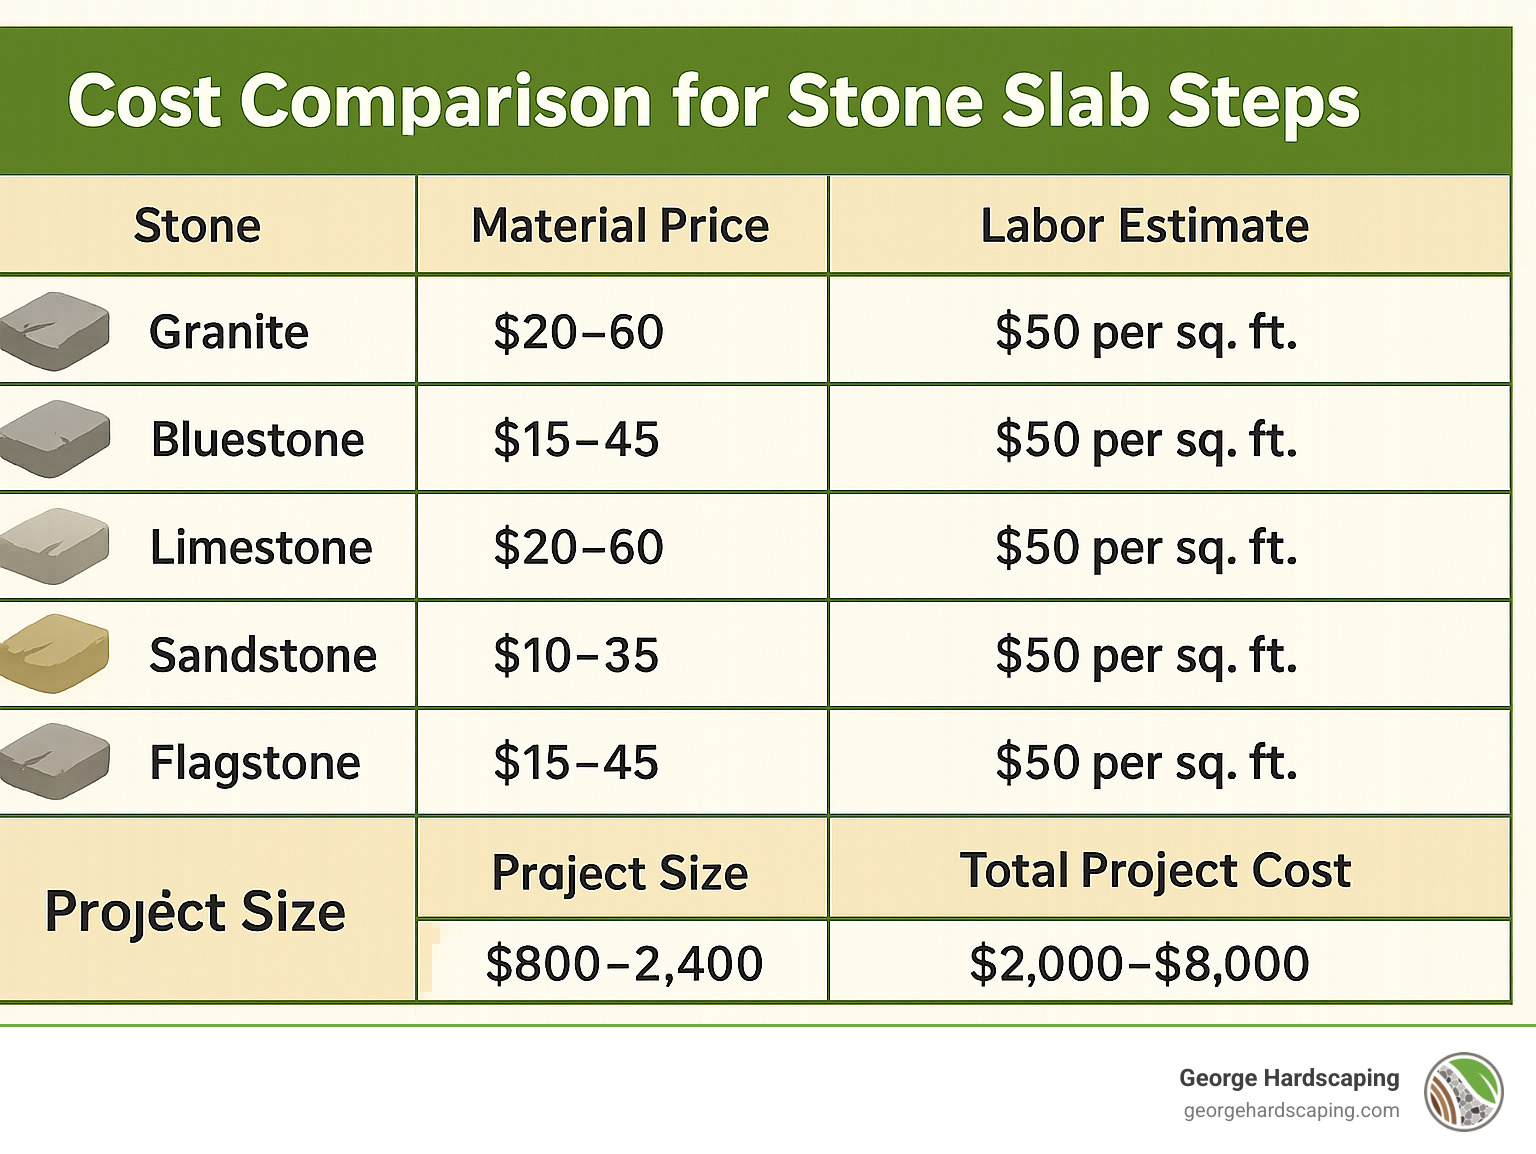
Based on internet research, here are average material costs per square foot (these are not George Hardscaping prices):
Material Costs:
– Granite: $20-$60 per square foot
– Bluestone: $15-$45 per square foot
– Limestone: $20-$60 per square foot
– Sandstone: $10-$35 per square foot
– Flagstone: $15-$45 per square foot
Total Project Costs (materials + labor):
– Simple 3-step installation: $800-$2,400
– Complex multi-level project: $2,000-$8,000+
Factors affecting cost include step size, stone type, site accessibility, base preparation requirements, and regional labor rates. Heavy equipment rental can add $200-500 per day to DIY projects.
Maintenance Tips for Decades of Use
Properly installed stone steps require minimal maintenance, but a little care goes a long way:
Annual Tasks:
– Sweep debris regularly to prevent staining
– Inspect for loose or shifting stones
– Check and refill gaps between steps as needed
– Remove weeds before they establish root systems
Every 2-3 Years:
– Reseal stone if recommended for your material type
– Deep clean with mild soap and water
– Inspect and repair any mortar joints
Winter Care:
– Use sand instead of salt for traction – salt can damage some stone types
– Remove ice buildup promptly to prevent freeze-thaw damage
– Clear snow to prevent ice dam formation
FAQs about Stone Slab Steps
Q: Should steps have uniform tread depth?
A: Yes, absolutely. Uniform tread depth (12-18 inches) is essential for safety and comfort. Inconsistent depths cause people to misjudge their steps, leading to trips and falls.
Q: Will winter salt damage my stone steps?
A: It depends on the stone type. Granite and bluestone handle salt well, but limestone and some sandstones can be damaged. When in doubt, use sand for traction instead of salt.
Q: Should I install steps before or after my patio?
A: Always install steps first. Steps dictate the final elevations for adjacent hardscape elements. You can adjust patio grades more easily than step risers, and setting steps on finished pavers looks unprofessional.
Q: How long do stone slab steps last?
A: With proper installation and minimal maintenance, natural stone steps can last 30+ years. The stone itself is essentially permanent – any issues usually stem from poor base preparation or drainage problems.
Q: Can I cut stone slabs to custom sizes?
A: Yes, but it requires specialized equipment and experience. Wet saws with diamond blades, angle grinders, or traditional feather-and-wedge splitting methods all work, but the techniques require practice to master.
For professional guidance on your specific project, explore our hardscaping services.
Conclusion
Learning how to install stone slab steps properly transforms your outdoor space while creating lasting value that you’ll appreciate for decades. The process demands patience, planning, and some serious muscle – but watching that first guest pause to admire your beautiful stone staircase makes every ounce of effort worthwhile.
The foundation work isn’t glamorous, but it’s absolutely critical. We can’t stress this enough – never compromise on base preparation. That 4-6 inch compacted gravel base and proper drainage will determine whether your steps look perfect for 30 years or start settling after the first winter. It’s the difference between a professional installation and a costly do-over.
Remember the essentials: accurate measurements set you up for success, working bottom-up ensures proper alignment, and maintaining that 1/8 inch forward pitch keeps water moving where it belongs – away from your steps and foundation.
At George Hardscaping, we’ve been creating stunning stone installations throughout Essex County for years. From the historic neighborhoods of Salem to the coastal homes of Newburyport, we understand how New England’s freeze-thaw cycles and clay soils challenge even the best installations. That’s why we never cut corners on the details that matter.
Safety comes first, always. Those 400-800 pound slabs demand respect and proper equipment. If you’re questioning whether to rent that forklift or recruit more help, err on the side of caution. A professional installation includes both expertise and insurance protection – sometimes that peace of mind is worth the investment.
The change from a basic slope to an neat stone staircase is truly remarkable. Your guests will notice, your family will appreciate the improved safety, and you’ll enjoy that sense of pride every time you walk up those perfectly aligned steps.
Whether you tackle this as a weekend warrior project or bring in the pros, stone steps represent a long-term investment in your property. Quality materials and proper installation techniques pay dividends for generations. Take your time, follow the proven methods we’ve outlined, and don’t rush the foundation work.
Ready to start planning your stone step project? Our team at stairs and walkways can help you steer the options and ensure your project succeeds from day one.
