Curved Paver Walkway Without Cutting: Top 3 Expert Tips
Elegant Curves Made Easy: The Art of Creating a Curved Paver Walkway Without Cutting
Planning a curved paver walkway without cutting can seem like a daunting task, but with the right approach, it becomes simple and even enjoyable. The key to success lies in meticulous planning and smart choices regarding paver sizes and patterns.
Quick Tips for a Cutting-Free Installation:
- Accurate Measurements: Begin with precise measurements of your walkway area.
- Choose Compatible Paver Sizes: Select pavers that fit well within your layout to avoid the need for cuts.
- Use Modular Patterns: Opt for modular designs such as running bond, herringbone, or basket weave.
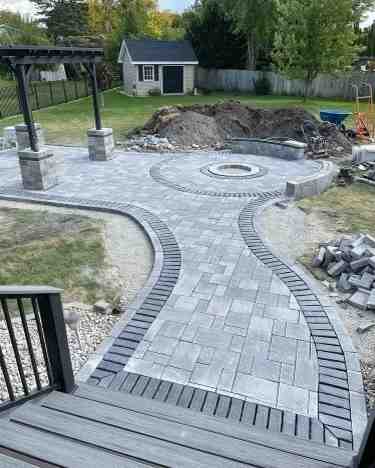
Creating a curved walkway not only enhances the aesthetics of your landscape but also offers numerous practical benefits. A well-designed curved path guides guests gracefully through your garden, adding a sense of flow and movement. Moreover, using whole pavers without cuts improves the durability and uniformity of the walkway.
The secret to success is all in the preparation. By following these steps, you can achieve a seamless, beautiful curve in your paver walkway without the hassle of cutting. Stay tuned as we delve deeper into the planning and installation techniques that make this possible.

Planning Your Curved Paver Walkway Without Cutting
Planning is everything when it comes to creating a curved paver walkway without cutting. Proper planning ensures a smooth installation and a stunning finish. Let’s dive into the essentials of choosing the right paver sizes and selecting modular patterns to make your project a breeze.
Choosing the Right Paver Sizes
Accurate measurements are crucial. Start by measuring the area where the walkway will be installed. Use a measuring tape, straightedge, or laser level for precision. Record all measurements carefully, accounting for any existing structures or obstructions.
Next, select paver sizes that align with your project dimensions. Opt for pavers available in sizes that complement your measurements, minimizing the need for adjustments. This choice ensures a seamless installation and reduces the likelihood of needing cuts.
Selecting Modular Paver Patterns
Modular paver patterns are your best friend when aiming to avoid cutting pavers. These patterns use specific combinations of paver sizes to create repetitive, interlocking designs. Here are three popular choices:
- Running Bond: Simple and versatile, this pattern involves laying pavers in staggered rows. Ideal for narrow walkways, it creates a seamless flow and can make small areas appear larger.
- Herringbone: This pattern features an interlocking zigzag design, offering excellent stability and durability. It’s perfect for areas with frequent foot traffic and adds a classic touch to your walkway.
- Basket Weave: Pavers are laid in pairs at right angles to each other, creating a woven effect. This pattern evokes a quaint, old-world charm and is suitable for homes with vintage or rustic architecture.
Before you start the installation, create a test layout with your chosen paver sizes and modular pattern. This allows you to visualize the final design and ensure the pavers fit seamlessly within the space. Lay the pavers without adhesive, paying attention to spacing and alignment. Adjust as needed until you are satisfied with the overall pattern and fit.
By carefully selecting the right paver sizes and modular patterns, you can achieve a beautiful curved walkway without the hassle of cutting any pavers. Next, we’ll explore the installation techniques to bring your plan to life.
Installation Techniques for a Seamless Curved Walkway
Creating a curved paver walkway without cutting pavers is all about careful planning and precise execution. Let’s dive into the installation process to ensure your walkway is both functional and visually appealing.
Preparing the Base
Excavation and Leveling
Start by excavating the marked path for your walkway. Dig to a depth of about 4 to 6 inches using a shovel or an excavator. Make sure the path is uniform in width and depth.

Pro Tip: If your walkway will only handle foot traffic, dig 7 inches below the finished grade. For areas with vehicular traffic, excavate 9 to 13 inches.
After excavation, level the area using a rake. Remove rocks, roots, and debris to create a smooth surface. This is crucial for a stable foundation.
Adding Gravel
Next, add a layer of compacted gravel to the excavated area. This layer helps with drainage and prevents pavers from shifting over time. Spread the gravel evenly and use a plate compactor or hand tamper to compact it thoroughly.

Pro Tip: A well-compacted gravel base is essential for a durable walkway.
Sand Layer and Leveling
Spreading the Sand
Once the gravel base is compacted, spread a thin layer of sand over the top. Aim for a 1-inch thick layer. The sand allows for minor adjustments during paver placement and creates a level surface.
To achieve a consistent thickness, use two parallel pipes or rails set at the desired height as guides. Drag a board or screed over the pipes to level the sand, removing excess material.
Screeding for Consistency
Use a screed board to level the sand layer. Start at one end of the walkway and drag the board back and forth in a sawing motion. Check the level periodically and make adjustments as needed.

Pro Tip: Ensure the sand layer is uniformly level to prevent tripping hazards and maintain stability.
Laying the Pavers
Center Point and Symmetry
Begin by installing the flexible edging along the marked path. Secure it with stakes, ensuring it matches the desired curve.
Identify the center point of the walkway curve. This is crucial for a symmetrical layout. Measure and mark the center point along the flexible edging.
Place the first paver at the center point, aligning it with the marked spot. Gently lower it onto the sand bed, ensuring it sits firmly and evenly.
Symmetry and Alignment
From the center paver, continue laying pavers outward along the curve. Position each paver snugly against the previous one, maintaining consistent spacing and alignment. Use a rubber mallet or wooden block to tap each paver into place, ensuring they are level with their neighbors.

Pro Tip: Regularly check the level using a straightedge or level to maintain a uniform surface.
Final Inspection
Once all pavers are laid, inspect the entire walkway. Ensure the pavers are level, evenly spaced, and aligned properly.
By following these steps, you can create a beautiful curved paver walkway without cutting any pavers. Next, we’ll cover advanced tips to further perfect your installation.
Curved Paver Walkway Without Cutting: Advanced Tips
Using Flexible Edging Materials
One of the big secrets to creating a curved paver walkway without cutting is using flexible edging materials. These materials, like plastic or rubber, can bend smoothly without breaking, providing a perfect guide for your pavers.
Why Use Flexible Edging?
- Flexibility: Plastic and rubber edgings bend easily to match the curve of your walkway.
- Durability: These materials are built to last, resisting weather and wear.
- Ease of Installation: They are simple to install and adjust as needed.
Installation Steps:
- Lay Out the Path: Outline your walkway using a garden hose or rope to visualize the curve.
- Install the Edging: Place the flexible edging material along the outlined path, securing it with stakes.
- Adjust as Needed: Make minor adjustments to ensure the edging follows the desired curve perfectly.
This flexible edging will act as a border and guide for the pavers, ensuring they stay in place and follow the walkway’s curve seamlessly.
Achieving Symmetry and Aesthetic Appeal
To create a visually appealing curved walkway, achieving symmetry and aesthetic alignment is key. Here are some tips to help you get it right:
Visual Balance:
- Consistent Spacing: Ensure the spacing between pavers is uniform. This creates a balanced look.
- Symmetrical Layout: Start laying pavers from the center of the walkway and work your way outwards. This helps maintain symmetry on both sides.
Spacing Adjustments:
- Minor Tweaks: Small adjustments can make a big difference. If you notice gaps or misalignment, gently shift the pavers to correct it.
- Test Layout: Before fixing the pavers permanently, lay them out to see how they fit. This allows you to make any necessary adjustments.
Aesthetic Alignment:
- Pattern Selection: Choose a modular pattern like running bond, herringbone, or basket weave. These patterns naturally complement curved walkways.
- Edge Treatment: Use contrasting pavers or different colors to highlight the edges. This adds a decorative touch and enhances the walkway’s visual appeal.
By focusing on symmetry, visual balance, and proper spacing, you can create a stunning curved walkway that looks professional and polished.
Next, we’ll answer some frequently asked questions about curved paver walkways to address any lingering concerns you might have.
Frequently Asked Questions about Curved Paver Walkways
How to Curve Pavers Without Cutting?
Creating a curved paver walkway without cutting is all about smart planning and gap management. Here’s how you can do it:
- Gap Management: Carefully plan your layout to ensure that the gaps between pavers are uniform. Using modular patterns like herringbone or basket weave can help maintain consistent spacing.
- Negative Space: Embrace the natural gaps that occur when laying pavers in a curve. These spaces can be filled with decorative stones or gravel, adding an aesthetic touch while maintaining the walkway’s integrity.
How Do You Lay a Curved Path with Pavers?
Laying a curved path with pavers can be straightforward if you follow these steps:
- Outside Curve: Start by laying pavers along the outer edge of your curve. This helps define the path and provides a guide for the rest of the pavers.
- PVC Conduit: Use flexible materials like PVC conduit to outline your curve. This ensures a smooth, consistent curve that you can follow as you lay your pavers.
- Marking Techniques: Mark your curve using a garden hose or rope. Secure it with stakes, then use marking paint to outline the path. This gives you a clear guide to follow during installation.
How to Set Out a Curved Path?
Setting out a curved path involves several key steps:
- Base Preparation: Excavate the area to a depth of 4-6 inches. Level the ground and remove any debris. Add a layer of compacted gravel to provide a stable base.
- Sand Screeding: Spread a 1-inch layer of sand over the gravel. Use a screed board to level the sand, ensuring a smooth surface for the pavers.
- Paver Laying: Begin laying pavers from the center of the path, working outwards. Align each paver carefully, maintaining consistent spacing. Use a rubber mallet to tap pavers into place, ensuring they are level.
By following these steps, you can create a beautiful, seamless curved walkway without the need for cutting pavers.
Conclusion
Creating a curved paver walkway without cutting is not only possible but also practical and beautiful. With the right planning, you can avoid the hassle of cutting pavers, ensuring a smooth and seamless installation.
Durability
One of the key benefits of a well-installed paver walkway is its durability. Pavers are designed to withstand heavy foot traffic and harsh weather conditions. When properly laid, they create a strong and stable surface that can last for many years. The compacted gravel base and sand layer provide excellent drainage, preventing pavers from shifting or sinking over time.
Maintenance
Maintaining a paver walkway is straightforward. Regular sweeping and occasional rinsing with water will keep it looking fresh. If a paver becomes damaged, it can be easily replaced without disturbing the surrounding area. This makes paver walkways a cost-effective option in the long run. For more detailed maintenance tips and advice, you can always reach out to us at George Hardscaping.
George Hardscaping
At George Hardscaping, we specialize in creating elegant and durable walkways that enhance the beauty and functionality of your outdoor spaces. Our team of experts is dedicated to providing top-quality installation services, ensuring that your walkway is both stunning and long-lasting. We take pride in our attention to detail and commitment to customer satisfaction.
Ready to transform your outdoor space with a beautiful curved paver walkway? Contact us today to discuss your project and see how we can bring your vision to life. Together, we can create a walkway that you and your guests will admire for years to come.
