Install Travertine Pavers Around Pool: 5 Essential Steps for Amazing Results
Transform Your Poolside with Natural Stone Elegance
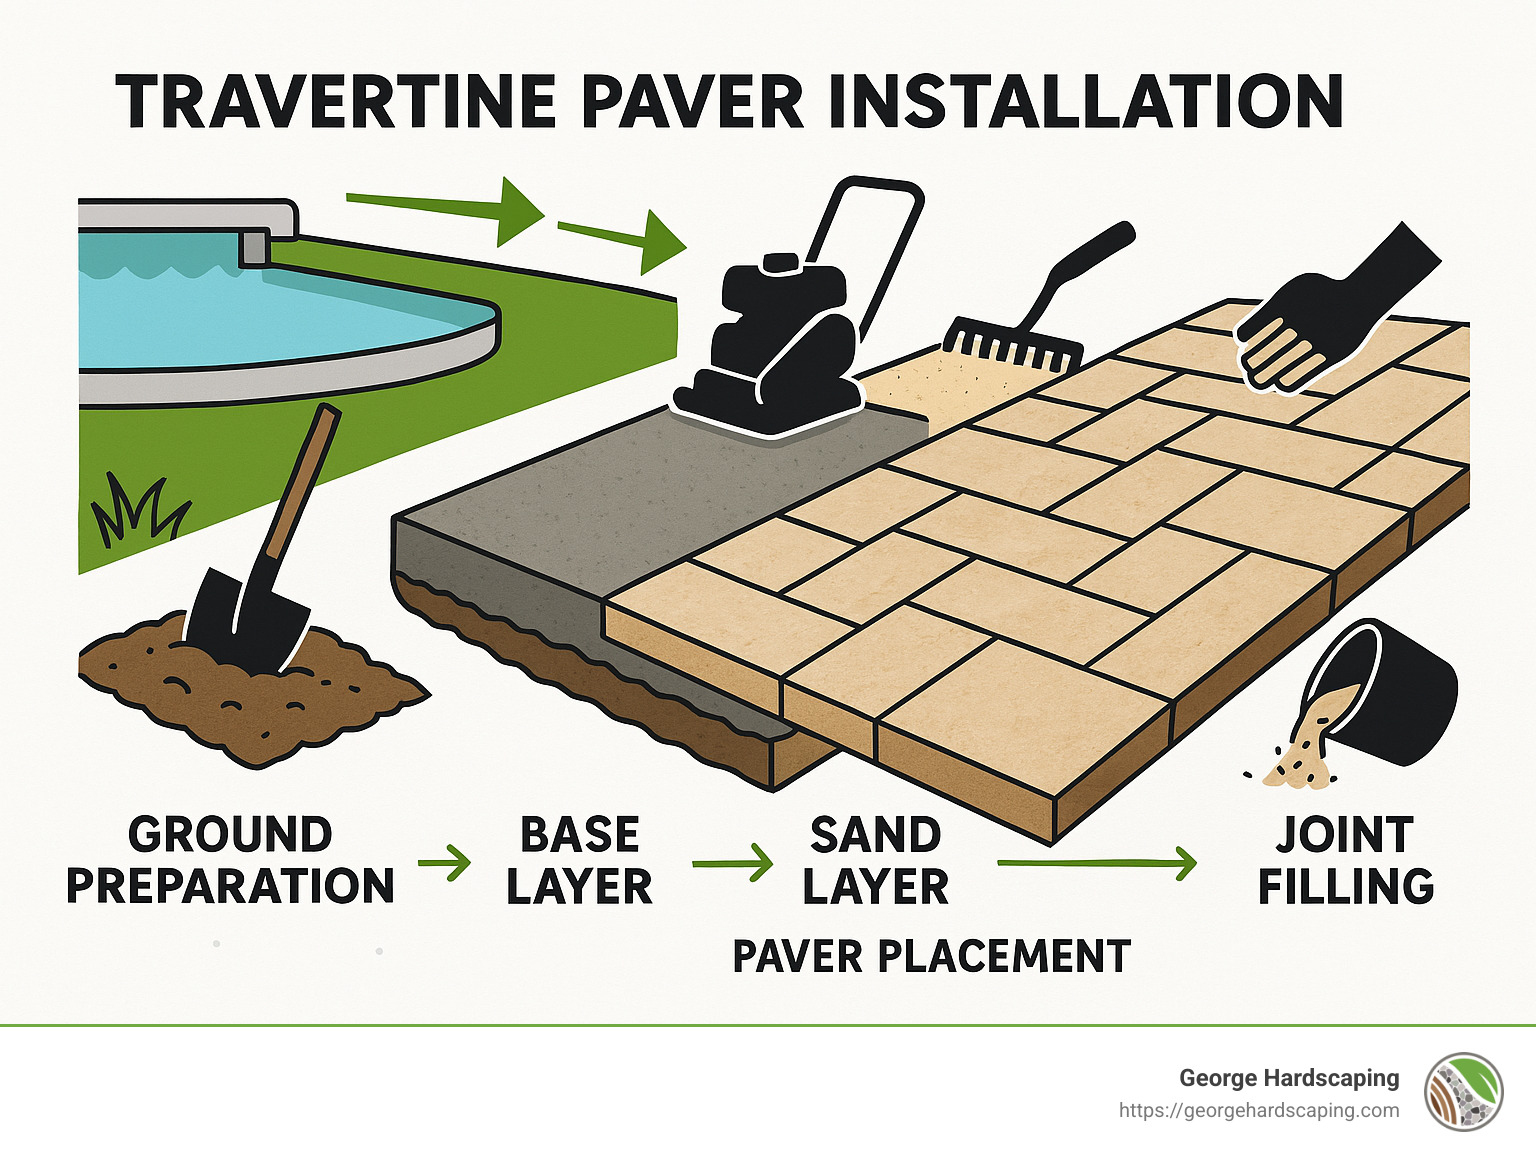
To install travertine pavers around pool areas, follow these key steps:
- Prepare the ground by excavating 6-8 inches of soil
- Create a stable base with compacted crushed gravel layers (ensure 1/8″ slope per foot for drainage)
- Add a sand layer (approximately 1/2 inch) and compact it
- Lay travertine pavers starting from the pool coping outward
- Secure pavers by tapping with a rubber mallet
- Fill joints with polymeric sand and mist with water to set
Changing your pool area with travertine pavers creates a luxurious, durable, and safe surface that improves your entire outdoor living space. Homeowners in Essex County appreciate travertine for its natural beauty and practical benefits around pools. Unlike manufactured materials, travertine stays cool underfoot even on hot summer days, making it comfortable for barefoot walking.
As a natural stone formed from mineral deposits in hot springs, travertine offers unique textures and patterns that can’t be replicated by concrete alternatives. Its naturally porous surface also provides excellent slip resistance when wet – a crucial safety feature for pool surroundings.
While the installation process requires careful planning and proper technique, the results are worth the effort. A properly installed travertine pool deck can last for decades with minimal maintenance, making it a sound investment in your property’s value and your family’s enjoyment.
“Paving an outdoor space involves careful design, the correct materials and some patience,” but the result is a timeless, neat poolside that serves as the centerpiece of your outdoor entertainment area.
Benefits of Using Travertine Pavers Around Pools
When it comes to creating the perfect poolside oasis, choosing the right material for your deck is key to beauty, safety, and comfort. Here at George Hardscaping, we’ve installed travertine pavers around countless pools across Essex County, and let us tell you—this natural stone is a homeowner favorite for good reason.
Natural Beauty That Stands the Test of Time
Travertine is a stunning natural stone formed by water deposits over limestone, resulting in distinctive patterns, warm textures, and eye-catching colors. From creamy beige and ivory tones to deeper shades like walnut and silver, there’s a perfect travertine hue for every landscape design and home style.
Because travertine is naturally porous—those tiny holes that make each paver unique—it actually absorbs water, adding functional benefit along with beauty. And here’s a fun fact to impress your guests at the next pool party: the ancient Romans chose travertine to build the legendary Colosseum! That’s right, this natural stone has been admired for its durability and elegance for thousands of years.
Superior Safety Features
Around a pool, safety should always come first—especially if you have kids running and splashing around. Travertine’s naturally textured surface provides excellent slip resistance, even when wet. Unlike smoother, man-made materials that can become slick and hazardous, travertine actually becomes more slip-resistant when damp, offering peace of mind and helping keep your loved ones safe.
Remarkably Cool Underfoot
On those toasty summer days here in the North Shore, walking barefoot on hot surfaces can feel like a risky trip. Thankfully, travertine pavers stay remarkably cool underfoot—even in direct sunlight. While concrete and brick quickly absorb heat and can burn your feet, travertine reflects heat and naturally pulls coolness from the ground. So go ahead, ditch those flip-flops, and enjoy your poolside comfortably barefoot.
Exceptional Durability in New England Climate
We know New England winters can be tough, which is why choosing materials that stand up to freezing temperatures and harsh weather is crucial. Travertine is freeze-thaw compatible, meaning it can handle fluctuating temperatures without cracking or breaking down. Its proven resilience and natural strength mean your travertine pool deck, when properly installed and maintained, can last for decades.
Environmentally Friendly Choice
If you’re eco-conscious, travertine is your best outdoor friend. As a natural stone, it doesn’t require heavy manufacturing processes or harsh chemicals, greatly reducing its environmental footprint. Plus, its impressive durability means you won’t need replacements very often—another win for sustainability.
In short, choosing to install travertine pavers around pool areas provides an unbeatable blend of natural elegance, practical benefits, and lasting value.
Tools and Materials Needed for Travertine Paver Installation
Before diving into your project to install travertine pavers around pool areas, it pays to gather all the right tools and materials. Trust me—nothing brings your DIY momentum to a screeching halt faster than finding you’re missing something essential halfway through the process!
At George Hardscaping, we’ve worked with homeowners throughout Essex County, from Beverly to Salem, and we’ve learned that good preparation is absolutely key. Let’s walk through everything you’ll need, step by step, so you can tackle your installation like a pro (or at least feel like one).
Essential Tools for a Smooth Installation
First things first, you’ll need a sturdy shovel to excavate and level the ground—think of it as your best pal for heavy lifting tasks. Next up is a plate compactor, typically rented from your local equipment store, to compact the soil and crushed gravel layers. Don’t underestimate this tool; proper compaction ensures your pavers stay flat and stable for years.
You’ll also want a rubber mallet handy. Unlike a regular hammer, this gentle giant helps tap the travertine into place without cracking it. Keep a sledgehammer at the ready too, perfect for driving stakes and edge restraints securely into the ground.
Accurate measurements are critical, so grab your trusty measuring tape and a string line and stakes to ensure straight and level travertine paver placement. For precision checking of slopes and grades (especially important around pools for proper drainage), invest in both a string level and a carpenter’s level.
Need to cut pavers to size? A diamond blade wet saw (another rentable item) makes clean, precise cuts without breaking your beautiful travertine. And don’t forget your wheelbarrow for hauling gravel, sand, and pavers around your yard—your back will thank you!
Lastly, a sturdy outdoor broom helps sweep polymeric sand into the joints, while a basic garden hose with a spray nozzle allows you to gently mist the sand afterward to lock everything into place. And please—wear proper safety equipment like gloves, eye protection, a dust mask, and knee pads. You want to finish without injuries, not become a cautionary tale!
Materials to Get Your Project Underway
Choosing quality materials is just as important as having the right tools. First and foremost, you’ll need the travertine pavers themselves. One pro tip we swear by at George Hardscaping: always order around 10-15% extra. This covers any cuts, breakages, or future repairs, saving you headaches down the road.
Your base materials are equally essential. For a sturdy and well-draining base, purchase plenty of crushed gravel or limestone screenings—plan for a layer about 6-8 inches deep. A thin, even layer of coarse sand (around ½ inch) provides a smooth bedding surface for your pavers.
To prevent shifting or sagging edges, you’ll want some durable edge restraints. And to keep weeds at bay and ensure your gravel doesn’t migrate into the soil, lay down sturdy landscape fabric (geotextile) beneath your gravel layer.
For securely bonding border pavers and handling natural expansion and contraction through the seasons (we see you, Massachusetts winters), consider using FlexBond or a similar adhesive. Filling the joints between pavers? That’s a job for polymeric sand, which hardens once misted with water, keeping your pavers stable and discouraging weed growth.
Finally, protect your beautiful new surface with a quality travertine sealer. It’s worth every penny in keeping your pool deck looking pristine and stain-free.
By carefully selecting your tools and materials upfront, you’re setting yourself up for a smooth and rewarding installation process. With patience and the right preparation, you’ll soon be relaxing poolside on a stunning travertine deck that you proudly installed yourself.

How to Install Travertine Pavers Around Your Pool
Installing travertine pavers around your pool can seem like an ambitious project, but with careful planning and patience, it’s entirely doable for homeowners who enjoy DIY projects. Here at George Hardscaping, we’ve helped many Essex County residents transform their backyards into luxurious retreats. Follow our warm, friendly guide below, and you’ll be well on your way to a beautiful and durable travertine pool deck!
Step 1: Preparing the Ground for Travertine Paver Installation
Great pool decks start with solid groundwork—literally! Preparation is crucial. If you skip or rush this step, you’ll risk uneven surfaces and drainage issues later on. (Trust us, your future self will thank you for doing this properly.)
Start by clearly marking out the area where you plan to install travertine pavers around pool spaces. Use stakes and string lines to help you visualize the layout and get accurate measurements. Not confident about slope or depth? No worries—consider checking in with professionals like our team at George Hardscaping for guidance.
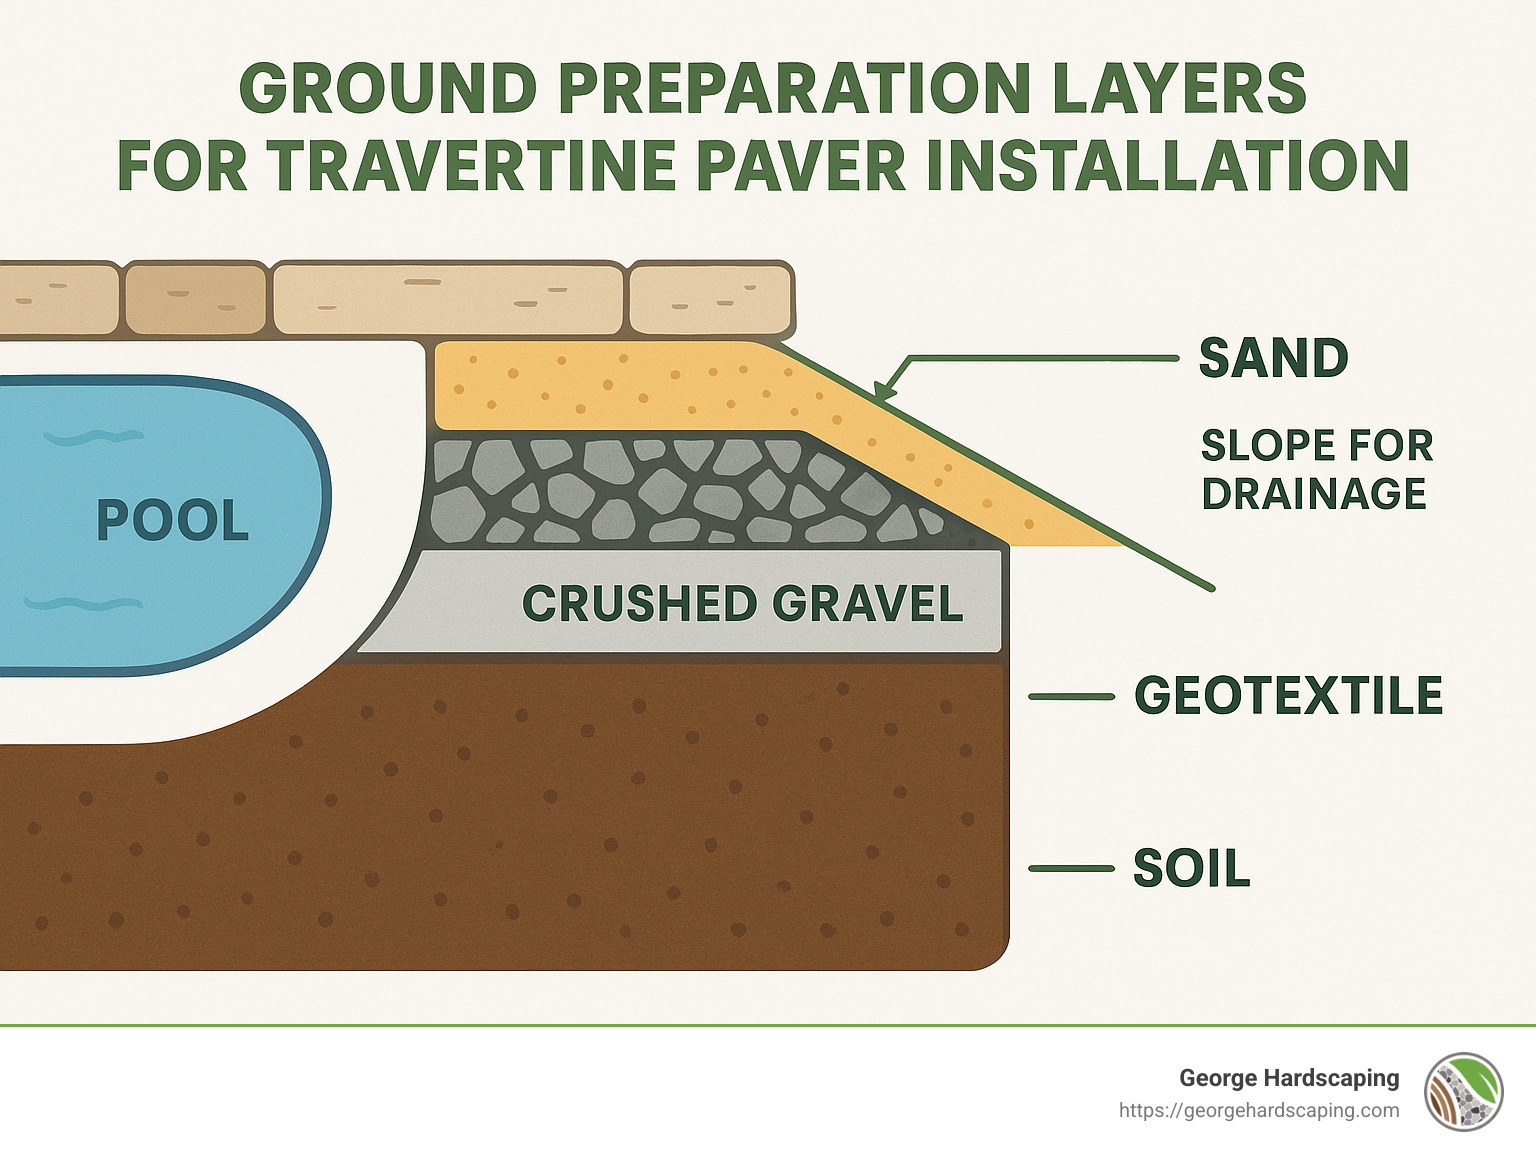
Next, excavate soil within the marked boundaries to a depth of about 6-8 inches. If you’re in an area like Essex County, with harsh winters, you might even want to go deeper to avoid frost-related issues. Aim for a slight slope (around 1/8 inch per foot) away from the pool. This ensures proper drainage; after all, no one enjoys puddles around their pool!
Once you’ve excavated, compact the soil thoroughly using a rented plate compactor. Think of this step as firming up a mattress—it’s the foundation that supports everything else.
To keep weeds at bay and prevent gravel from sinking into the soil, lay down landscape fabric (also called geotextile). Over this fabric, build a stable base using crushed gravel or limestone screenings. Spread gravel in multiple layers, compacting each layer as you go until you’ve reached a total thickness of about 4-6 inches.
Lastly, add a ½-inch bedding layer of coarse sand on top of your compacted gravel base. Carefully screed the sand to create a smooth, even surface, but don’t compact it—this sand will softly hug your travertine pavers in place.
Step 2: Laying Travertine Pavers Around the Pool
Now comes the fun part—actually laying those beautiful travertine pavers around your swimming area!
Always start your installation at the pool coping—the edge closest to the water—and work outward toward your home or yard. Beginning at the coping lets you maintain a cleaner look where everyone’s eyes naturally go first. Cuts or adjustments can then be hidden in areas further away from the pool, keeping your deck looking sharp.
There are two primary ways to install travertine pavers around pool areas: the dry-set method and the mud-set method.
The dry-set method (our recommended approach) involves placing pavers directly on your sand bed without mortar. It’s simpler, forgiving for DIYers, allows easier repairs or replacements, and handles ground movement beautifully. Plus, it helps with drainage, ensuring water won’t pool on your deck.
The mud-set method, on the other hand, involves setting pavers into a mortar bed. It’s a bit more complex and typically used when installing pavers on existing concrete surfaces.
As you lay your travertine stones using the dry-set method, keep about 1/8 to 1/4 inch gaps between each paver. Check your alignment frequently with a string line and a carpenter’s level to ensure everything stays even and maintains the correct slope. Tap each paver gently with a rubber mallet to set it snugly into place.
Around curves, like corners or rounded pool edges, you might need to make cuts. Rent a wet saw with a diamond blade for neat, clean lines. For added style and strength along the edges, consider placing border pavers in what’s called a “soldier course” layout—perpendicular to the main pattern, giving your deck a polished look.
Step 3: Filling the Joints and Sealing the Pavers
You’re nearing the finish line! After setting all your travertine pavers, it’s important to secure and protect them properly to preserve their beauty for years.
First, fill the paver joints with polymeric sand. Make sure your pavers are completely dry before starting. Spread the polymeric sand evenly over the entire deck, sweeping it gently into all the joints. Clear away any extra sand from the surface using a broom, and then use a leaf blower on a low setting to remove fine dust.
Next, mist the area lightly with water, following the polymeric sand manufacturer’s directions. This activates the sand to harden it, locking your pavers securely in place. After application, avoid foot traffic for 24-48 hours while the sand fully sets.
Sealing your travertine isn’t strictly necessary, but it’s highly recommended (and your pavers will thank you for it). Applying a high-quality natural stone sealer improves travertine’s beautiful colors and patterns, protects against pool chemical stains and spills, and makes cleaning easier. It also significantly extends the lifespan of your pavers.
Always wait about a week after installation to ensure your deck is completely dry before sealing. Follow the sealer manufacturer’s instructions carefully, applying sealant with a roller or sprayer, and let it dry thoroughly before enjoying your gorgeous new pool area.
At George Hardscaping, we know how adding travertine pavers around your pool dramatically lifts your backyard experience. If you feel overwhelmed or simply prefer professional hands, we’re always ready to help you achieve a perfect installation. Just reach out to us through our dedicated Pool Deck Installation page—your dream pool deck is closer than you think!
Common Mistakes to Avoid During Travertine Paver Installation
At George Hardscaping, we’ve had the pleasure—and sometimes, let’s be honest, the challenge—of helping homeowners across Essex County fix travertine paver installations that didn’t go quite as planned. While we always enjoy lending a hand, we’d prefer to help you get it right the first time. Here are some common pitfalls you should absolutely avoid when you install travertine pavers around pool areas.
Improper Base Preparation
Skipping or rushing the groundwork is hands-down the biggest mistake we see. Trust us; the base is the foundation (literally!) of your pool deck. If it’s not properly compacted or sturdy enough, you’ll end up with uneven pavers, sinking areas, and possibly cracked stones. Take your time and ensure you excavate deep enough, layer your gravel base properly, and compact each layer thoroughly. The extra effort spent on prep work saves you headaches (and repair costs!) down the road.
Neglecting Proper Drainage
Another common misstep is neglecting drainage considerations. Some homeowners mistakenly install their travertine pavers perfectly level, thinking it will look best. Unfortunately, water pooling around your pool deck can lead to safety hazards, staining, and even structural damage over time.
Instead, always maintain a gentle slope away from your pool—about 1/8 inch per foot is perfect. It’s subtle enough you won’t notice visually, but your feet and your pavers will thank you later!
Incorrect Paver Spacing
Spacing seems simple enough, but getting it wrong can cause big problems. Setting your travertine pavers too close together means there’s no room for joint sand, causing instability as the stones shift over time. On the other hand, gaps that are too wide allow weeds into the party—definitely unwanted guests!
Aim for consistent spacing of about 1/8 to 1/4 inch between pavers. Using spacers is a great idea to keep these gaps uniform and maintain a stable, attractive finished surface.
Not Allowing for Expansion and Contraction
Travertine is natural stone, and it expands and contracts slightly as temperatures fluctuate. Here in Massachusetts, our hot summers and cold winters mean your pavers will experience these temperature extremes. Without proper planning for this natural movement, you could see cracked or displaced pavers down the line.
To avoid issues, install flexible edge restraints and leave small expansion gaps near fixed structures like your house foundation or pool coping. Taking these measures will ensure your beautiful new deck remains intact season after season.
Starting Installation in the Wrong Spot
One surprisingly common mistake is starting the installation at the wrong place—usually the house rather than the pool coping. Doing this often leaves awkwardly cut small pieces right near your pool’s edge—the most visible spot! We once heard a professional installer say, “The small pieces shown, I feel, is unacceptable,” and we wholeheartedly agree.
Begin laying your travertine pavers starting from the pool coping and working outward. This technique keeps the most visible areas clean and neat, burying your cuts in less noticeable spots closer to the house, fence, or landscaping edge.
Choosing the Wrong Joint Sand
Here’s another small detail with big consequences: choosing the wrong sand to fill the joints. Regular playground or masonry sand might seem economical, but it washes out easily. Over time, loose pavers and weeds become an issue.
Instead, use polymeric sand specifically designed for paver installations. It hardens once activated by water, keeping your pavers secure, weeds away, and the surface stable yet flexible enough for minor shifts.
Incorrect Cutting Techniques
Cutting travertine pavers incorrectly can lead to chipping, cracking, and wasted material—not to mention plenty of frustrations. Always use a wet saw with a diamond blade that’s specifically made for natural stone. Take your time, cut slowly and steadily, and properly support the pavers during cutting. Your cuts will be clean, crisp, and professional-looking.
Rushing the Sealing Process or Using the Wrong Sealer
We get it: you’re excited to finish your project and enjoy your gorgeous new pool deck. But sealing your travertine too quickly after installation can trap moisture, causing discoloration or surface damage.
Wait at least a week after installation before sealing, ensuring the area is completely clean and bone-dry. Also, always choose a penetrating sealer specifically formulated for travertine around pool areas—this provides a natural look, prevents slippery surfaces, and improves the stone’s beauty.
By avoiding these common installation mistakes, you’ll ensure a smooth, enjoyable project and a stunning poolside area that will stand the test of time. Of course, if you ever feel overwhelmed or prefer professional help, our team at George Hardscaping is always here to assist homeowners across the North Shore.
How to Maintain Travertine Pavers to Ensure Longevity
Travertine pavers are a beautiful addition to your poolside, bringing elegance and functionality that can last decades. But, like any long-term investment, proper care matters. At George Hardscaping, we guide our clients throughout Essex County on how to protect and maintain their pool decks. Here’s the simple, practical way to keep your travertine pavers looking pristine year after year.
Regular Cleaning Routine
Keeping your travertine pavers clean doesn’t require fancy equipment or harsh chemicals—just a bit of routine attention. To start, sweep your pavers weekly with a soft-bristle broom to clear away dirt, leaves, and debris. This quick step prevents stains from forming as organic matter decomposes on the stone.
Once a month, give your pavers a gentle wash. Plain water or mild dish soap diluted in water works best. Stay away from acidic solutions like vinegar, lemon juice, or harsh chemical cleaners, as they can etch travertine’s delicate surface.
About two to four times per year, you’ll want to do a deeper clean. Use a stone-specific neutral pH cleaner that’s gentle yet effective on natural travertine. Pro Tip: Try to clean your pavers on a cool, cloudy day—this stops the cleaner from drying too quickly and gives you better results with less effort.
Prompt Stain Management
Accidents do happen—someone spills soda, wine, or perhaps a greasy snack by the pool. Because travertine is porous, quick action is your best friend. Don’t wipe or rub the spill, as you’ll only push it deeper. Instead, gently blot the spill with a clean cloth or paper towel.
For persistent stains, a stone-specific poultice can save the day. Simply apply it per the manufacturer’s instructions, cover it with plastic wrap, and let it sit for 24-48 hours. This solution draws the stain out of the stone without damaging it.
And if stubborn stains still linger, don’t hesitate to reach out to professionals like us at George Hardscaping. We’re experienced in natural stone restoration and can get your beautiful poolside looking flawless again.
Seasonal Sealing
Sealing your travertine pavers isn’t just a nice-to-have step—it’s essential, especially around pools where chlorine and chemicals are common. We recommend sealing your pavers every 2-3 years to maintain protection. Not sure if it’s time yet? Simply sprinkle a few drops of water onto the surface. If the water beads up nicely, your sealer is still effective. If the water rapidly absorbs into the stone, it’s time for a reseal.
Before sealing, ensure your travertine is completely clean and dry. Then, apply a penetrating sealer specifically designed for outdoor travertine pavers, carefully following the manufacturer’s instructions. Sealing helps prevent stains, improves the stone’s natural beauty, and makes cleaning simpler.
Winter Care in New England
Our North Shore winters can be tough, but your travertine pavers can handle it with a bit of extra TLC. When clearing snow, opt for plastic snow shovels rather than metal, which can scratch and damage the stone surface.
Avoid harsh ice-melting chemicals—they can cause surface damage. Instead, opt for sand, which provides traction without harming the stone. After winter, it’s a good practice to inspect your travertine carefully, looking for any cracks, chips, or signs of damage. Addressing small issues right away prevents them from turning into costly repairs later.
Protecting Your Travertine from Furniture Damage
Outdoor furniture can be hard on travertine pavers, potentially scratching or staining them. Always place protective pads under furniture legs to prevent scratches. When rearranging your space, remember to lift furniture rather than dragging it, to avoid damaging the stone surface.
Check your metal furniture regularly, as rust stains can be particularly tricky to remove from travertine. Rust prevention goes a long way toward avoiding headaches down the road.
Professional Maintenance for Long-Term Peace of Mind
Regular DIY maintenance will keep your pool deck looking great, but periodic professional care can make your travertine last even longer. Every 3-5 years, consider scheduling a professional cleaning. Expert technicians can remove deep-set dirt and grime, restoring your poolside’s original elegance.
Additionally, promptly repairing any cracked or damaged pavers is crucial. At George Hardscaping, we provide skilled repair services across Essex County, ensuring your travertine remains both beautiful and safe.
With just a little love and care, your travertine pool deck will continue to be the stunning, welcoming focal point of your outdoor oasis, season after season.
Frequently Asked Questions about Installing Travertine Pavers Around Pools
At George Hardscaping, we love helping homeowners throughout Essex County improve their outdoor spaces with beautiful natural stone. Over our many years of serving communities like Ipswich, Marblehead, Salem, and beyond, we’ve answered countless questions about how to install travertine pavers around pool areas. To help you feel confident about your upcoming project, we’ve gathered detailed answers to some of the most common questions we hear.
Should Travertine Pavers Be Sealed, and How Often?
Yes, sealing travertine pavers is strongly recommended, especially when they’re used around pools. Travertine, while durable and beautiful, is naturally porous. This means it can absorb liquids—think pool chemicals, spilled drinks, barbecue sauces (hey, it happens), or even organic debris from nearby landscaping.
Applying a quality sealer creates a protective barrier, helping prevent stains and making routine cleaning much easier. Plus, sealing improves travertine’s stunning natural colors and unique patterns, giving your pool area that extra wow factor.
We recommend initially sealing your travertine pavers about a week after installation—just be sure the surface is completely clean and dry first. After that, reapply the sealer every 2 to 3 years, depending on how much your outdoor space is used. For high-traffic or busy pool areas, you might even consider sealing annually.
Easy tip: Not sure if it’s time to reseal? Sprinkle some water onto your travertine. If the water beads up, your sealer is still working well. If it quickly absorbs into the paver, it’s a clear sign that it’s resealing time.
Can Travertine Pavers Be Installed Over Existing Concrete?
Absolutely! If your existing concrete pool deck is solid and in decent condition, installing travertine pavers directly over it can save you time, money, and hassle compared to fully removing old concrete. This “overlay” or mud-set installation method is an increasingly popular choice for homeowners on the North Shore and throughout Essex County.
Here’s how it works: first, the concrete surface is thoroughly cleaned and checked for issues. Any cracks or uneven areas are repaired, and the surface is prepared by applying a bonding agent like FlexBond. Next, a layer of mortar is spread over the concrete, and travertine pavers are placed directly onto that mortar base. Once set, the joints are filled with grout, and finally, a protective sealer is applied.
This method eliminates major excavation, speeds up the installation process, and often reduces overall installation costs. However, if your existing concrete has serious structural problems, significant cracks, or drainage issues, a full removal and new installation might be necessary. If you’re unsure whether an overlay solution is right for your pool area, our experienced team at George Hardscaping can evaluate your situation and advise you on the best option.
What Patterns Are Available for Laying Travertine Pavers?
When you choose to install travertine pavers around pool areas, you’ll enjoy a wide range of stunning pattern options to perfectly complement your style and home’s architecture. At George Hardscaping, we’ve installed just about every pattern imaginable, but here are the popular favorites among our Essex County customers:
One of our most requested designs is the French pattern (also called the Versailles pattern). This layout combines four different sizes of pavers, creating a charming, naturally random look. It’s excellent for larger areas, as it improves the natural beauty and variation of travertine while minimizing material waste.
If you prefer something clean and modern, the grid pattern might be your style. This classic, structured look typically uses just one consistent paver size (like 12″x12″ or 16″x16″) and is perfect for contemporary homes and smaller pool decks.
For a timeless appearance, the running bond (or brick pattern) layout is ideal. Using rectangular pavers laid in offset rows, this pattern offers the perfect balance of simplicity and character. It also highlights the natural elegance of travertine beautifully.
Want to add eye-catching visual interest and extra stability? Consider the herringbone pattern. With rectangular pavers arranged at 45° or 90° angles, this layout provides superb interlocking stability and a visually dynamic effect. It’s great for driveways or high-traffic areas near the pool.
Finally, for a standout accent, circular or fan-shaped patterns can be custom-created. These unique designs require expert installation and precise cutting, but they add dramatic focal points to your outdoor living space—ideal for areas around fire pits or seating groups.
When choosing your pattern, take a moment to consider your home’s style, the size and shape of your pool deck, and your personal taste. If you’re unsure, don’t worry—we’re always here to help. At George Hardscaping, we can provide detailed design renderings to help you visualize exactly how your travertine paver layout will come together.

Conclusion

Choosing to install travertine pavers around pool areas isn’t just about creating a beautiful backyard—it’s an investment that turns your outdoor living space into a luxurious, comfortable retreat. Across Essex County—from Gloucester’s coastal homes to Salem’s charming neighborhoods—homeowners are finding how travertine can dramatically improve their poolside experience.
Installing travertine pavers takes thoughtful planning, careful preparation, and attention to detail. If you’re comfortable tackling DIY projects, this guide gives you all the tools and steps you need to succeed. However, for a flawless, professional-quality finish, many North Shore residents rely on trusted contractors like our team here at George Hardscaping.
One of the most critical elements of any successful installation is proper base preparation. If there’s one step you shouldn’t rush or cut corners on—this is it. A well-prepared base means your travertine paver pool deck can withstand decades of summer fun without sinking or shifting.
Always start your installation from the pool coping and work outward, towards your home or lawn areas. This helps ensure your most visible edges feature full, visually appealing travertine pavers. You can hide any smaller cuts farther away from the pool, keeping your deck clean and professional-looking. And don’t forget drainage! A gentle yet consistent slope of about 1/8 inch per foot away from your pool prevents water pooling and potential damage over time.
High-quality materials make all the difference too. From the crushed gravel and polymeric sand to your sealer—investing in top-notch products supports long-lasting results you’ll enjoy year after year.
Once your installation is complete, regular maintenance helps protect your investment. Simple routines like regular cleaning, prompt stain removal, and sealing every two to three years keep your travertine pavers looking their best. And since travertine naturally stays cool underfoot, resists slips, and stands up beautifully to New England’s freeze-thaw cycles, it’s a practical and attractive choice for Massachusetts pool areas.
While travertine pavers might cost a bit more initially compared to other materials, their strength, minimal maintenance requirements, and timeless elegance make them a wise choice. A properly installed and well-maintained travertine pool deck not only adds significant value to your Essex County home—it enriches your family’s daily life.
At George Hardscaping, we’ve proudly transformed countless outdoor spaces throughout Beverly, Danvers, Marblehead, Ipswich, and beyond. With our experienced, dedicated team of craftsmen, we make sure every travertine project surpasses expectations—creating beautiful, functional spaces families cherish for generations.
Whether you’re adding a brand-new pool or updating your existing deck, consider the enduring elegance and practical advantages of travertine pavers. Your poolside area isn’t just a place to cool off—it’s the heart of outdoor living, entertaining, and relaxation. Make it exceptional with quality materials and expert installation you can count on.
Ready to transform your pool area into a breathtaking retreat? Reach out to our friendly experts at George Hardscaping today—we’re here to help turn your vision into reality.
